About
Sew a zombie undertaker feltie.
To get undead, you have to die first. And who better to manage the interment than an undead mortician, brain exposed and alive with pearly little maggots? Grave in demeanour, grim in appearance, and perfect for the role, he's even brought a suitable coffin to manage the occasion.
Tags
-
 Key West Witch favorited Zombie Undertaker
05 May 07:37
Key West Witch favorited Zombie Undertaker
05 May 07:37
-
 olivoyle favorited Zombie Undertaker
29 May 09:47
olivoyle favorited Zombie Undertaker
29 May 09:47
-
 Harley Q. added Zombie Undertaker to Inspiration to be Creative
08 Apr 08:48
Harley Q. added Zombie Undertaker to Inspiration to be Creative
08 Apr 08:48
-
 Emma H. favorited Zombie Undertaker
27 Sep 18:22
Emma H. favorited Zombie Undertaker
27 Sep 18:22
-
 PixieFey added Zombie Undertaker to The Undead
20 May 12:05
PixieFey added Zombie Undertaker to The Undead
20 May 12:05
-
 Linakins favorited Zombie Undertaker
28 Dec 13:32
Linakins favorited Zombie Undertaker
28 Dec 13:32
-
 DMGINC favorited Zombie Undertaker
11 Feb 23:48
DMGINC favorited Zombie Undertaker
11 Feb 23:48
-
 Miss.Bs.Page favorited Zombie Undertaker
05 Feb 00:46
Miss.Bs.Page favorited Zombie Undertaker
05 Feb 00:46
-
 DocDoolittle favorited Zombie Undertaker
15 Nov 05:21
DocDoolittle favorited Zombie Undertaker
15 Nov 05:21
-
 drevanhoussen favorited Zombie Undertaker
29 Oct 00:06
drevanhoussen favorited Zombie Undertaker
29 Oct 00:06
You Will Need
-
 Step 1
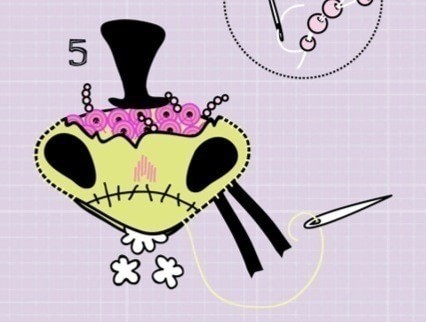
Cut out all the felt pieces as marked. Stitch the eye sockets on the front head piece with craft glue. Thread an embroidery needle with 2 strands of pink floss and make the nose with small, overlapping satin stitches. Rethread the needle with 1 strand of black floss and make the mouth with a line of backstitch, referring to the photograph to place it correctly. Cross the mouth with 8 single, slightly angled and uneven stitches.
-
 Step 2
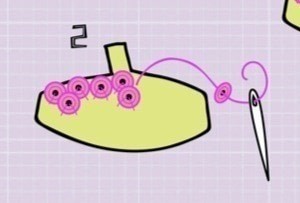
Thread a beading needle with 1 strand of pink floss, and stitch the sequins onto the forehead piece, starting by overlapping them slightly over the top edge and working inward, continuing to overlap them as you work down. Leave the "stem" clear of sequins; it will be used as the base on which to glue the top hat.
-
 Step 3
Add the maggots-each is made from 4 pearl beads in 2 sizes, a smaller one at each end of a pair of larger ones. Thread a beading needle with 1 strand of white floss and thread it through the felt and the sequins where you want to add a maggot, then thread on first a tiny bead, then 2 larger ones, then one more tiny one. Bring the thread around the end bead and take it back through the other 3, then stitch it back through the felt, pulling tightly to hold the maggot in a line. Repeat 3 times, checking with the photograph for placement.
-
 Step 4
Use craft glue to stick the hat pieces on either side of the forehead "stem," aligning them carefully with each other. Then align the forehead with the front head piece to make a whole face and glue the 2 pieces together.
-
 Step 5
Stick the 2 hat bands on the inside of the back head piece, then align the front and back heads and sew them together using an embroidery needle threaded with 1 strand of beige embroidery floss and small overstitch. Sew the felt edges just behind the sequins at the top of the head. Leave a gap at the base of the head and pad with wisps of stuffing using a matchstick or tweezers to help you. Stitch the gap closed.
-
 Step 6
Glue the hands in place on the front of one of the body pieces. Thread a beading needle with 1 strand of beige embroidery floss and sew 4 bugle beads onto each hand to make bony fingers.
-
 Step 7
Align the 2 body pieces, thread an embroidery needle with 1 strand of black floss, and sew them together using a small overstitch. Leave a gap at the neck, pad with wisps of stuffing as with the head, then stitch the gap closed.
-
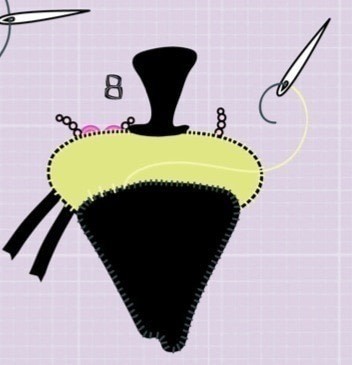
 Step 8
Stitch the body onto the back of the head, using overstitch and 1 strand of black floss. Check the photograph of the finished Zombie Undertaker to ensure that you get the right overlap of the body with the head.