


About
Look it's asuper happy flower-bedecked handbag.
Well, I've been seeing everyone else having such fun with wool felting and finally decided to take the big plunge myself. So, look what I made! It's one super happy flower-bedecked handbag. I love it and it was so easy to felt and dye up in these luscious spring colors. Oh, all this sunshine n' flowers makes me downright giddy!
-
 Ana M. favorited *Wool Felting For A Rosy Dyed Spring Bag*
02 Nov 03:35
Ana M. favorited *Wool Felting For A Rosy Dyed Spring Bag*
02 Nov 03:35
-
Step 1
1. The wool I used was already felted but not quite thick enough to give structure to a bag. So I decided to re-felt it in the washing machine. All it took was one wash cycle for the wool to thicken and shrink up about 75% of it's original size. While it was still wet, I reblocked it back into an even rectangular shape and laid flat to dry.
-
Step 2
2. When it was dried, I cut two 9"x12" rectangles for the body of the bag. For the straps, I cut one 3"x36" length of the wool and for the flowers, I cut out two rectangles, 5"x7"each.
-
Step 3
3. OK, onto the dyeing, shall we? First, I soaked the 3"x36" section and one 9"x12" section of the wool in warm water and gently squeezed out the excess water. Pre-soaking helps the dye to be absorbed better into the fabric.
Grabbing my rubber gloves, I started shaking up the Rit Fuchsia dye. Measuring out ¼ cup of dye, I added it to 1 gallon of hot 140˚ water in a 2 gallon container and mixed well. Next, I immersed both wool fabric sections in the dye bath and agitated with a spoon for even coverage. After 5 minutes in the dye bath, I added ½ cup of white vinegar and 1Tbsp of laundry detergent. This helps to achieve a more intense color and a more level dyeing. Then I continued the dye process for 5 additional minutes for a total of 10 minutes in the dye bath. After removing the wool from the dye bath, I rinsed it in cool water until the water ran clear. I gave it a hand washing with mild detergent in warm water and then reblocked the fabric and laid flat to dry. I took care to give the strap section a good stretch to achieve the original 36" length.
The second 9"x12" wool section was dyed exactly the same way as the first 9"x12" section but with Rit Sunshine Orange dye.Note: Dyeing wool in water hotter than 140˚ can cause shrinkage. For my application this was not a concern but when dyeing a finished garment extra care should be taken to monitor water temperature to avoid any shrinkage.
-
 Step 4
4. For the flowers, I mixed 1Tbsp of Rit Petal Pink dye in ½ gallon of hot 140˚ water and mixed well. I immersed both 5"x7" sections of wool in the dye bath and agitated for even coverage for 2 minutes. Then I added ¼ cup of white vinegar and 1Tbsp of laundry detergent. The dye process continued for another 2 minutes. Then I removed one of the wool sections from the dye bath. After another 4 minutes I removed the second section of wool from the dye bath and repeated the rinse/wash process as above. In this way, I achieved two different pink tones from the same dye bath. Nifty, huh?
-
 Step 5
5. With all the wool dyed, it was time to assemble the bag. For the body of the bag, I trimmed the orange section to 7"x11". This makes the back of the bag and the top flap. The fuchsia rectangle was trimmed to 7"x7". This makes the front panel of the bag. I laid the fuchsia square on top of the orange rectangle and pinned together. Then I sewed them together with a simple backstitch using tan wool crewel yarn. I added a little extra decorative backstitch on the orange flap of the bag just cause it looks pretty.
-
 Step 6
6. For the straps, I cut three ¼" strips that were 36" long. I secured the three ends with tape to my work surface and braided the full length. The braided strap ends needed a good stitching back and forth to keep from unraveling and then I did a matching backstitch with the crewel yarn to attach the strap to the back panel of the bag.
-
 Step 7
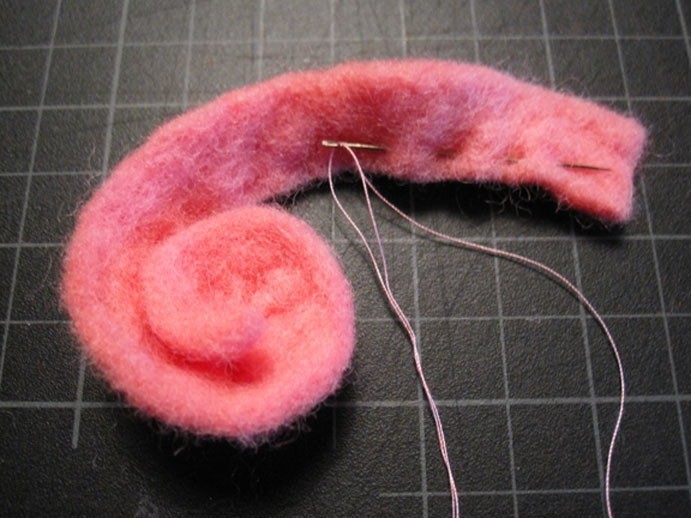
7. Oh, now comes the fun part! Making the felt flowers was so easy. Using my two tones of pink felt, I cut strips about ¾"-1" wide and 7" long. Basically, I just did a long running stitch the full length of the strip and pulled to gather the wool. This will automatically make the strip start to curl up into a spiral. To hold the spiral shape, I stitched thru the layers on the bottom of the flower using a whip stitch. The whip stitch also worked to attach the flowers to the bag.
I also found that I could recycle much of the trimmed fuchsia and orange scraps into flowers too. Yay, it's so nice when there's no waste! -
 Step 8
And here's some extra flowers I had leftover cause I just couldn't stop making them. Hmmmm, getting me thinking about my next project already!
-
 Step 9
Ack! Not all my supplies are showing up on the top of this page. What a mess. Here's what I really used to make this bag.


Comments


