


About
Print your own batik paper
Create your own decorative papers for collage, book making, scrap booking and gift tags. The possible uses for these papers are endless.
-
 Xfluffy_unitatoX favorited Wax Batik Collage Papers
19 Nov 23:35
Xfluffy_unitatoX favorited Wax Batik Collage Papers
19 Nov 23:35
-
 Alyssa D. added Wax Batik Collage Papers to Fox Project
05 Oct 00:20
Alyssa D. added Wax Batik Collage Papers to Fox Project
05 Oct 00:20
-
Alyssa D. favorited Wax Batik Collage Papers
03 Sep 14:52
-
Katrina P. favorited Wax Batik Collage Papers
28 Apr 13:31
-
 Leeni S. favorited Wax Batik Collage Papers
01 Nov 04:49
Leeni S. favorited Wax Batik Collage Papers
01 Nov 04:49
-
 celia.nichols.7 favorited Wax Batik Collage Papers
21 Mar 19:55
celia.nichols.7 favorited Wax Batik Collage Papers
21 Mar 19:55
-
 buttercup303 added Wax Batik Collage Papers to origami / papercraft
01 Dec 06:55
buttercup303 added Wax Batik Collage Papers to origami / papercraft
01 Dec 06:55
-
 lilcalcb@gmail.com added Wax Batik Collage Papers to Craftwork
25 Aug 17:37
lilcalcb@gmail.com added Wax Batik Collage Papers to Craftwork
25 Aug 17:37
-
 nigrummonten favorited Wax Batik Collage Papers
04 Feb 02:48
nigrummonten favorited Wax Batik Collage Papers
04 Feb 02:48
You Will Need
-
 Step 1
To make wax batik papers you will need an electric wax pot, soft wax, tjap (Javanese printing tool), iron, cartridge paper, lots of newspaper and dyes or inks in various colors.
Please note: wax is a very volatile material. Do not be tempted to melt candles in a pan as this can catch fire. The wax pot has a regulated temperature control to keep the wax at the correct temperature. -
 Step 2
First heat the wax until liquid then gently place the tjap (pronounced cap)into the wax to heat.(A tjap is a copper printing tool from Java. Leave the tjap for a few seconds to heat through and then gently lift from the wax.
-
 Step 3
Place the tjap firmly down onto your white cartridge paper and hold it on the paper for a few seconds. Carefully lift the tjap and return it to the wax pot. There will be a wax impression of your tjap design left on the paper. This one is a gecko.
-
 Step 4
Repeat the process until the paper is covered in wax geckos. When not in use, lay the tjap down on its side. Never turn it upside down when printing or hot wax will drip onto your hand.
-
 Step 5
It will take only seconds for each wax impression to dry. Now you can apply dye or ink to the paper. Brush the dye directly over the wax geckos. Wax is a resist, therefore the color won't seep under the wax.
Start with your lightest color first. This is golden yellow. -
 Step 6
Leave your dyed paper to dry thoroughly before moving to the next step. Wax will not penetrate damp paper. This should take about 30 minutes.
-
 Step 7
Once the paper is dry, repeat the wax process in step 3. The geckos you now print will remain golden yellow. Next, apply a deeper color of dye or ink on the paper. This is cherry red.
-
 Step 8
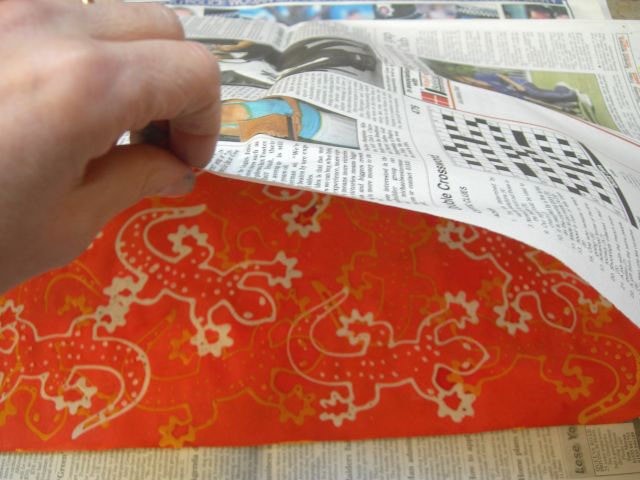
Once dry, place the waxed and dyed paper between two sheets of newspaper and set your iron to a high temperature.
-
 Step 9
Slowly iron the newspaper to melt and remove the wax. Repeat this process twice more to remove any wax residue.
-
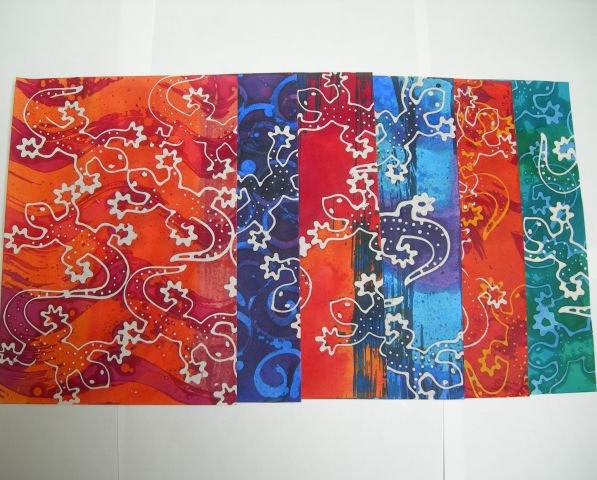
 Step 10
Here is the finished paper. You will see that the first geckos printed remain white, the second geckos printed are golden yellow and the paper is bright cherry red.
-
 Step 11
A little something about health and safety: please take care when using hot wax. If you burn yourself then place the burn under cold water until the burning sensation stops. You will notice that I have used words such as gently, slowly and carefully. If you work sensibly then accidents won't occur.


Where do you buy the tjap? They dont even sell it in North Sumatra...
(here in Indonesia, its cap... but other countries pronounce it as 'tjap' anyway, so...)
Dang, this is just a difficult thing to get into...
Link for this article in russian languge: http://art-batic.ru/2008/05/04/goryachij-batik-master-klass
I translated it into russian and posted with backlink on my personal site in post "<a href="http://art-batic.ru/2008/05/04/goryachij-batik-master-klass">Горячий батик - мастер класc</a>"