


About
Knit a colorful and waving chevron scarf
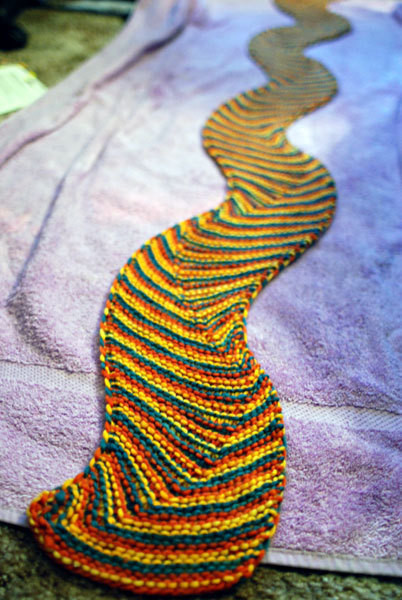
this one has been in the works for quite some time, i’m so happy to release it! super simple, it’s a basic garter stitch scarf with some increases and decreases forming the waving shape and chevron point, and 3-color striping to make it pop!
this sample uses 3 shades of malabrigo worsted merino and size us 10 1/2 needles, but the pattern is written for any yarn weight, needle size, gauge - you just cast on as many stitches as you want for the width and knit until it’s long enough. i can’t wait to see some knit up it super bulky or super fine yarns for a totally different look!
of course, you can also modify the striping pattern - try a self-striping or variegated yarn, or use a single solid for a simpler scarf, or try big color chunks instead of 1-row stripes. the only thing i wouldn’t recommend is 2-row stripes because that will create a defined right side and wrong side, which i made sure to avoid in designing the scarf. by striping between 3 colors, 1 row each, you get completely equal sides on your scarf.
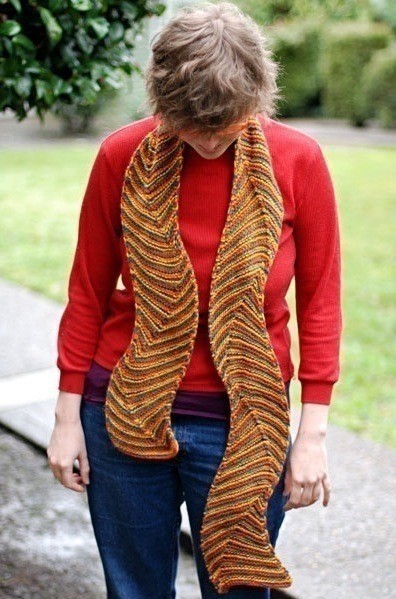
because of the wavy shape, this scarf is actually really comfortable (and cute, i think) as a headband! as a blindfold, it’s just silly, but the malabrigo is so soft, i wanted to be wrapped in it! (photoshoots are fun!)
those are my first two versions - the one on the right was my original construction of the design concept. stockinette stitch and 2-row stripes made for a clear right and wrong side, no good, plus curling. it also uses k3tog decreases instead of sk2p, causing holes along the chevron point (not visible in that shot, but they’re there). so, i did some rewriting, and started knitting the one on the left with scrap yarn. that’s the exact pattern i ended up with, but once i decided it was right, i put that one aside and knit it in the malabrigo for the pattern sample.
if you want to make a leftover scrap-busting scarf, gather all your tiny balls (5-20ish yards is fine) and knit the pattern exactly as it’s written, striping 3 colors at a time, switching to a new ball every time one runs out. i love how it’s looking!
When switching between 3 yarns, just carry each color loosely along the edges. You’ll be knitting with one yarn, while the other two each hang from the two sides. At the beginning of each row, bring the new yarn over the old, always the same way for a neat edge. Be sure to untangle your yarn balls every couple of rows or you’ll end up with a huge mess!
Terms:
y = yarn (or color)
kfb = knit front and back (increases 1)
pm = place marker
sk2p = slip a stitch, knit 2 together, pass the slipped stitch over (decreases 2)
k = knit
i can’t wait to see your versions!!
of course, you can also modify the striping pattern - try a self-striping or variegated yarn, or use a single solid for a simpler scarf, or try big color chunks instead of 1-row stripes. the only thing i wouldn’t recommend is 2-row stripes because that will create a defined right side and wrong side, which i made sure to avoid in designing the scarf. by striping between 3 colors, 1 row each, you get completely equal sides on your scarf.
because of the wavy shape, this scarf is actually really comfortable (and cute, i think) as a headband! as a blindfold, it’s just silly, but the malabrigo is so soft, i wanted to be wrapped in it! (photoshoots are fun!)
those are my first two versions - the one on the right was my original construction of the design concept. stockinette stitch and 2-row stripes made for a clear right and wrong side, no good, plus curling. it also uses k3tog decreases instead of sk2p, causing holes along the chevron point (not visible in that shot, but they’re there). so, i did some rewriting, and started knitting the one on the left with scrap yarn. that’s the exact pattern i ended up with, but once i decided it was right, i put that one aside and knit it in the malabrigo for the pattern sample.
if you want to make a leftover scrap-busting scarf, gather all your tiny balls (5-20ish yards is fine) and knit the pattern exactly as it’s written, striping 3 colors at a time, switching to a new ball every time one runs out. i love how it’s looking!
-
 Melissa Beth favorited Waving Chevron Scarf
12 Jan 02:48
Melissa Beth favorited Waving Chevron Scarf
12 Jan 02:48
-
 Spencer M. favorited Waving Chevron Scarf
22 Sep 09:38
Spencer M. favorited Waving Chevron Scarf
22 Sep 09:38
-
 Essence added Waving Chevron Scarf to To Knit
19 Jan 21:05
Essence added Waving Chevron Scarf to To Knit
19 Jan 21:05
-
 Heather G. favorited Waving Chevron Scarf
30 Nov 23:30
Heather G. favorited Waving Chevron Scarf
30 Nov 23:30
-
 Rumpazel favorited Waving Chevron Scarf
20 Jul 00:15
Rumpazel favorited Waving Chevron Scarf
20 Jul 00:15
-
 Gabby S. favorited Waving Chevron Scarf
24 Nov 08:09
Gabby S. favorited Waving Chevron Scarf
24 Nov 08:09
-
 Emily aka GreyFowl favorited Waving Chevron Scarf
25 Jul 02:29
Emily aka GreyFowl favorited Waving Chevron Scarf
25 Jul 02:29
-
 Step 1
y1): cast-on (example scarf is 26 stitches)
row 1 (y2): kfb, pm, sk2p, k to last 1, kfb
row 2 (y3): knit all
row 3 (y1): kfb, k to marker, sk2p, k to last 1, kfbRepeat rows 2 and 3, switching yarn with every row so you will rotate y1, y2, y3, y1, y2, y3.
Repeat until there are no stitches between the sk2p and the last stitch (kfb). That’s one section, now you’ll bring the chevron back over to the other side by switching the odd and even rows. So, starting with that last pattern row, this is what you’ll do:
(odd row): kfb, k to marker, sk2p, kfb
(even row): knit all, removing the marker
(odd): knit allNow start back at row 1 of the pattern (but ignore the y#, just keep rotating 1,2,3,1,2,3).
Keep repeating the whole thing, so the chevron waves from one side to the other, until the scarf is as long as you want (the sample scarf has 8 sections). Finish at the end of a section - knit the row in which you remove the stitch marker, then bind off the following row.
Weave in the ends, and block as needed. I lightly wet blocked the sample by spraying it with water and laying it flat on a towel overnight.


