


About
Don't Buy DIY: Anni Albers Washer Ribbon Necklace
I fell in love with this washer necklace, originally by artist Anni Albers. They sell the DIY necklace kit on Urban Outfitters for $14.
But I'm not paying $14 for a kit! I just put together the parts - one trip to Home Depot, and one trip to Michael's later, I was set. Figuring out how the ribbon was woven through took a few false starts, but here is the DIY anyway, just in case anyone's interested:
*I know it looks from the "materials needed" like we just bought a whole bunch of 1/2" washers, but for some reason the loose 1/2" dia washers actually ARE 1/2", whereas the loose, in the drawer "cutwashers1/2" are larger (like 7/8" if truth must be told). Not sure why. Anyway, those are what I used; choose whatever sizes you like!
Total cost of washers? $3.74.
Tags
-
 jeny S. commented on Washer Ribbon Necklace
09 Sep 16:28
jeny S. commented on Washer Ribbon Necklace
09 Sep 16:28
-
jeny S. commented on Washer Ribbon Necklace
09 Sep 16:26
-
jeny S. commented on Washer Ribbon Necklace
09 Sep 16:26
-
Angela G. favorited Washer Ribbon Necklace
16 Mar 04:24
-
 Meredith T. favorited Washer Ribbon Necklace
29 Jun 02:39
Meredith T. favorited Washer Ribbon Necklace
29 Jun 02:39
-
 Sarah S. added Washer Ribbon Necklace to Jewelry
19 Jan 07:20
Sarah S. added Washer Ribbon Necklace to Jewelry
19 Jan 07:20
-
 rouge s. favorited Washer Ribbon Necklace
31 Oct 20:57
rouge s. favorited Washer Ribbon Necklace
31 Oct 20:57
-
Alice G. added Washer Ribbon Necklace to to make
23 Jul 10:11
-
 Charlotte H. favorited Washer Ribbon Necklace
30 Jun 20:32
Charlotte H. favorited Washer Ribbon Necklace
30 Jun 20:32
-
 Judy favorited Washer Ribbon Necklace
19 May 04:33
Judy favorited Washer Ribbon Necklace
19 May 04:33
You Will Need
-
 Step 1
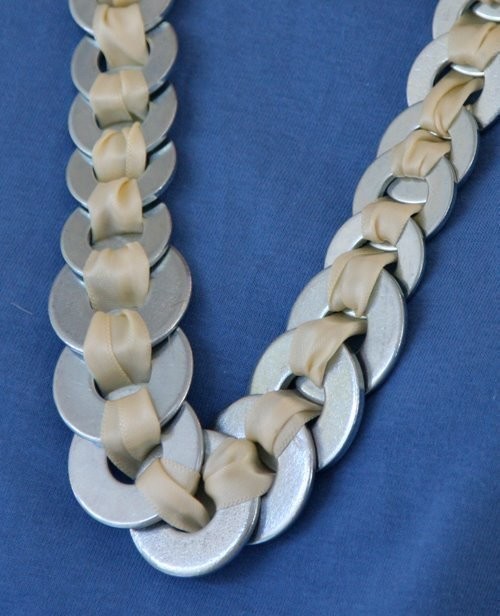
Thread one of the smallest washers onto your length of ribbon, about 8" or so from one end. Follow lacing instructions below, adding washers on in this order:
(S= small washer, M=medium washer, L=large washer)S-S-M-M-M-M-M-M-L-L-L-L-L-L-L-M-M-M-M-M-M-S-S
-
 Step 2
Make sure you underlap the washers as you add each new one; the new one goes underneath the previous one. And they're single-sided (a shiny side, and a matter side), so make sure you're keeping the same side out for each one as you add it on!
Leave 6-8" on the end once you're done , and tie the end of the ribbon. You can also treat the ends with Fray-Stop, or fold them over twice and stitch a narrow hem to encase the edges (neither of which I've done in the photo cuz I'm just too lazy). I think I'll just leave the ends tied - am not sure I like the bow I made. Anyhow.
Project Cost: $4.74.
-
 Step 3
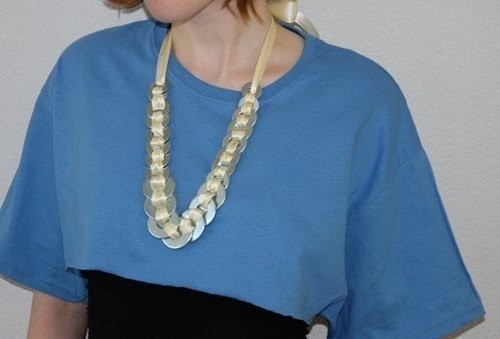
The necklace (though heavy) sits beautifully on the body, almost like a flat snake. Very nice, Anni Albers!
Happy DIY'ing!
xoxox
Carly


Thanks for your comment!
xoxo
Carly
Thanks for your comments!
xoxox
Carly