


About
Learn How To Turn Those Scrapbooking Layouts Into A Vision Board Wall Hanging!
The craft tool featured in this DIY is the We R Memory Keepers Photo Sleeve Fuse Tool. I was given this craft tool by CutOut + Keep to review and to use in a project. Now before we get into the DIY, let me tell you a little bit about the Photo Sleeve Fuse Tool.
The Photo Sleeve Fuse Tool was created by the company We R Memory Keepers, who is known for their scrapbooking and paper crafting supplies. The Photo Sleeve Fuse Tool was designed to be used when creating scrapbooking layouts. According to the packaging that came with the product, the three big things that you can achieve when using the Fuse Tool are:
1. Creating Custom Size Sleeves
2. Adding Waterfall Sleeves
3. Sealing In Keepsakes
Besides fusing sleeves together, the Fuse Tool also allows you to cut sleeves open or apart if need be. Along with the Fuse Tool, you also received 4 additional items in the packaging. These items were the fusing tip, cutting tip, ruler stencil and tool stand.
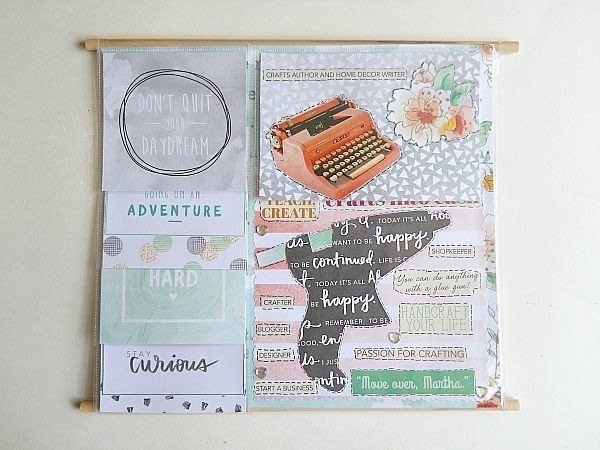
Once I received the Fuse Tool and watched a couple of YouTube videos about the product, I decided to make my own version of a vision board for this review. So I grabbed all my pretty scrapbooking paper, embellishments and old magazines, then went to town designing / fusing the whole thing together!
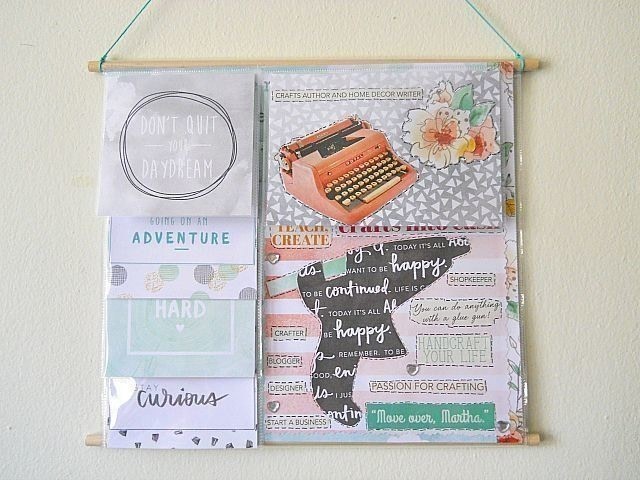
After completing the project, I was very happy with how the whole thing turned out! The fusing of the plastic (when using the tool) created a strong bond which didn't pop open or come apart. For example, in my project I used dowel rods for the top and bottom portion of my wall hanging. The bond from the fuse tool was strong enough to hold the dowels rods in place and I didn't have to reinforce the bond in anyway.
With that being said, I think it's important to mention that the ruler stencil you get with the product is only 6 inches long. Why is this a big deal? Well, the ruler stencil has a vertical cut out in the middle which is designed for you to place the fuse tool in the cut out and follow it to create a straight ''fusing line'' on your projects. Now this is a great idea but I think there are going to be those times when you need to fuse a bigger layout together (like a 12x12) and you may be fusing pieces together that are longer than 6 inches.
Also I think it's important to mention that this Fuse Tool comes in different ''versions''. For example you have a U.S, AU, UK and EU version. The only difference between the four is the voltage and the plug-in needed for the tool. So make sure you get the Fuse Tool designed for your country :)
All in all, I was very happy with how this project turned out and would consider buying more We R Memory Keepers products in the future.
-
 Mia added Vision Board Wall Hanging Diy to Room Decor
18 Jan 07:48
Mia added Vision Board Wall Hanging Diy to Room Decor
18 Jan 07:48
-
 PixieFey favorited Vision Board Wall Hanging Diy
08 Oct 14:10
PixieFey favorited Vision Board Wall Hanging Diy
08 Oct 14:10
-
 Katie K. published her project Vision Board Wall Hanging Diy
08 Oct 06:00
Katie K. published her project Vision Board Wall Hanging Diy
08 Oct 06:00
You Will Need
-
 Step 1
Take your 12x12 Page Protector and measure 11 inches straight across. At the 11 inch mark, make a small dot with a pen. Then grab a ruler and line it up (vertically) to your dot mark and draw a line going straight down your Page Protector. Once this is done, take your fuse tool and fuse your Page Protector together by following that line you just drew. When your done cut off the extra plastic and you should have a fused Page Protector which now measures 11x12.
-
 Step 2
Flip your Page Protector over and fold the bottom of the Page Protector up by 1 inch. While folding, don't be afraid to make a crease in the plastic because it will help the fold lay flatter. Then grab your fuse tool and fuse the folded edge to the Page Protector. By doing this, we are creating a sleeve for your dowel rod.
-
 Step 3
Grab your scrapbooking paper, embellishments and waterfall selves and begin playing around with the over all design of your vision board wall hanging. When doing this make sure that you create a 11x10 page layout because this will slide into your 11x12 Page Protector.
For my wall hanging I ended up using 4 of the 4x4 waterfall sleeves and 1 of the 4x6 waterfall sleeves. However this is completely optional.
-
 Step 4
Slide in your 11x10 page layout into your 11x12 Page Protector. Then repeat step 2 by flipping your Page Protector over to the back and fusing down the top edge. When your done you should have something like the picture on the right.
-
 Step 5
Now it time to add your waterfall sleeves! To do this, first layout your 4x4 sleeves onto your main wall hanging in the order you want them in. Once your happy with the look, remove each sleeve from your wall hanging until you reach the last sleeve. When you have your last sleeve (in my case the ''Stay Curious'' sleeve), fuse the top of the sleeve to your main Page Protector.
Once the sleeve is fused on, fuse on another sleeve by placing it a bit higher and on top of the first sleeve you just fused. Keep repeating this process until all your 4x4 sleeves are attach to your Page Protector.
-
 Step 6
Now add your 4x6 waterfall sleeve by fusing the top edge to your main Page Protector.
-
 Step 7
Cut a piece of yarn that is about 12 inches and tie each end to top of your dowel rod.
When you've finished tying the yarn, you're ready to hang your new vision board wall hanging!