About
make this super cut and super easy vintage valentine for special friends and family this year
Tags
-
 Kinhime Dragon favorited Vintage Valentine
02 Jan 16:07
Kinhime Dragon favorited Vintage Valentine
02 Jan 16:07
-
 Kay T. favorited Vintage Valentine
13 Nov 08:49
Kay T. favorited Vintage Valentine
13 Nov 08:49
-
 chang.shai favorited Vintage Valentine
30 Sep 03:06
chang.shai favorited Vintage Valentine
30 Sep 03:06
-
 Sherley E. favorited Vintage Valentine
22 Feb 02:20
Sherley E. favorited Vintage Valentine
22 Feb 02:20
-
 Hannah F. favorited Vintage Valentine
21 Aug 14:26
Hannah F. favorited Vintage Valentine
21 Aug 14:26
-
 Miss_Fit added Vintage Valentine to Greeting Cards
10 May 17:12
Miss_Fit added Vintage Valentine to Greeting Cards
10 May 17:12
-
 Lia fangirl of scotland! favorited Vintage Valentine
22 Dec 23:23
Lia fangirl of scotland! favorited Vintage Valentine
22 Dec 23:23
-
Lia fangirl of scotland! added Vintage Valentine to got to make!
22 Dec 23:23
-
 Thatcartoongirl favorited Vintage Valentine
25 Aug 16:54
Thatcartoongirl favorited Vintage Valentine
25 Aug 16:54
-
 Libby W. favorited Vintage Valentine
14 Jul 20:52
Libby W. favorited Vintage Valentine
14 Jul 20:52
-
 Step 1
gather your supplies in one clean workspace. I would suggest ironing your handkerchiefs prior to starting to save time. once that is done, you're ready to begin. Cut your cardstock into 4"x4" square.
Place your handkerchief over the square and determine the best section of the pattern of embroidery to use for your card. -
 Step 2
cut out the section leaving atleast 1/2" extra fabric around designated embroidery or pattern area.
-
 Step 3
liberally apply matte medium to the back of the cardstock and place the handkerchief onto the card, right side up. place a heavy book over the card and let dry for about fifteen minutes.
-
 Step 4
after the card is dry, neatly trim the rest of the handkerchief edges.
-
 Step 5
use a corner rounder to round each of the 4 corners.
-
 Step 6
using an oversew stitch, neatly stitch around the perimeter of the card.
(hint: to ensure even stitches measure out the holes prior to starting a stitch.)
-
 Step 7
use the template which you can download here:
http://www.ohsosuite.com/handmade-and-special/2009/1/26/vintage-valentine.htmltrace onto the piece of velum and cut out.
-
 Step 8
cover the velum in matte medium and press onto the second handkerchief. press firmly and push out all the wrinkles. (there will be a few you can't avoid.) cover with a book and let dry.
(option: you can forgo using the velum if you are not mailing. The velum adds sturdiness. But if you're just leaving on your valentine's desk, it's prettier without the velum.)
-
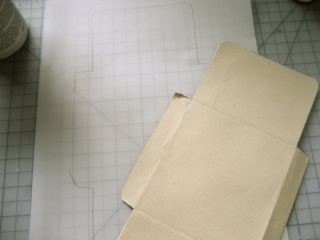
 Step 9
fold and crease along dotted lines. hot glue the bottom flap to the two side folds. If you're are just using the handkerchief, iron the folds and add a few small slip stitches to keep everything together.
-
 Step 10
write your love letter!