https://www.cutoutandkeep.net/projects/tsumami-kanzashi-flower • Posted by The AfterCraft
These are a bit fiddly to make but they are so cute. You can do almost anything with them from hair pins to rings to necklaces to jacket/hat pins. And you can use up that bit of scrap fabric you can't bare to part with for that perfect project. Well you just found it. It looks like a long tutorial, but I've tried to get every step in there and as clear as possible. You can see more pretty flowers on my blog :www.theaftercraft.blogspot.com/


These are a bit fiddly to make but they are so cute. You can do almost anything with them from hair pins to rings to necklaces to jacket/hat pins. And you can use up that bit of scrap fabric you can't bare to part with for that perfect project. Well you just found it. It looks like a long tutorial, but I've tried to get every step in there and as clear as possible. You can see more pretty flowers on my blog :www.theaftercraft.blogspot.com/

Before you begin you want to starch your fabric. If you don't have access to this you can use fabric interfacing as well.

Pick out your scrap fabric.

Cut out your squares. Any size really will do. Mine were about 2 inch wide so I decided to use 6 petals, but you can use 5 or if you want use more just your petals won't be as open when you're finished.

fold in half

Fold corner to the center

Same thing to the other side

Flip over, the two ends that are together are at the bottom of the diamond as we're looking at it now.

Imagine a line going down the middle if the diamond. Fold the side to the middle.

Same thing to the other side.

Now fold it half length wise.

It should looke like this from the top....

And this on the bottom.

Taking your need and thread.( yes no thread in this photo) Push the needle through the middle. See the next photo for a more exact placement.

See how the needle catches the little triangles in middle?? That's what we want.

Stack em all together and get them on the needle and on to the thread. I quatruple up on my thread to make it strong.

Now you want to cutt off the ends. Closer picture next step.

About this much.. and do it to them all.

Squish them all togther.

And make a knot.

Nice and tight. Give it a few knots so it won't come undone. Then snip your threads. Should look like this.

Push the centre piece out and flat to al the petals

should look like this now...

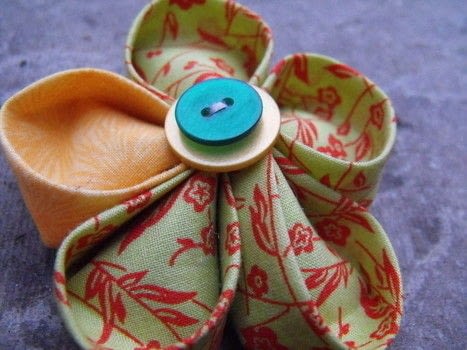
Sew on your center AND TA DA!!!! cute and sweet!!