

About
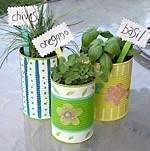
Cute Little "pots" For Your Own Indoor Herb Garden
Alright, so My camera decided NOT to work, So I just used the original picture.
There is no "one site" with the original craft, and I don't want to give credit to one site when there is THE SAME EXACT craft on every other craft site, so yea, just look up the craft name, and you'll find a list of craft sites with this how to :D
-
 Key West Witch favorited Tin Can Herb Pots
29 Jun 00:11
Key West Witch favorited Tin Can Herb Pots
29 Jun 00:11
-
 Michelle C. favorited Tin Can Herb Pots
20 Apr 05:13
Michelle C. favorited Tin Can Herb Pots
20 Apr 05:13
-
 sandra.dorton1 added Tin Can Herb Pots to want to do
24 Dec 13:50
sandra.dorton1 added Tin Can Herb Pots to want to do
24 Dec 13:50
-
 BlackCherry favorited Tin Can Herb Pots
08 Oct 05:44
BlackCherry favorited Tin Can Herb Pots
08 Oct 05:44
-
 Lauren J. favorited Tin Can Herb Pots
24 May 13:40
Lauren J. favorited Tin Can Herb Pots
24 May 13:40
-
 Milleyone favorited Tin Can Herb Pots
07 May 06:01
Milleyone favorited Tin Can Herb Pots
07 May 06:01
-
 Lorrie B. added Tin Can Herb Pots to home dec
13 Apr 19:49
Lorrie B. added Tin Can Herb Pots to home dec
13 Apr 19:49
-
 Arawynn favorited Tin Can Herb Pots
25 Mar 05:16
Arawynn favorited Tin Can Herb Pots
25 Mar 05:16
-
 pink added Tin Can Herb Pots to things i want to make in the future
03 Oct 03:21
pink added Tin Can Herb Pots to things i want to make in the future
03 Oct 03:21
-
 Katharine C. favorited Tin Can Herb Pots
23 Aug 18:40
Katharine C. favorited Tin Can Herb Pots
23 Aug 18:40
-
Step 1
Completely wash and dry aluminum can. If necessary, sand off any rough edges from opening of can.
Turn can upside down. Use screwdriver or other pointed object to poke holes in the bottom of the can. Use a hammer to tap the end of the screwdriver to make the holes. -
Step 2
Paint outside of can with one coat of Acrylic Base Paint. Let dry completely.
Paint can desired color, repeat coats if needed.Decorate however you like. Use a thin paint brush for long lines, dip the end of the paint brush into paint for polka dots.
Spray the outside of the completed can with acrylic sealer spray (or paint over with 5 parts glue 1 part water). Let dry.
-
Step 3
Place enough rocks or pebbles in the bottom of the can to form a single layer.
Add enough potting soil to fill the can two-thirds full. -
Step 4
Remove potted herb from its container and transplant into the can.
Fill edges with remaining potting soil, gently pat down so that plant is firmly in the can but not compacted so much that it’s too tight.
Place can on a plate (to catch any water drainage) and add some water to the newly planted herbs. -
Step 5
Paint craft stick whatever color you like. Allow to dry.
Cut a piece of thin cardboard into a small rectangle (about 1.5 x 3 inches) using pinking shears or scissors.
Paint both side of the cardboard with the acrylic base paint, let dry.
Glue the rectangle to the top of the craft stick.
Use a black Sharpie marker to write the herb name onto the rectangle.
Insert your plant marker into the soil, being careful not to crush any roots along the way.
Place your new garden in a sunny window and remember to water them! -
Step 6
Tips:
A 4-inch potted plant will be enough to make 2-3 vegetable sized cans (15 oz) or one larger tomato sauce type can (28 oz).
This is a great project to teach people about growing plants, especially edible ones. Take this opportunity to visit your local library and check out a book on simple container gardening or gardening.
Versions


Comments


