About
Designed by June McCrary Jacobs
This game can go anywhere, quietly! Take it in the car, a plane, a motel, a campground, or just keep it at home in the garden or by the fireplace! It’s a great way to spend time as a family, and you can simply slip the pieces in the pocket, tie it closed with ribbon, and go!
Finished dimensions — 12" square
Seam allowance — ?" unless otherwise specified
-
 amyistheparty added Tic Tac Toe Travel Game to beach day
18 Apr 22:16
amyistheparty added Tic Tac Toe Travel Game to beach day
18 Apr 22:16
-
 Romana S. favorited Tic Tac Toe Travel Game
07 Jul 12:13
Romana S. favorited Tic Tac Toe Travel Game
07 Jul 12:13
You Will Need
-
 Step 1
Measure, Mark, and Cut
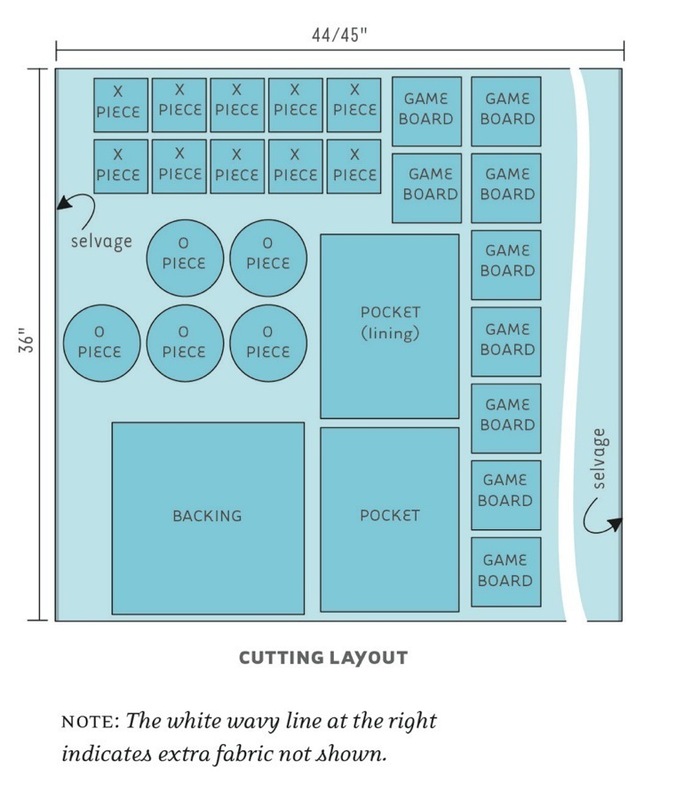
Lay out your fabric in a single layer with the wrong side facing up. Measure and mark the following pieces directly on the wrong side of your fabric as shown in the layout, placing straight edges along the grainline. Cut out the pieces.
Game board squares 4?" square (cut 9)
Backing 12?" square (cut 1)
Pocket and lining 12" 9" (cut 2)
X pieces 3?" square (cut 10)
O pieces 5" circle (cut 5)
In addition, cut the following pieces from batting:
For backing 12?" square (cut 1)
From medium-weight sew-in interfacing:
Pocket 9" 12" rectangle (cut 1)
X piece 3H" square (cut 5)
From grosgrain ribbon, for ties Two 21" lengths
From medium rickrack Ten 5" lengths -
Step 2
Make the Pocket
Pin the pocket and pocket lining with the right sides together, aligning all raw edges. Pin the pocket interfacing on top. Round both corners of one 9" (top) edge with a cup or similar circle template.
Stitch all around, leaving a 4" to 5" opening on the straight (bottom) edge for turning; include the interfacing in the stitching. Clip the corners and turn the pocket right side out, pushing out the corners with a turning tool.
Turn the seam allowance at the opening to the inside and press the pocket. Stitch ?" from the edge, around the pocket, closing the opening as you stitch.Fold up the bottom edge 4?" and press to form the pocket. Fold the top rounded edge over the bottom edge and press to form the flap. Pin the sides, but don’t stitch yet.
For closures, hand-sew the snaps on the inside of the flap and outside of pocket, 2" from the side edges. To hide the snap stitches, hand-sew buttons on the outer flap.
-
Step 3
Attach Pocket and Ties to the Backing
Center and pin the pocket on the backing, 1" up from the bottom raw edge. Open the pocket flap and stitch the pocket in place along the sides and bottom with an edgestitch. Stitch to just above the pocket top edge on both sides; backstitch to secure. Fold the flap back down.
Fold each ribbon tie in half to find the center. Pin the ribbon centers 1" above the top of the pocket flap on both sides of the pocket. Attach the ribbons with a box stitch at the center. Tuck the ribbon ties inside the pocket for now and set the backing aside. -
Step 4
Make the Game Board Squares
Note that the game board side is made with four of the squares wrong side up.
Stack two game board squares, both with the right sides facing up, and align the raw edges. Stitch them together on one side edge and press the seam open. On the square with the wrong side up, place a third square, right side down, and stitch along the opposite side edge. Press the seam open. This is the top row, with two outer squares that are right side facing up.
Make another strip of three squares in the same fashion, for the bottom row.
Make the middle row in the opposite fashion, so that the two outer squares will have their wrong side facing up.
Stitch the three rows together to form the checkerboard, aligning the seams of the squares.Hand-sew a small button in each of the corners of the center game board block.
-
Step 5
Stitch the Game Board and Backing
Pin the game board and backing (with pocket attached) with the right sides together, aligning the raw edges. Pin the batting on top and stitch around all sides, leaving a 5" opening at one edge for turning.
Clip the corners and turn the game board and backing right side out, pushing out the corners with a turning tool. Press all around, turning the seam allowance at the opening to the inside.
Edgestitch the outer edges, closing the opening as you stitch. Use a zigzag or other decorative stitch if desired.
Hand-sew a large decorative button on each game board corner. -
Step 6
Make the O Game Pieces
Make yo-yos with the five O pieces and the yo-yo maker, following the manufacturer’s instructions. Hand-sew a button to each yo-yo center to cover the gathers.
-
Step 7
Make the X Game Pieces
Topstitch two lengths of rickrack diagonally, forming an X, across five ?X squares.
Pin each stitched square to a plain X square with the right sides together. Stitch the outer edges, leaving a 2" opening on one edge for turning. Clip the corners and turn the pieces right side out, pushing out the corners with a turning tool.
Press each game piece, turning the seam allowance at the openings to the inside. Edgestitch all sides, closing the opening as you stitch.
* Storing the Game
Place the game pieces in the pocket and snap the pocket closed. Fold the game board in half and tie it closed with the ribbon ties.