

The Portrait Blouse
Extract from Gertie's New Book for Better Sewing • By Gretchen Hirsch • Published by Abrams

About
Gertie's New Book for Better Sewing
This sweet blouse is figure-flattering and amazingly versatile. Make it in a cotton eyelet and pair it with shorts in the summer. In wool jersey, it’s a great wintertime layering piece with a pencil skirt and cardigan. And it’s absolutely smashing in a drapey silk satin for a glam evening look. There are very few fabrics this design won’t work in! I would just avoid anything that’s too stiff (like taffeta, for instance), as it won’t provide a flattering drape. The length of the blouse is relatively short, so add length at the hem if you like your tops on the longer side.
FABRIC NOTES
My sample blouse is made up in a dotted silk charmeuse. Charmeuse is known for its luxurious feel and signature sheen. It’s also known for being fussy to work with because it’s so slippery. The two best tips I can give you are:
1) Put weights on your pattern pieces when cutting out, and cut with a rotary blade. This keeps the silk from shifting as you cut it because it remains flat on the table.
2) Hand-baste your darts and seams together before stitching on the machine. This may seem like overkill,
but it makes working with charmeuse a snap, rather than a nightmare. Plus, on a small project like this one, there aren’t too many seams to baste. Remember to remove your basting before pressing!
Downloads
- Gerties_BrandedPattern_FINAL.pdf 7.42 MB [ Download ]
-
 Ms Dorito favorited The Portrait Blouse
12 Jun 00:05
Ms Dorito favorited The Portrait Blouse
12 Jun 00:05
-
 Luna D. favorited The Portrait Blouse
24 Apr 16:27
Luna D. favorited The Portrait Blouse
24 Apr 16:27
-
Swapna E. favorited The Portrait Blouse
13 Apr 14:57
-
 Tamara D. favorited The Portrait Blouse
20 Apr 20:37
Tamara D. favorited The Portrait Blouse
20 Apr 20:37
-
 Kristina U. favorited The Portrait Blouse
09 Oct 17:47
Kristina U. favorited The Portrait Blouse
09 Oct 17:47
-
 Loki_Doki favorited The Portrait Blouse
20 Feb 21:46
Loki_Doki favorited The Portrait Blouse
20 Feb 21:46
-
 Erin B. added The Portrait Blouse to Zooey Deschanel
20 Jan 23:10
Erin B. added The Portrait Blouse to Zooey Deschanel
20 Jan 23:10
-
 CountessAudronasha added The Portrait Blouse to Rockabilly
05 Nov 21:09
CountessAudronasha added The Portrait Blouse to Rockabilly
05 Nov 21:09
-
Elizabeth s. favorited The Portrait Blouse
07 Sep 16:23
-
 Ashley V. commented on The Portrait Blouse
06 Jul 01:31
Ashley V. commented on The Portrait Blouse
06 Jul 01:31
-
 Step 1
This neckline needs to be stabilized well so that it won’t gape. Stay-stitch 1⁄2" (1.3 cm) from top edge, or use one of the other methods described on page 77 (A).
-
 Step 2
Stitch front-bust darts, and press them (B).
-
 Step 3
Stitch dart tucks on front and back pattern pieces by bringing the two lines together and stitching. Backstitch at beginning and end of the tucks. Press tucks to the center of each piece (C).
-
 Step 4
Stitch blouse front and back together at the shoulder seams. Press open (D).
-
 Step 5
Stitch front and back together at side seams, starting at upper notch and leaving left side open under lower notch for zipper. Press seams open, clipping into seam allowance at waistline to allow seam to lie flat (E).
-
 Step 6
Apply interfacing to your facings. For my sample blouse, I used silk charmeuse as sew-in interfacing, but you can also use a fusible in a weight to match your fashion fabric. Tip: You can match your interfacing to your skin tone to avoid show-through of your facings on light-colored or slightly sheer fabrics.
-
 Step 7
Stitch facings together at shoulder seams (G).
-
 Step 8
Pin facings to neckline, right sides together. Stitch facings to blouse. Trim, grade, and clip seam allowances. Press and turn facings to the inside. Understitch facings by hand using a pick stitch (H). Finish outer edge of your neckline facings by pinking, zigzagging, or hand-overcasting. Tack facings to shoulder seams.
-
 Step 9
Hem sleeves, using one of the two methods in sidebar below. For both methods, clip upper side seam notch almost to line of stitching so sleeve hem can lie flat (I).
-
Step 10
Hem bottom of blouse as you did for sleeves.
-
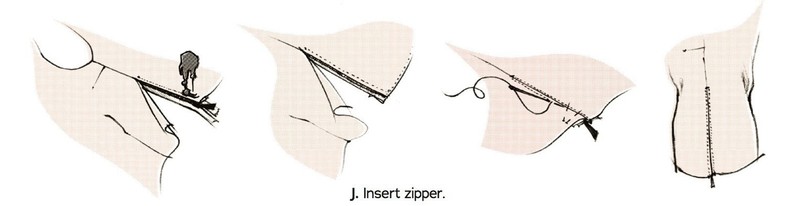
 Step 11
Insert side-hand-picked lapped zipper (J). (Your zipper will go in
upside down in a blouse, so zipper pull hangs just below hem of blouse when closed.) Turn back zipper opening seam allowance under 1⁄2" (1.3 cm) and press. Pin this pressed fold over zipper tape, pinning as close to zipper teeth as possible. Match zipper stop to lower edge of blouse hem. Conceal top of zipper tape by turning it under and stitching or trimming it with pinking shears. With a zipper foot, stitch next to zipper teeth to secure it. -
Step 12
On front side of zipper opening, turn seam allowance under 5⁄8" (1.5 cm) and press. Close zipper and pin right seam allowance so that fold covers zipper teeth. Hand-pick zipper in place on right side, using a double strand of beeswax- coated thread. (Press the thread in a press cloth first to melt the beeswax.)


Comments


