

About
Join me in making your own temporary tattoos for all purposes!
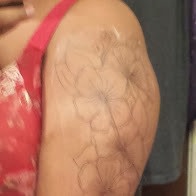
I wanted something more geared towards adults rather than making a bunch of kids temporary tattoos and its as easy as 1.2.3! This is much safer and faster than drawing on yourself. Aside from the usual small tattoos, this would make a great "try before you buy" for actual tattoos, cosplay use, and for photoshoots!
-
 Anya N. published her project Temporary Tattoos
30 Nov 12:54
Anya N. published her project Temporary Tattoos
30 Nov 12:54
-
 Step 1
Firstly, if you are not already familiar with your printer. test to see how the printer feeds. I do this by marking a side of cheap printer paper with sharpie (I recommend doing just a line or an uneven cross) and printing out any image). Where the mark ends up relative to your printed image tells you the steps to make sure your tattoo is printed on the right side of the paper.
-
 Step 2
When you pull out the sheets there will be two sets. one set of white glossy paper with marks on the non glossy side, and one set of green paper with a plasticy side. You will be using the white paper first. The paper that we will be using first is the white glossy.
-
 Step 3
Depending on the needs of your printer, feed the white sheet into the printer so that the glossy side is the printed side. In my epson printer it means I just feed mine facing up, glossy side to me.
-
Step 4
From here you can print out any downloaded image that suits your fancy! Make sure to give it at least a few minutes to dry!
-
 Step 5
Now we are gonna be using the Green shiny paper! It will take some picking around the short edges, but there should be a green lifted edge to help you peel the plastic off! Silhouette recommends pulling it off partway, applying it to the top edge your glossy image, and then slowly peeling it off onto the paper. Then smooth it out! I used an icing scraper, but you can use any flat edge.
-
 Step 6
Cut around the image, and the tattoo is made! When you are ready apply it like any ordinary temporary tattoo!


