
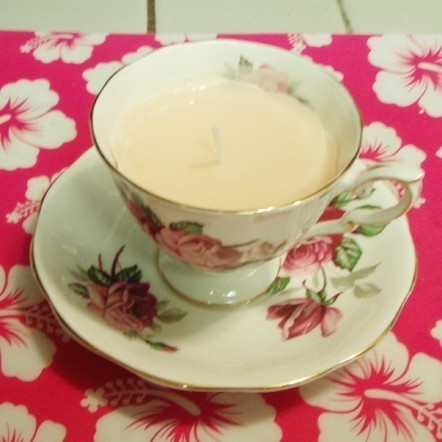

About
Make a fun candle out of an old tea cup!
I always wanted to make an antique tea cup candle! After purchasing a simplistic candle making kit on etsy.com I decided to give it a try! Here are my simple instructions.
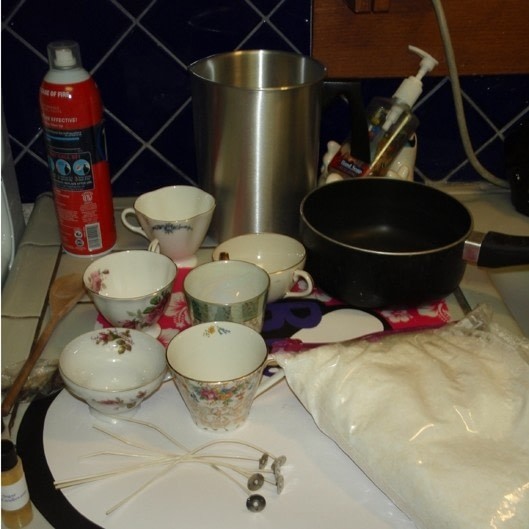
The kit cost me $15 and the tea cups cost me around $4 each from thrift stores (including the saucer which makes it prettier).
Well worth the time and energy!
Use these as gifts, wedding table decorations, tea time decor, the possibilities are endless!
-
 Key West Witch favorited Tea Cup Candle
03 Aug 00:59
Key West Witch favorited Tea Cup Candle
03 Aug 00:59
-
 San added Tea Cup Candle to Tea Party
01 May 17:35
San added Tea Cup Candle to Tea Party
01 May 17:35
-
 Cheryl added Tea Cup Candle to Sherlock's Flat
29 Oct 18:58
Cheryl added Tea Cup Candle to Sherlock's Flat
29 Oct 18:58
-
 Emma H. added Tea Cup Candle to Steampunk Tea Party
17 Jul 15:34
Emma H. added Tea Cup Candle to Steampunk Tea Party
17 Jul 15:34
-
 Brett H. favorited Tea Cup Candle
01 May 10:39
Brett H. favorited Tea Cup Candle
01 May 10:39
-
Len favorited Tea Cup Candle
12 Feb 23:01
-
 SteamAlyce favorited Tea Cup Candle
08 Jul 04:09
SteamAlyce favorited Tea Cup Candle
08 Jul 04:09
-
Alina M. favorited Tea Cup Candle
10 Jan 10:54
-
Kimberley K. added Tea Cup Candle to What I Like
13 Sep 08:07
-
 Katrina C. favorited Tea Cup Candle
08 Aug 02:22
Katrina C. favorited Tea Cup Candle
08 Aug 02:22
-
 Step 1
Start off by covering your work surface. I used ghost place mats from the 99 cent store.
I do not have a double boiler, so I took a wax pouring container and sat it in a pot of water, set to low heat on my stove. I put a small amount (an inch or two) of wax in the pouring container. It is easier to melt the wax a little at a time. Add more as it melts.
-
 Step 2
As your water is heating up and starting to melt your wax make sure to line up all your cups. You don't want to go reaching for one and knock one over that is already filled with hot wax!
-
 Step 3
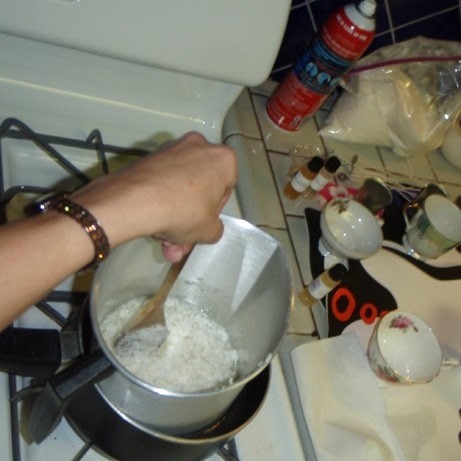
Stir your wax constantly! Don't let it sit. Wax can catch on fire if it gets hot...hence the fire extinguisher!
Once the small amount of wax you put in melts, add more. There is no science to this (actually I am sure there is, except I don't know it) so you will have to guestimate how much wax you will need.
Obviously one cup will need less wax then 6 cups!
After all the wax you want to melt is melted add coloring. Add a little bit at first and mix with wooden spoon. If you want more add more.
NOTE: I never had made candles before, and forgot that the wax was going to get milky. I choose a color that resembled tea, but after the wax cooled down, it looked like orange milk. So keep this in mind when mixing your colors!
-
 Step 4
After the color is completely dissolved, take your melted wax off the heat.
Add your scent.
Again add a little bit at first and mix with wooden spoon. If you want more add more.
-
 Step 5
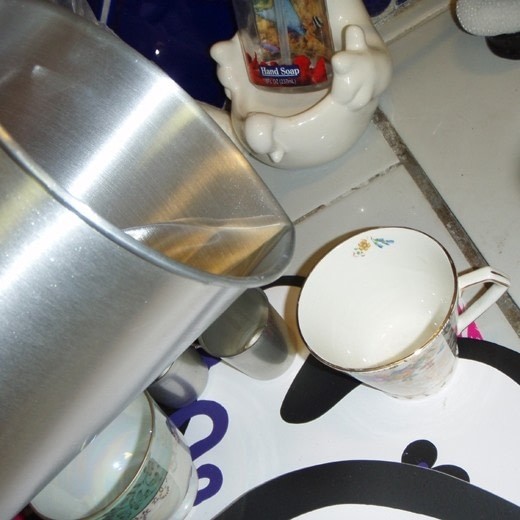
Now carefully pour the melted wax into your tea cups.
If you are doing more then one cup, and have them all lined up nice and pretty, and are right handed, start at the furthest teacup on the right and move your way towards the left. Trust me it makes the process easier!
Now we wait for the wax to start to look milky or cloudy.
-
 Step 6
While waiting for the wax to get milky or cloudy measure your wick.
The wick should be at least a 1/2 inch above the top of the wax once the candle is complete.
I made mine about an inch above the wax and decided to trim it after it cooled.
-
 Step 7
Once the candle is cloudy or milky you will want to place your wick into the center of the cup.
If it starts to move around lay a kitchen knife across the cup to hold the wick in it's proper place.
Allow to cups with wicks to cool.
-
 Step 8
Once the tea cups are safe to move without the threat of wax dripping on you, pkeep them out of harms (cats) way for a few hours.
I tried to put mine in the fridge to cool faster, but this made the wax crack and break. If this happens just remelt the wax and start from the beginning. You might need to add a bit more of the scent though!
-
 Step 9
Once fully cooled trim the wick to 1/2.
Light and enjoy your new tea cup candle.
Don't forget to never leave the burning candle unattended!!!
If you want, after the candle has burned away, reuse the tea cup by making another candle tea cup!


thanks for the how-to!
thanks for the how-to!