
Sweet Kitty Pincushion
Extract from Easy to Learn Hand Embroidery • By Chris Malone • Published by Annie's

About
Easy to Learn Hand Embroidery
This whimsical cat pincushion has a trio of embroidered flowers made with lazy daisy stitches. She stands upright, ready to hold pins and needles for your sewing projects.
Finished Size
4 x 6 inches
Cutting
Full-size templates are included on the insert for body, outer and inner ear, tail and base pieces. Transfer all markings from templates to fabric.
From pink:
• Trace 2 inner ears about 1/2 inch apart onto paper side of fusible web and cut out. Apply to wrong side of fabric following manufacturer’s instructions. Cut out on template lines.
From gray check:
• Cut 1 (8 x 10-inch) rectangle.
• Cut 4 outer ears, 2 tails (reversing one) and 1 each
body back and base.
Tags
Downloads
- 111530_2F2015-10-16-104255-SweetKittyPincushion.jpg 96.9 KB [ Download ]
-
 Key West Witch favorited Sweet Kitty Pincushion
04 Oct 21:56
Key West Witch favorited Sweet Kitty Pincushion
04 Oct 21:56
-
 Debra R. favorited Sweet Kitty Pincushion
17 Jan 15:38
Debra R. favorited Sweet Kitty Pincushion
17 Jan 15:38
-
 Karen F. favorited Sweet Kitty Pincushion
17 Jan 08:55
Karen F. favorited Sweet Kitty Pincushion
17 Jan 08:55
-
Karla M. commented on Sweet Kitty Pincushion
05 Jan 14:03
-
 Karen C. favorited Sweet Kitty Pincushion
28 Feb 06:37
Karen C. favorited Sweet Kitty Pincushion
28 Feb 06:37
-
 Trish R. favorited Sweet Kitty Pincushion
24 Jan 21:34
Trish R. favorited Sweet Kitty Pincushion
24 Jan 21:34
-
Margaret M. commented on Sweet Kitty Pincushion
13 Jan 19:12
-
michael r. commented on Sweet Kitty Pincushion
18 Aug 09:56
-
michael r. favorited Sweet Kitty Pincushion
18 Aug 09:55
-
Joan W. commented on Sweet Kitty Pincushion
06 Jul 01:23
You Will Need
-
Step 1
Embroidery
Refer to Embroidery Necessities on page 2 for stitching tips and the Stitch Guide on page 6. Full- size embroidery design is included on the insert.
1. Using embroidery design provided, draw the cat body outline centered on the right side of the gray check 8 x 10-inch rectangle with a pencil.
2. Use your preferred method to transfer the embroidery design onto the cat body.
3. Embroider the design as follows.
Use 1 strand size 8 pearl cotton to stitch:
Stems
Leaves
Center flower Side flowers Flower centers Whiskers
green stem/outline stitch green lazy daisy stitch dark pink lazy daisy stitch light pink lazy daisy stitch yellow knot
black straight stitchUse 1 strand size 16 pearl cotton to stitch:
Bee outline Bee eye Bee trail Under nose
black stem/outline stitch black knot
black running stitch black stem/outline stitch -
Step 2
Assembly
Use 1/4-inch seam allowance and stitch right sides together unless otherwise indicated.
Use black sewing thread to sew the black buttons to the face for eyes referring to the embroidery design for placement.
-
Step 3
Use pink sewing thread to sew the pink button to the face for a nose referring to the embroidery design for placement.
-
Step 4
Cut the embroidered front out on the tem- plate lines.
-
 Step 5
Remove paper backing from inner ear pieces. Center and fuse an inner ear on right side of each outer ear (Figure 1).
-
Step 6
Layer fused ears right sides together with remaining outer ears and pin to scraps of batting. Stitch around ears leaving flat bottom edge open.
-
Step 7
Trim batting close to seam, clip curves and trim point. Turn right side out and press flat.
-
 Step 8
Machine-topstitch around the pink inner ear through all layers (Figure 2).
-
Step 9
Make a tail referring to steps 5 and 6.
-
 Step 10
Pin and baste ears and tail to right side of embroidered body front between placement circles referring to pattern and Figure 3.
-
Step 11
Pin body front and back, right sides together, and stitch all around, leaving seam open at straight bottom and between squares on side. Clip the curves. Do not turn right side out.
-
Step 12
Mark the center front and back of the body. Pin the body to the base, matching centers to squares on base and side seams to circles.
-
Step 13
Stitch body and base together all around. Clip the curves and turn right side out through the body opening.
-
 Step 14
Pour crushed walnut shells into the body through the opening. Stuff the body firmly with fiberfill or cotton stuffing.
-
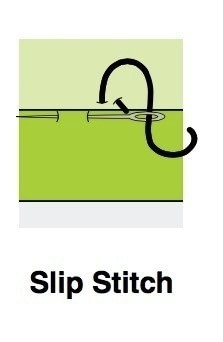
 Step 15
Fold opening seam allowance to inside and slip stitch opening closed to complete cat
-
Step 16
Tie the ribbon into a bow and trim the ends as desired. Tack the bow to the side of the cat, referring to the sample photo.


Comments


