


About
Straightforward with simple vertical repeats.
These peachy socks are named after a little bundle of joy (four months as of this writing) named Sunshine. They are straightforward, just like she is, with simple vertical repeats. A smattering of cables and lace make these socks a little bit interesting without too much strain. I hope Sunny T, as I like to call her, grows up to be a knitter unlike her mother, Eunice. Even if she doesn’t, she’ll still be loved.
Finished Measurements
Leg circumference—8" (20.5 cm), slightly stretched.
Foot circumference—8" (20.5 cm), slightly stretched.
Yarn
Fingering weight (Super Fine #1).
Shown here: Artyarns Ultramerino 4 (100% wool; 191 yd [175 m]/50 g): #221, 2 skeins.
Needles
U.S. size 1½ (2.5 mm): circular (cir) or double-pointed (dpn). Adjust needle size if necessary to obtain the correct gauge.
Notions
Cable needle (cn); markers (m; optional); tapestry needle.
Gauge
30 stitches and 45 rounds = 4" (10 cm) in stockinette stitch in the round.
40 stitches and 47 rounds = 4" (10 cm) in lace/cable pattern in the round, slightly stretched.
Sizing
To resize, add or remove repeats.
stitch guide
Cable 2K L 2K
Sl 2 sts to cn and hold in front of work, k2 from left needle, k2 from cn.
Cable 2K R 2K
Sl 2 sts to cn and hold in back of work, k2 from left needle, k2 from cn.
Cable Decrease 2 Left
Sl 2 sts to cn and hold in front of work, [knit 1 st from cn tog with 1 st from left needle] 2 times—2 sts dec’d.
Cable Decrease 2 Right
Sl 2 sts to cn and hold in back of work, [knit 1 st from left needle tog with 1 st from cn] 2 times—2 sts dec’d.
-
 Lotusburger favorited Sunshine Socks
14 Jan 03:48
Lotusburger favorited Sunshine Socks
14 Jan 03:48
-
 C.J. M. added Sunshine Socks to Knit
15 Feb 20:34
C.J. M. added Sunshine Socks to Knit
15 Feb 20:34
-
C.J. M. favorited Sunshine Socks
15 Feb 20:33
-
 Gaby H. favorited Sunshine Socks
25 Sep 13:16
Gaby H. favorited Sunshine Socks
25 Sep 13:16
-
 RareJewel favorited Sunshine Socks
11 Aug 05:38
RareJewel favorited Sunshine Socks
11 Aug 05:38
-
Alecia B. favorited Sunshine Socks
23 Aug 07:12
-
 aneniine favorited Sunshine Socks
27 Mar 14:57
aneniine favorited Sunshine Socks
27 Mar 14:57
-
 Shirley T. favorited Sunshine Socks
09 Mar 23:16
Shirley T. favorited Sunshine Socks
09 Mar 23:16
-
 Hai_ItsAmy favorited Sunshine Socks
23 Sep 18:24
Hai_ItsAmy favorited Sunshine Socks
23 Sep 18:24
-
 Hikikomori H. favorited Sunshine Socks
25 Jan 05:54
Hikikomori H. favorited Sunshine Socks
25 Jan 05:54
You Will Need
-
 Step 1
Cuff
Ribbing
CO 60. Being careful not to twist stitches, join for working in the round and place marker (pm) for beg of rnd.
Work Ribbing chart for 1" (2.5 cm). -
 Step 2
Set up for Leg
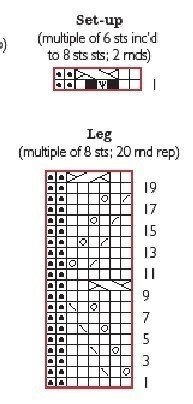
Work Rnds 1 and 2 of Set-up chart—80 sts.Leg
Work Rnds 1–20 of Leg chart across all sts 2 times, then work Rnds 1–19 of Leg chart once more (59 rnds total).
Next rnd: Work Rnd 20 over 40 sts (5 times), [k2, Cable Decrease 2 Right, p2] 4 times, k2, Cable Decrease 2 Right; do not work last 2 sts of rnd—70 sts rem. -
Step 3
Heel
Heel Flap
Divide for heel flap as foll: Place 2 unworked sts from last rnd and next 40 sts on hold for top of foot; rem 28 sts will be worked back and forth for heel flap. Turn work.
Row 1: (WS) Sl 1 purlwise (pwise) with yarn in front (wyf),
p27, turn.
Row 2: [Sl 1 pwise with yarn in back (wyb), k1] 14 times, turn.
Rep Rows 1 and 2 until heel flap measures 2¼–2½" (5.5–6.5 cm) or desired length, ending after Row 1. -
Step 4
Turn Heel
Work back and forth in short-rows to shape heel.
Short-Row 1: (RS) Sl 1 pwise wyb, k16, ssk, k1, turn.
Short-Row 2: Sl 1 pwise wyf, p7, p2tog, p1, turn.
Short-Row 3: Sl 1 pwise wyb, knit to 1 st before gap created on previous row, ssk (1 st from each side of gap), k1, turn.
Short-Row 4: Sl 1 pwise wyf, purl to 1 st before gap created on previous row, p2tog (1 st from each side of gap), p1, turn.
Rep Short-rows 3 and 4 until all sts have been worked—18 heel
sts rem. -
Step 5
Shape Gussets
Note: Where possible, arrange sts so that marker placement occurs between needles.
Set-up rnd: Sl 1 pwise wyb, k8, pm for beginning of round, k9, pick up and knit (see Glossary) 1 st in each sl st along edge of heel flap plus 1 st between heel flap and top of foot, pm for foot right side, resume working in the rnd on held sts by working Rnd 1 from Top of Foot chart, pm for foot left side, pick up and knit 1 st between top of foot and heel flap and 1 st in each sl st along edge of heel flap, k9.
Rnd 1: Knit to 2 sts before right m, k2tog, work in patt (following Top of Foot chart) to left m, ssk, knit to beginning of rnd m—2 sts dec’d.
Rnd 2: Knit to right m, work in patt to left m, sl m, knit to
beginning of rnd m.
Rep Rnds 1 and 2 until 70 sts rem (42 sts for top of foot and 28 sts for sole). -
 Step 6
Foot
Work even in patt until foot measures about (but not more than) 2" (5 cm) less than desired length from back of heel, ending with Rnd 9 or 19 of Top of Foot chart. Dec 10 sts on next rnd as foll:
• If last rnd worked was Row 9, knit to right m, [p2, Cable Decrease 2 Left, k2] 5 times, p2—60 sts rem (32 sts for top of foot, 28 sts for sole).
• If last rnd worked was Rnd 19, knit to right m, [p2, k2, Cable Decrease 2 Right] 5 times, p2—60 sts rem (32 sts for top of foot, 28 sts for sole).
Sl first and last sts from top of foot to sole—30 sts each for top of foot and sole.
Work even in St st until foot measures 2" (5 cm) less than desired length from back of heel. Remove m for beginning of round, knit to right m (new beg of rnd). -
Step 7
Toe
Rnd 1: Knit.
Rnd 2: K1, ssk, knit to 3 sts before left m, k2tog, k1, k1, ssk, knit to 3 sts before m, k2tog, k1—4 sts dec’d.
Rep Rnds 1 and 2 ten more times—16 sts rem. Divide sts
evenly over 2 needles so that there are 8 sts each for top of
foot and sole. -
 Step 8
Finishing
Cut yarn, leaving a 12" (30.5 cm) tail. With tail threaded on a tapestry needle, use the Kitchener st (see Glossary) to graft sts. Weave in ends.


Comments

