


About
Make this fabulous 60's style necklace that'll have you truly loved up!
N.B. On the diagrams, we have shown the violet strands in 2 slightly different shades to make the instructions easy to follow
-
 Key West Witch added Summer Of Love Necklace to Jewelry
30 Jun 04:49
Key West Witch added Summer Of Love Necklace to Jewelry
30 Jun 04:49
-
 Kd L. favorited Summer Of Love Necklace
22 Dec 19:56
Kd L. favorited Summer Of Love Necklace
22 Dec 19:56
-
veronica f. favorited Summer Of Love Necklace
19 Dec 20:36
-
 agneyi favorited Summer Of Love Necklace
01 Mar 12:20
agneyi favorited Summer Of Love Necklace
01 Mar 12:20
-
agneyi commented on Summer Of Love Necklace
01 Mar 12:19
-
 Joy A. added Summer Of Love Necklace to Jewerly
17 Feb 21:56
Joy A. added Summer Of Love Necklace to Jewerly
17 Feb 21:56
-
 Dani A. added Summer Of Love Necklace to Macrame,etc
07 Nov 12:58
Dani A. added Summer Of Love Necklace to Macrame,etc
07 Nov 12:58
You Will Need
-
 Step 1
To make the first side of your necklace cut 2 x 1m lengths of turquoise waxed cord and 2 x 2.5m lengths of violet waxed cord. Knot them together about 5cm from the ends. The 2 turquoise lengths will be the central strands and these are known as the ‘lazy cords’. The violet lengths will be your outside cords and these are the ones you knot with.
-
 Step 2
Tie an overhand knot by taking the left hand cord over the lazy cords and the right hand cord under them. Pull tight.
-
 Step 3
Now tie a second overhand knot, this time taking the right hand cord over the lazy cords and the left hand under them. Basically this is the same as the first knot but reversed. Repeat steps 2 and 3 until you have about a 5cm length of knotting.
-
 Step 4
Adding beads to your necklace is easy. Simply thread any 1 of your round beads onto the 2 lazy threads and knot underneath. Continue knotting another couple of centimetres and then add your next bead. Knot a couple more centimetres.
-
 Step 5
When you wish to add a flower, pass one of the outside threads through the central hole of the flower and then continue knotting until you want to add your next bead. The charms are added in the same way. Repeat steps 2 to 3 until your piece is about 28cm in length and has about 7 beads (including flowers and charms) on it. After the last of the 7 beads, finish off with another couple of centimetres of knotting. Do not trim! Repeat steps 1 to 5 to make the second side.
-
 Step 6
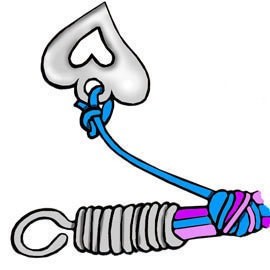
On one of your pieces, trim 3 of the 5cm ends you started at to about 2cm long. Add a leather crimp by inserting the 3 trimmed ends into the crimp and squeezing the end ring shut with flat nosed pliers. Repeat on the other piece. Add your hook to one side. Add a charm to each of the 2 remaining strands, knotting to secure.
-
 Step 7
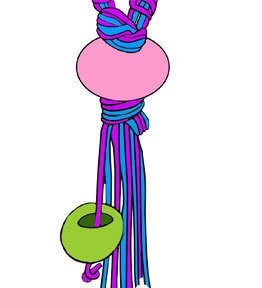
To join the two halves together, at the opposite end to the leather ends and hooks, knot all of the strands together, directly underneath the last knots. Thread all of the strands through one ceramic bead and knot underneath. On each strand add a bead or charm. Knot underneath the bead to secure in different positions so that the tassels hang at random lengths. Trim off any excess cord.
-
 Step 8
Your finished necklace should look something like this.


Versions

Comments


