

About
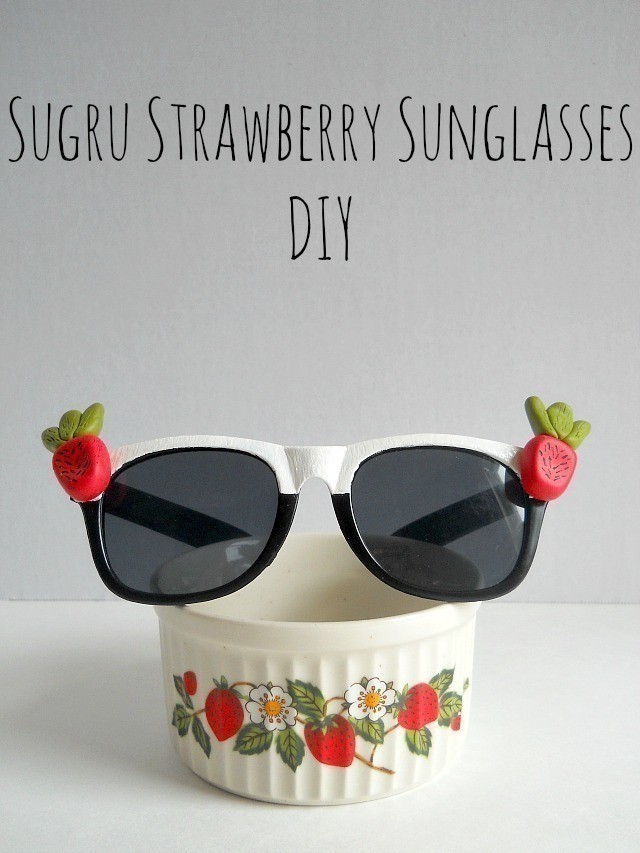
Create A Scrumptious Pair Of Strawberry Sunglasses Using Sugru!
The main product being used in this DIY is Sugru. I was given this product by CutOut + Keep to review and to use in a project. Now before we get into the DIY, let me tell you a little bit about what Sugru actually is.
Sugru is a product that starts out as a mouldable glue, then after 24 hours dries and turns into rubber. According to the maker's website, Sugru is designed to permanently stick to glass, wood, metal, plastic and several other materials. The product itself however, can be used in many different ways. For example, you could make your own grip for crochet hooks or create rubber feet for some-thing like a planter, so it won't scratch your table.
Another important thing to note, is that Sugru comes in many different colors! In the set I received, there were 8 packs of Sugru which came in the colors Classic Red, Woody Brown, Awesome Orange, Panther Pink, Sliver Grey, Royal Blue, Mossy Green and Sunny Yellow. Besides these colors, Sugru is also available in black and white.
Now I had never used Sugru before, so it took me a little while to decide what to actually make with the product. Then one day I was flipping through a magazine and saw an expensive pair of sunglasses which were decorated with little pieces of fruit. Since summer is right around the corner, I thought it would be fun to create my own version of the sunglasses but make the pieces of fruit out of Sugru!
After creating the sunglasses and using the Sugru, I was very happy with the final results. I thought that the Sugru had many ''characteristics'' of clay which made it easy to shape and mould. The only thing that I noticed, was that you had to be mindful of how long you worked with the Sugru. On the packaging it mentioned that you only had about a half hour to mould and shape your Sugru. If you worked with the Sugru longer than that, the product would start to crack.
With that being said, my one tip when working with this product is to practice! Before I started my project, I used the Sliver Grey (since it was my least favorite color) to practice and to get use to the Sugru. This helped me later on in the DIY process because I already knew how I was going to shape my strawberry.
All in all, I thought the product worked really well for this small project and that the fruit itself came out looking pretty realistic!
-
 Kinhime Dragon favorited Sugru Strawberry Sunglasses Diy
01 Jan 18:13
Kinhime Dragon favorited Sugru Strawberry Sunglasses Diy
01 Jan 18:13
-
 jaisa.riley favorited Sugru Strawberry Sunglasses Diy
31 Aug 16:35
jaisa.riley favorited Sugru Strawberry Sunglasses Diy
31 Aug 16:35
-
 Pam ^_^ favorited Sugru Strawberry Sunglasses Diy
21 Jul 02:16
Pam ^_^ favorited Sugru Strawberry Sunglasses Diy
21 Jul 02:16
-
 Katie K. published her project Sugru Strawberry Sunglasses Diy
15 Jul 06:00
Katie K. published her project Sugru Strawberry Sunglasses Diy
15 Jul 06:00
You Will Need
-
 Step 1
Decide what areas of your sunglasses that you want painted white. Then tape off those areas you don't want painted white with some painters tape. I decided to run a strip of tape down the middle of my sunglasses and only paint the top portion.
Once your sunglasses are taped off, begin painting. You may need to paint at least 2 coats to get a solid white color. When your happy with the look of your sunglasses, set them aside to dry.
-
 Step 2
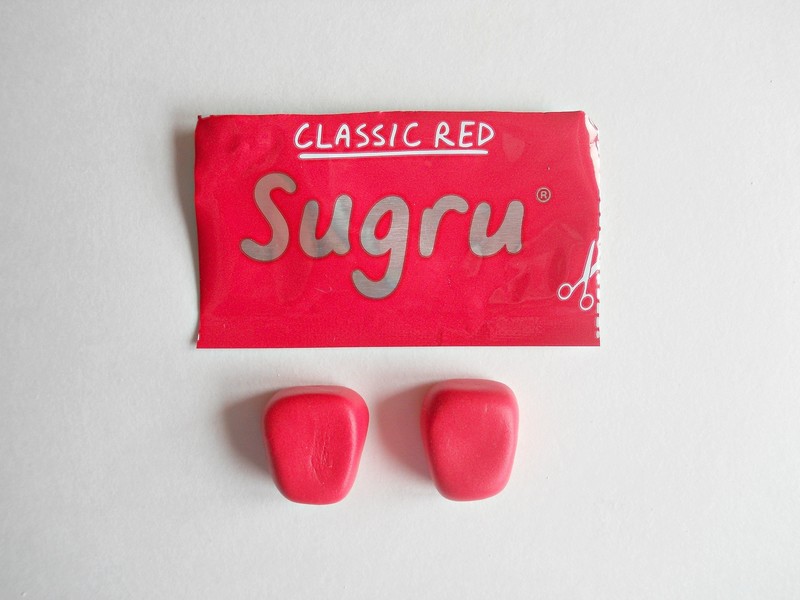
Take your Sugru Red Pack and cut it open. You will want to roll the Sugru in your hands to warm it up until it feels like ''clay''. Once your Sugru feels like ''clay'', separate it into two equal size pieces. These equal pieces should be round little balls which look similar to gumballs.
Then take each ball and begin shaping it into a strawberry. The best way I found to do this was to flatten your piece of Sugru in the middle but then ''square up'' the sides. You may want to refer to the photo to get a better idea of how your strawberry should look.
On a side note, its important to remember that you only have about a half hour to mould and shape your Sugru. So once your happy with the look of your strawberry, don't mess with it anymore (since it may cause your Sugru to develop cracks). Just put it to the side and move on to the next step.
-
 Step 3
Now take your Green pack of Sugru and cut it open. You will again, want to roll the Sugru in your hands to warm it up until it feels like ''clay''. Once your Sugru feels like ''clay'', separate it into six (small) equal size pieces. These equal pieces should be round little balls which look similar to beads.
Take three of your small green balls and roll each of them into a tiny log (similar to the first row in the picture). Then take all three of those logs and press them together (similar to the bottom row in the picture). By doing this you are creating the leaf stem for your strawberry. Repeat this process so you will have two leaf stems when completed.
-
 Step 4
Grab your strawberry bodies and leaf stems. You will want to combine the two by gently pressing the green leaf steam to the body of your strawberry. When your happy with the look of your strawberries, set them aside for 24 hours so they can turn into rubber.
Now before setting them aside you could add some texture to your strawberries to make them look more life like. For example, I took a toothpick and made tiny lines onto the green stems. By doing this it gave my strawberry a more realistic look, however this ''extra step'' is completely optional.
Also once your strawberries have turned to rubber, you can paint on little seeds (with some black paint) to (again) give your strawberries a more realistic look.
-
 Step 5
After 24 hours is up, take your strawberries and apply some E6000 glue to there backs. Then adhere one to each corner of your sunglasses. When your happy with the placement, set it aside to dry.
Once your glasses are dry, you are ready to wear them all around town!