


About
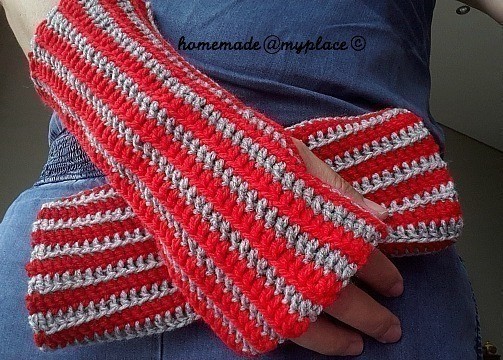
stylish, warm and comfortable! Oh happy fingers !!!!!
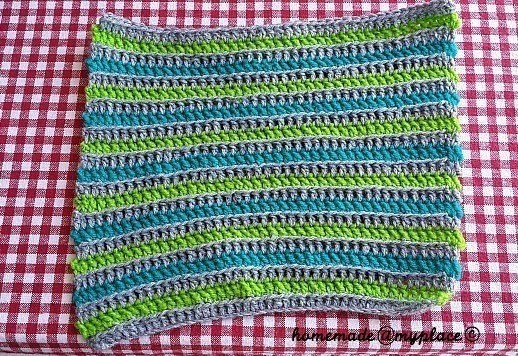
A pair of wrist warmers : why not? With simple stitches and just crocheting few rows, you'll have a colourful and cosy pair of wrist warmers that will not pass unnoticed! No sewing involved : how cool is that, too? ;oD
You can choose 3 different ways to finish them (!!!!) and this pattern is suitable both for girls and boys!
please note that I follow the US crochet terminology!
-
 Key West Witch favorited Stripy Wrist Warmers
05 May 04:43
Key West Witch favorited Stripy Wrist Warmers
05 May 04:43
-
 Rosalie E. favorited Stripy Wrist Warmers
11 Feb 18:47
Rosalie E. favorited Stripy Wrist Warmers
11 Feb 18:47
-
 BerthaAOG favorited Stripy Wrist Warmers
07 Feb 15:42
BerthaAOG favorited Stripy Wrist Warmers
07 Feb 15:42
-
 Chudames favorited Stripy Wrist Warmers
05 Feb 22:51
Chudames favorited Stripy Wrist Warmers
05 Feb 22:51
-
 Annelie S. favorited Stripy Wrist Warmers
04 Feb 16:39
Annelie S. favorited Stripy Wrist Warmers
04 Feb 16:39
-
 Tilda favorited Stripy Wrist Warmers
03 Feb 12:37
Tilda favorited Stripy Wrist Warmers
03 Feb 12:37
-
 Alessandra P. published her project Stripy Wrist Warmers
28 Nov 07:08
Alessandra P. published her project Stripy Wrist Warmers
28 Nov 07:08
-
 Step 1
To start this project you need to pick up the hook and the yarn that you will consider as the "base colour" of your work : in my case, this colour is grey. Choose even other 2 colours ( A and B), but, if you prefer, even just one is sufficient.
Each row of the wrist warmers is worked on the front of your work.PATTERN :
With the grey yarn make a slip knot on the hook and crochet loosely a foundation chain of 45 chains.
ROW 1 : wrap the yarn around the hook and insert the hook in the 5th chain from the hook and make a double crochet (DC). Make one DC in each following chain until the end of the row. You will have 42 DCs (the first one is made of 3 chains!). Cut the yarn and fasten off.
Row 2 : pick a new colour (A). Make a slip knot on the hook and insert it in the top of the first stitch (made of 3 chains!) and make a single crochet (SC). Chain 1 and in the same top of the stitch make a DC. In the following stitches you are going to work one DC in each one , but ONLY INTO THE BACK LOOPS of the stitches! This simple technique will create a nice RIDGED EFFECT (the ridge is formed by the unworked loops)!!
At the end of this row, youwill still have 42 DCs, but the first one is worked normally, while the other 41 are worked into the back loops.
Cut the yarn and fasten off.
ROW 3 : pick colour B or the base colour and make a slip knot on the hook. Insert the hook in the first DC of row 1 and make a SC. Chain 1 and make a DC in the same top of the stitch. Work one normal (not into the back loops) DC in each following stitch. At the end of the row you will have 42 normal DCs.
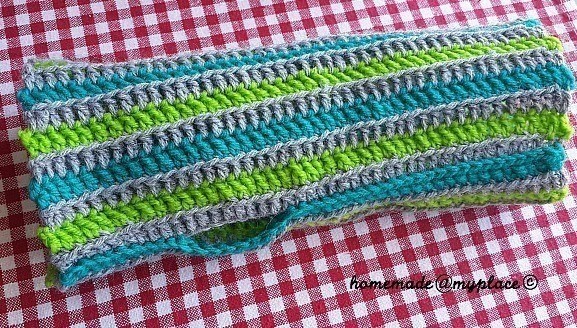
Cut the yarn and fasten off.REPEAT ROWS 2 and 3 until you complete ROW 23.
-
 Step 2
a zoom in to see the ridges formed by working into the back loops.
Look at the tops of the grey stitches! -
 Step 3
This is the rectangle you will have after completing ROW 23.
-
 Step 4
VERSION 1 : BASIC FINISH (and good even for boys)
Work with the back of your work in front of you and trim in the ends.
Now, fold the 2 long sides in front of you, so that they almost meet.
Collect 2 stitch markers. -
 Step 5
This is how the rectangle is, once folded.
-
 Step 6
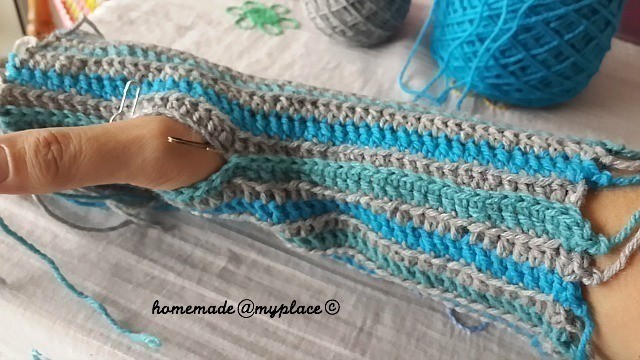
Before joining the 2 sides together, you must define the space where your thumb is free to slide out. To do that, just consider the top fold and, from left to right, count 10 stitches. Collect one stitch marker and put it around the 11th stitch. Continue your counting and, when you reach the 18th stitch, put your 2nd stitch marker around it. Between the stitch markers you have the area for your thumb!
-
 Step 7
How to join the 2 sides?
You have to crochet one last row, that is ROW 24!
Pick the right colour (base colour? A?B?) and make a slip knot on the hook. Please note that you have to crochet a row of DCs into the back loops only, as for ROW 2.
But not only! Now you'll see what I mean!
Insert the hook in the top of the first DC of row 23 and, as usual, make a SC and chain 1. Then make a normal DC in the same top of the stitch. But here start the difference! When you have completed the first half of the stitch, you have to insert the hook in the base of the first stitch of the first row, wrap the yarn around the hook, pull it trough all the loops (base of first stitch+2 last loops of your DC) and its done! You have joined the first stitches of both rows together!!!
Continue in this way, remembering to work DCs into back loops ! Stop before the stitch marker! -
 Step 8
You have joined 24 stitches.
The next 8 stitches DON'T HAVE TO BE JOINED!
In fact, you work 8 SCs along the bottom top, while ignoring the 8 stitches between the stitch markers.
After this gap, you join the last 10 stitches (starting just after the stitch marker) as the previous 24!
Cut the yarn and fasten off. -
 Step 9
Your first wrist warmer is done !!!!
Make another one and you'll have a pair !!! ;oD -
 Step 10
VERSION 2 : WITH MINI KNOTS
You don't have to trim in the ends before joining the 2 sides of the crocheted rectangle, but keep them!
Knot them in pairs (3 little knots) and cut the excess of yarn. I cut my tails 0,5cm long after the knots!
The tails, on both sides, are in odd numbers : the extra tail could be finish wit a couple of knots, then cut the excess!!! -
 Step 11
VERSION 3 : HALF/HALF
Just trim in the ends at the top of your wrist warmers, while knot them at the base.
If you like, you can add a row of SCs at the top, using a nice contrasting colour!!!