

About
Stenciling onto washi tape? It can be done—and it gives a crisp, clean silhouette!
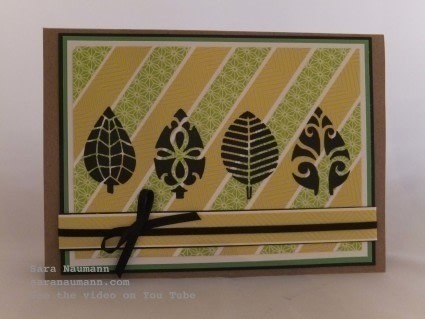
I can’t resist washi tape for cardmaking, and I love how easily you can combine a washi tape background with stenciling and embossing paste to create a really crisp, modern design. While the creation of the design is quick and easy, you'll need to allow for the embossing paste to dry.
-
 cj A. favorited Stenciled Cards With Washi Tape And Embossing Paste
13 Jan 04:28
cj A. favorited Stenciled Cards With Washi Tape And Embossing Paste
13 Jan 04:28
-
 Sara N. published her project Stenciled Cards With Washi Tape And Embossing Paste
12 Nov 06:00
Sara N. published her project Stenciled Cards With Washi Tape And Embossing Paste
12 Nov 06:00
You Will Need
-
Step 1
Apply strips of washi tape diagonally across a piece of white cardstock. Alternate the two patterns, leaving a small space between each strip. Trim the excess tape from the edges.
-
Step 2
Place the stencil on the washi tape background and secure with more washi tape. (Using washi tape on washi tape means the stencil will be easier and quicker to remove.) Mask off other areas of the stencil with sticky notes.
-
Step 3
Use the palette knife to apply embossing paste through the stencil. Remove the stencil by lifting straight up, then be sure to clean it right away with soap and water. Let the embossing paste dry.
-
Step 4
Mat on white, green and black cardstock. Adhere yellow/gray washi tape to a strip of white cardstock, mat on black and glue at the bottom of the stenciled piece, wrapping the ends to the back. Wrap with black ribbon and glue a black ribbon bow as shown.
-
Step 5
Glue to the center of the kraft card.
