

About
Steam Your Own Silk Painting Tutorial
You can also just use a small hotplate and a smaller pipe. It will just take a bit longer to heat up.
-
 Karen C. commented on Steam Your Own Silk Painting
19 Mar 19:19
Karen C. commented on Steam Your Own Silk Painting
19 Mar 19:19
-
 Rekha S. favorited Steam Your Own Silk Painting
14 May 06:08
Rekha S. favorited Steam Your Own Silk Painting
14 May 06:08
-
 GothicYolita favorited Steam Your Own Silk Painting
21 Jun 14:56
GothicYolita favorited Steam Your Own Silk Painting
21 Jun 14:56
You Will Need
-
 Step 1
First you need a hot plate with at least one burner. This hot plate must be powerful enough to maintain boiling temperature for 3 hours. I bought a used industrial strength one at a second-hand restaurant supply store. Make sure it has infinite heat controls ie. the control knobs don't have just a high, medium or low setting but can be controlled gradually.
-
 Step 2
Then you need a very large Stock pot that can hold enough water so you don't run out during the 3 hours of steaming! Leave a few inches of space between the water and the top so the water doesn't splash up and damage your piece.
-
 Step 3
Place an upside down pot cover with holes drilled in it like this 13" (33cm) Wok lid or a colander of some kind to cover the pot. This will serve as a barrier and holder for the 12" (30cm) galvanized Stove Pipe that will rest on top.
-
 Step 4
Then duct tape the Wok lid to the rim of the pot and place the Stove Pipe tube on the lid. Duct tape the Stove Pipe to the lid. Make sure all holes are covered and little or no steam escapes.
-
 Step 5
File two slots in the top of the Stove Pipe like this picture so you can lodge the rod in there which your piece will hang from.
-
 Step 6
The next step is to roll up your completed silk painting in brown paper and old sheets. Lay down a piece of brown paper leaving plenty of room both above and below the edges of the silk. Also create a core tube out of the brown paper so the steam can go up inside the roll. Use 2 - 3 sheets to layer your painting with. Projects with a lot of concentrated dye and/or gutta will need more layers of sheets to absorb excesses. From bottom (outer) to top (inner):
Outer - brown paper
Next - cotton sheet
Middle - silk scarf
Next - cotton sheet
Inner - brown paper -
 Step 7
Roll your package up carefully so it doesn't wrinkle. Any wrinkles will be steam set and hard to remove later. Secure with masking tape so it doesn't come undone.
-
 Step 8
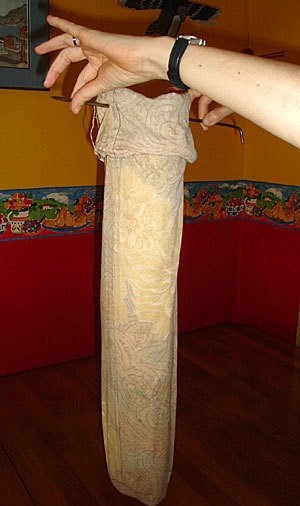
Sew a long bag out of an old sheet and place your roll in it.
-
 Step 9
Cut a brass rod which you can find at almost any hardware store and file a sharp point on one end. Bend the other end and file a groove in that end so it slides into the slots in the stove pipe and doesn't slip. Pierce the bag with the rod at the top so it hangs evenly.
-
 Step 10
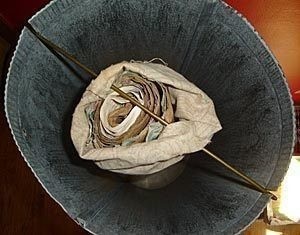
Place the rod in the slots you made earlier at the top of the Stove Pipe. Make sure the sides of the bag do not touch the sides of the Pipe and there are a couple of inches of space around the bag. Condensation in the Pipe will cause water damage if it comes in contact with the bag.
-
 Step 11
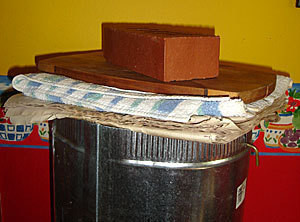
Then place a layer of newspaper about 1/2 inch (1cm) thick, a towel layer and then a flat piece of wood and finally a weight on top. I stick a meat thermometer in one of the slots to measure the temperature of the steam as it exits the slots. I also bolt the stove pipe to a piece of wood attached to a door frame (not shown) so that the assembly cannot fall over and scald anyone.
Turn the hot plate on high until LIVE STEAM (100 degrees C, 212 degrees F) comes out of the slots at the top. Then you can reduce the controls a bit as long as the live steam continues to flow out. Steam for 3 hours or for however long your dyes require. When removing the bundle use oven mitts!
So, that's how I have built my steamer and steam my silk paintings which works very well. It might look complicated at first and it is a bit of work to get set up, but once you've done that it's easy! Steam setting is definitely the best way to get the brightest and longest lasting color on silk.


Comments


