


About
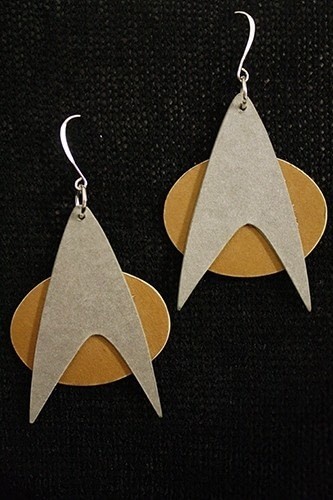
The perfect jewelry for galactic exploration
These earrings will clearly demonstrate your love of Star Trek, and on top of that they're inexpensive to make and totally lightweight since they're constructed of paper.
Try out this technique with other shapes as well, to create other styles of earrings and accessories.
Tags
-
 Chudames favorited Star Trek Combadge Earrings (Or Pin)
19 Nov 19:52
Chudames favorited Star Trek Combadge Earrings (Or Pin)
19 Nov 19:52
-
 Magenta favorited Star Trek Combadge Earrings (Or Pin)
17 Jul 01:34
Magenta favorited Star Trek Combadge Earrings (Or Pin)
17 Jul 01:34
-
 Julie s. favorited Star Trek Combadge Earrings (Or Pin)
04 Apr 14:13
Julie s. favorited Star Trek Combadge Earrings (Or Pin)
04 Apr 14:13
-
 happyliltoaster favorited Star Trek Combadge Earrings (Or Pin)
14 Jan 04:00
happyliltoaster favorited Star Trek Combadge Earrings (Or Pin)
14 Jan 04:00
-
 CreativeGirl79 favorited Star Trek Combadge Earrings (Or Pin)
16 Dec 01:00
CreativeGirl79 favorited Star Trek Combadge Earrings (Or Pin)
16 Dec 01:00
-
 Alex B. favorited Star Trek Combadge Earrings (Or Pin)
13 Dec 19:22
Alex B. favorited Star Trek Combadge Earrings (Or Pin)
13 Dec 19:22
-
 Morgaine O. favorited Star Trek Combadge Earrings (Or Pin)
21 Jul 02:11
Morgaine O. favorited Star Trek Combadge Earrings (Or Pin)
21 Jul 02:11
-
 Conner W. added Star Trek Combadge Earrings (Or Pin) to fantasy stuff
28 Jun 18:23
Conner W. added Star Trek Combadge Earrings (Or Pin) to fantasy stuff
28 Jun 18:23
-
Conner W. added Star Trek Combadge Earrings (Or Pin) to fashion
28 Jun 18:23
-
Conner W. favorited Star Trek Combadge Earrings (Or Pin)
28 Jun 03:40
You Will Need
-
 Step 1
First you’ll need a combadge image to trace.
Just do a Google image search, find a clear picture of the iteration of combadge you want to make, and either print the image out and cut out the shape, or just trace it directly off your computer screen.
Either way, you can also adjust the image for size, to make larger or smaller earrings.
-
 Step 2
Take your combadge image, cut it out and trace it onto your gold or silver card stock (whichever colour is appropriate for the combadge iteration you're doing).
Trace it multiple times – three to four times per earring.
(I transferred my image onto a piece of plain card stock first, and then traced that onto the silver card stock, since that was easier to trace around than flimsy computer paper.)
-
 Step 3
Cut out each shape, very carefully and neatly.
-
 Step 4
When all your pieces are cut out, divide them into two sets.
Apply glue* to one of your pieces, then place another piece on top of it, matching up their edges exactly. Press together.
Repeat this until all of the pieces in one of your sets are glued together.
Then glue together the pieces of the other set. So now you should have two glued-together stacks of combadge shapes.
(*I strongly recommend using a gluestick for this. Any kind of wet or gel glue in this situation is liable to leak out the edges and get messy, and might cause the paper to warp or ripple.)
-
 Step 5
If you're making a combadge that has multiple parts, now trace the other pieces onto the appropriate colour of card stock multiple times, cut those out and glue them together, just like you did with the first set of pieces in steps 1-5.
-
Step 6
Place all your glued-together paper pieces under a large book or other flat, heavy object and allow them to dry completely.
-
 Step 7
Optional step: sanding! You don’t have to do this, but I like the slightly more finished look it gives the piece.
Take a small piece of fine grain sandpaper and lightly sand the edges of each paper shape. You’ll want to do this on the back and the front of each shape: you’re sanding along its edge, but slanting slightly onto the face of the piece as well, so first do it slanting onto the front face, then slanting onto the back face.
This gives the pieces a slightly round-edged and more completed look. It also helps to hide the fact that each shape is multiple pieces of paper glued together, rather that one solid piece.
-
 Step 8
To make a pin instead of earrings, skip ahead to step 9.
Now get out your drill and a small drill bit. Make a pencil mark in the same place at the top of each Starfleet logo piece, and drill a small hole there.*
*Put an old phone book underneath, so that when the drill goes through the combadge it just drills harmlessly into the phone book.
-
 Step 9
Now use your superglue or other strong adhesive to attach the multiple pieces of your combadge, if the combadge iteration you’re recreating has multiple pieces.
Don’t use too much glue, or it’ll leak out the edges and make your nice neat surfaces all messy.
-
 Step 10
And finally, time to varnish it up!
You can skip this step too if you like, but I recommend it as it gives the whole piece more durability and a bit of extra shine.
Varnish options: You can get a can of clear varnish from the hardware store (go with water-based, it’s waaaay easier to clean off of brushes and fingers and anything else).
Or you can use some form of polyvinyl acetate (often mixed with paint to add or subtract shine, dilute the colour a bit or just make the paint last longer, sometimes used in bookbinding) and paint a couple coats of that on.
Or simply seal with a coat or two of Mod Podge.
-
 Step 11
Once the varnish is dry, use your needle nosed or jewelry pliers to attach jump rings and earring hooks.
If you decided to make a pin instead of earrings, glue a pin backing onto the back of your combadge.


Comments

