


About
Makery
I made a huge one of these for our
Christmas window display one year at
The Makery, and months later he was still
up there! We have so many comments and
requests for the pattern, I thought it was
high time I shared him with you all.
This stag is somewhat smaller than my
original, but equally charming, I think.
Downloads
- stag_01.tif 129 KB [ Download ]
-
 Key West Witch favorited Stag Head
12 Sep 05:58
Key West Witch favorited Stag Head
12 Sep 05:58
-
 Sergio C. favorited Stag Head
16 Oct 17:53
Sergio C. favorited Stag Head
16 Oct 17:53
-
 Florence B. favorited Stag Head
06 Sep 07:06
Florence B. favorited Stag Head
06 Sep 07:06
-
Rebecca M. favorited Stag Head
19 Jun 14:26
-
 Abbey S. favorited Stag Head
08 Oct 14:50
Abbey S. favorited Stag Head
08 Oct 14:50
-
 sian d. favorited Stag Head
05 Sep 20:26
sian d. favorited Stag Head
05 Sep 20:26
-
 Quackers, Vino & Cheese favorited Stag Head
23 May 19:59
Quackers, Vino & Cheese favorited Stag Head
23 May 19:59
-
 Chudames favorited Stag Head
31 Mar 22:41
Chudames favorited Stag Head
31 Mar 22:41
-
 RavenQuinzel added Stag Head to Home stuff
10 Jan 12:00
RavenQuinzel added Stag Head to Home stuff
10 Jan 12:00
-
 Emma H. favorited Stag Head
27 May 11:40
Emma H. favorited Stag Head
27 May 11:40
-
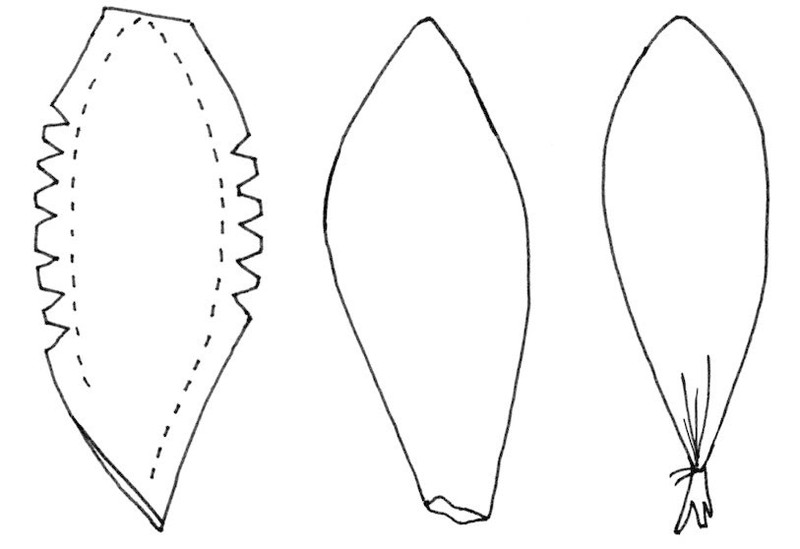
Step 1
Make the antlers and ears
Begin by cutting out all your felt and fabric
pieces: 4 x antlers from the felt; 4 x ears, 2 x
side heads, 1 x top head and 1 x back head from
the fabric. Use pins to mark the ear positions
and also points A and B on the side head pieces.
Snip the notches on the side head and top head
pieces. Use pins to mark the dots and the loop
hanging position on the back head piece. -
Step 2
To make the antlers, first place one of the felt
antler pieces on top of another and pin them
together. Machine top-stitch all the way around
the antler, leaving the bottom (straight) edge
open – you need a very small seam allowance
here, no more than 0.5cm ( in). Repeat with the
other two felt antler pieces. -
Step 3
Now stuff the antlers. Gently push the stuffing
in, a little at a time. You’ll find it very hard to
poke the stuffing all the way into the ends with
your fingers, so use a knitting needle. The antlers
need to be rigid enough to stand up. No one likes
a floppy antler. -
 Step 4
For the ears, place one pair of fabric ear
pieces right sides together and machine stitch
round the curved sides with a 1cm (¼in) seam
allowance, leaving the straight edge open.
Clip the corners to reduce some bulk, then turn
ear the right way out. Again, you might need
your knitting needle to help you. Pinch the ear
in half at the open seam and tack together at
the bottom with a couple of hand stitches.
Repeat for the other ear. -
Step 5
SEW AND STUFF the head
Take one finished ear and tack it to one of
the side head pieces, as noted on the pattern,
on the right side of the fabric with raw edges
aligned. You need to ensure that the open side
of the ear is facing towards the nose of the
head piece. Repeat with the other ear and
second side head piece. -
 Step 6
Take the top head piece and pin it to one
side head piece, right sides together, matching
the notches and point A. Machine stitch in
place with a 1cm (¼in) seam allowance.
Match the top head piece to
the other side head piece, and again machine
stitch in place, matching the notches. -
Step 7
Now machine stitch the two side head pieces
together from the nose point around to the
bottom of the neck, between the pins (points
A to B on your pattern), leaving a 1cm (¼in)
seam allowance. -
Step 8
Then machine stitch the two side head pieces
together at the top, between points C and D.
Pin and machine stitch in place with a 1cm (¼in)
seam allowance. -
Step 9
Take the back head piece and pin it to the rest
of the head, right sides together, all the way
around the opening you’ve left at the back of the
neck. Machine stitch in place with a 1cm (¼in)
seam allowance, leaving a 10cm (4in) opening
at the bottom. Clip all curves. -
Step 10
Turn the head right-side out and stuff it with
polyester stuffing so that it’s rigid enough to
stay upright. -
Step 11
Finish your stag
Decide where you would like your stag’s eyes
to be. I position them about 7.5cm (3in) apart and
6.5cm (2¾in) down from the antlers. Mark with
tailor’s chalk or an erasable fabric marker. -
 Step 12
To make the eye dimples, I have a nifty method
that means you don’t end up with knots or ends.
First cut a piece of thread about 80cm (32in) and
fold it in half. Thread the two cut ends through
the eye of the long needle, to make a big loop.
Push the needle into one eye position and bring
it out of the other eye – but don’t pull it all the
way; you want to leave a loop on the first side. -
 Step 13
Push the needle back in at the second eye,
0.2cm ( in) away from where it just came out,
through to the first eye and through the loop.
Now pull the needle all the way,
making the thread taut so that it dimples the
eyes and gives the face some shape. When
you’re happy with the appearance, make a
couple more stitches on each side, then finish
by bringing the needle up some distance from
the eye and snipping the thread neatly, so it
disappears inside the the fabric and stuffing. -
Step 14
Now make a loop with the embroidery thread
and stitch it to the marked position (given on the
pattern) on the back head piece, so that you can
hang your stag up for all to admire.7. Hand stitch the opening in the bottom of
the head with ladder stitch.
Position the antlers on the top of the stag’s
head, as noted on the pattern. Hand stitch
in place using ladder stitch.


Versions


Comments


