


About
Kitty cat ears for halloween or just for going meow...
Easy sew, set of kitty ears just in time for Halloween. I was looking for some in shops but all the ones I found weren't very good and expensive, so I made my own.
I think I've explained it in order but it will be worth reading through before starting...
Things you'll need.
Black fabric - velvet, short piled fake fur or felt
Pink fabric - felt, silk
Black sticky backed felt or Duct tape or stiff black card with glue
Cheap headband/Alice band
Small bit of white Marabou Feather boa or bit of white fake fur
Sheet of paper
Small bit of funky foam or stiff interface fabric (or a bit of card)
Glue gun
Sewing machine (you can hand sew but I'm lazy)
Tags
-
 Loviiletter favorited Squashedkitty's Kitty Ears
05 Oct 06:51
Loviiletter favorited Squashedkitty's Kitty Ears
05 Oct 06:51
-
 CK Garred favorited Squashedkitty's Kitty Ears
05 May 16:57
CK Garred favorited Squashedkitty's Kitty Ears
05 May 16:57
-
 gypsy abru added Squashedkitty's Kitty Ears to how to costume
27 Dec 04:12
gypsy abru added Squashedkitty's Kitty Ears to how to costume
27 Dec 04:12
-
 Kichiru added Squashedkitty's Kitty Ears to Totoro, Pikatchu ~ kawaii animals 83
19 May 12:06
Kichiru added Squashedkitty's Kitty Ears to Totoro, Pikatchu ~ kawaii animals 83
19 May 12:06
-
Kichiru added Squashedkitty's Kitty Ears to Really do this !
18 May 18:17
-
Kichiru favorited Squashedkitty's Kitty Ears
18 May 18:17
-
 Aurelie L. added Squashedkitty's Kitty Ears to Accessoires Déguisement
14 Mar 21:24
Aurelie L. added Squashedkitty's Kitty Ears to Accessoires Déguisement
14 Mar 21:24
-
Sarah C. added Squashedkitty's Kitty Ears to Project 1
15 Jan 00:43
-
 The True Fox favorited Squashedkitty's Kitty Ears
27 Nov 17:47
The True Fox favorited Squashedkitty's Kitty Ears
27 Nov 17:47
-
 FrankieStein favorited Squashedkitty's Kitty Ears
12 Nov 05:47
FrankieStein favorited Squashedkitty's Kitty Ears
12 Nov 05:47
-
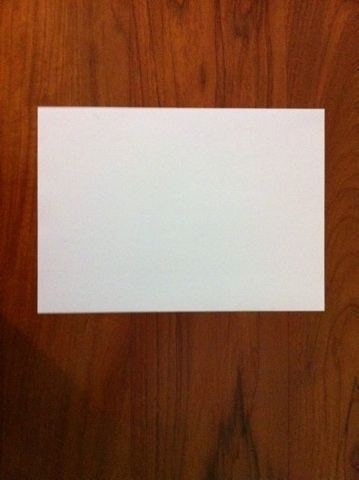
 Step 1
Let's make the pattern, take a sheet of A4 (or for some of you a sheet of Letter size paper).
-
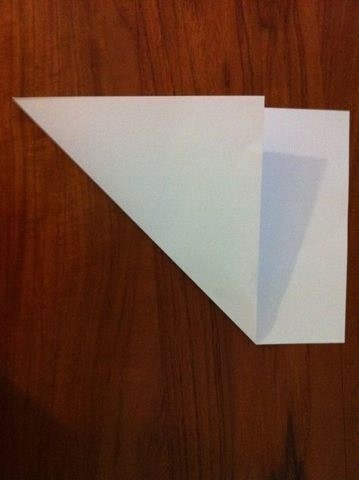
 Step 2
Fold the paper over to make a triangle...
-
 Step 3
Cut off the triangle and recycle the rest of the paper :O)
-
 Step 4
Fold the corners of the triangle to make a square...
-
 Step 5
Take the triangle and use the folds to define the bottom edges of a cone (hope that makes sense!)
-
 Step 6
Across the cone base, mark a line...
-
 Step 7
Cut off the ends of the triangle...
-
 Step 8
Unfold the cone and you have your ear pattern. Sorry if that seemed over complicated :O)
-
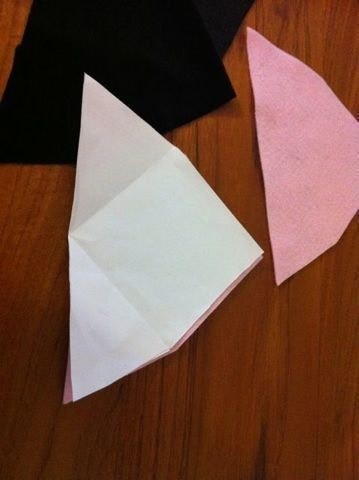
 Step 9
Cut out 2 copies of the pattern in the black fabric - MAKE SURE that you allow about 2 cm or about an 1 inch around the point end of the pattern, like in the picture.
Please note the way the paper pattern is sitting on the black that is the way you will position your pink fabric in step 11
-
 Step 10
Cut out 2 copies of the pattern in the pink fabric - the same size as the pattern
-
 Step 11
Place on of the pink pieces onto one of the black pieces line up the bottom of the triangle, then fold a simple hem by doing a double fold of the black fabric trapping the pink fabric. So I mean fold about 1 cm (half an inch) then fold it again by the same amount which will capture the pink fabric. Pin and sew the hem. DO NOT sew across the bottom of the triangle only the hems.
-
 Step 12
You'll need to snip off the top corner to get a neat fold at the top of the hem.
Do both the ears...
-
 Step 13
You should now have to triangle shaped pink and black pockets. To stiffen the ears and make them less floppy I inserted a triangle of funky foam/stiff fabric about half the size of the whole triangle. Push it all the way to the top of the ear.
-
 Step 14
Get your bits of boa/fur...
-
 Step 15
Fold each ear...
-
 Step 16
Trap a bit of the boa/fake fur in the fold...
-
 Step 17
Sew the line that I've marked in the picture, from the point of the fold to about a third of the way down, make sure you trap the fur/boa
-
 Step 18
Hopefully you can see the line that I sewed across the ear...
-
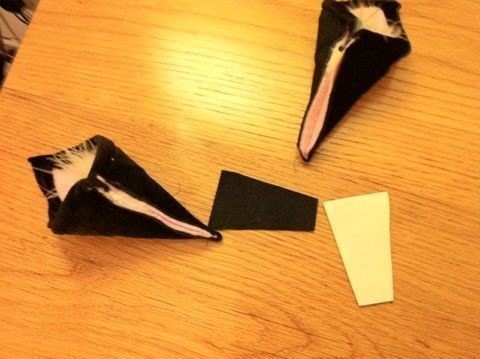
 Step 19
Now trim off the two flaps close to the sewn line...
(As an after thought I should really revise the pattern-but you can adjust the size of the ears in the last few steps!)
-
 Step 20
I used sticky back felt for this bit but you could use contact adhesive and black card or even duct tape...
Cut some trapezoids (sloppy squares) to stick to the bottom of the ear...
I really like sticky back felt it's easy to cut, sticks well and it's cheap!
-
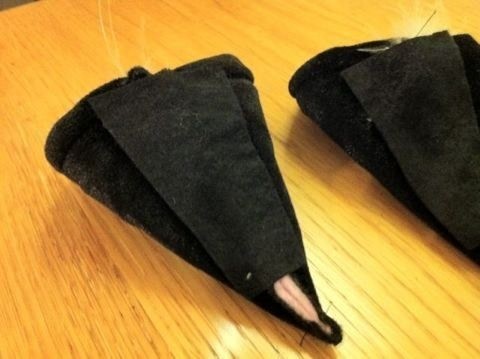
 Step 21
Here are the ears with the felt bottoms...
-
 Step 22
Flip the ears over, so it's sitting on the felt bottom and sew across the marked line...
-
 Step 23
This last bit of sewing, helps keep the ears in shape and also creates a grove for the head band/Alice band.
-
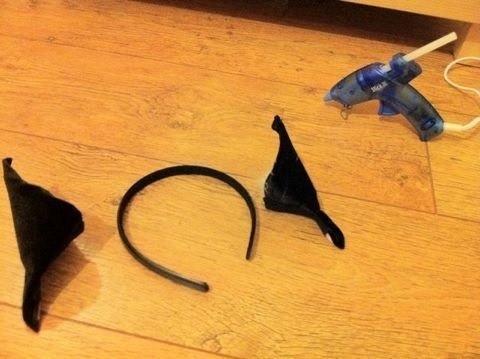
 Step 24
Hot glue time! - check in a mirror where you want the ears to sit of the band - put the band on you head when you check for ear position, I guessed the first time and got it wrong :O(
-
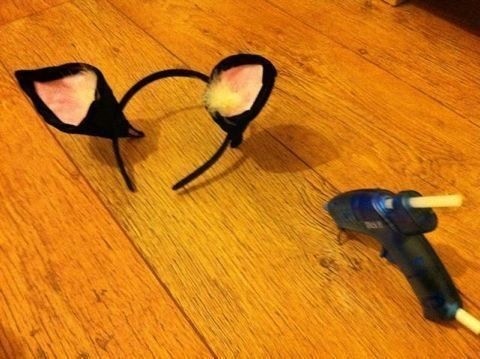
 Step 25
The grove caused by the last bit of sewing makes a fantastic glue line...
-
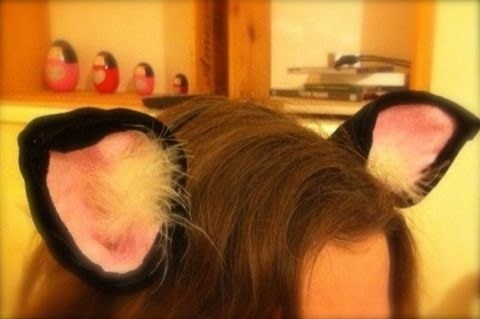
 Step 26
Meow... all done...


Comments

