About
Make a granny squares bag!
-
 t o. favorited Squares Bag
17 Jan 16:06
t o. favorited Squares Bag
17 Jan 16:06
-
 Ruth H. favorited Squares Bag
04 May 06:56
Ruth H. favorited Squares Bag
04 May 06:56
-
 Glenda W. favorited Squares Bag
30 Jul 00:23
Glenda W. favorited Squares Bag
30 Jul 00:23
-
Ella S. favorited Squares Bag
24 Nov 00:59
-
 BerthaAOG favorited Squares Bag
27 Jun 13:19
BerthaAOG favorited Squares Bag
27 Jun 13:19
-
 Carmen favorited Squares Bag
08 Dec 12:32
Carmen favorited Squares Bag
08 Dec 12:32
-
 mary.stuerke.7 added Squares Bag to Crochet
18 Sep 14:08
mary.stuerke.7 added Squares Bag to Crochet
18 Sep 14:08
-
 janisariot favorited Squares Bag
18 Aug 06:29
janisariot favorited Squares Bag
18 Aug 06:29
-
Belle W. favorited Squares Bag
02 Jul 13:03
-
SheepyFace favorited Squares Bag
22 May 18:24
You Will Need
-
 Step 1
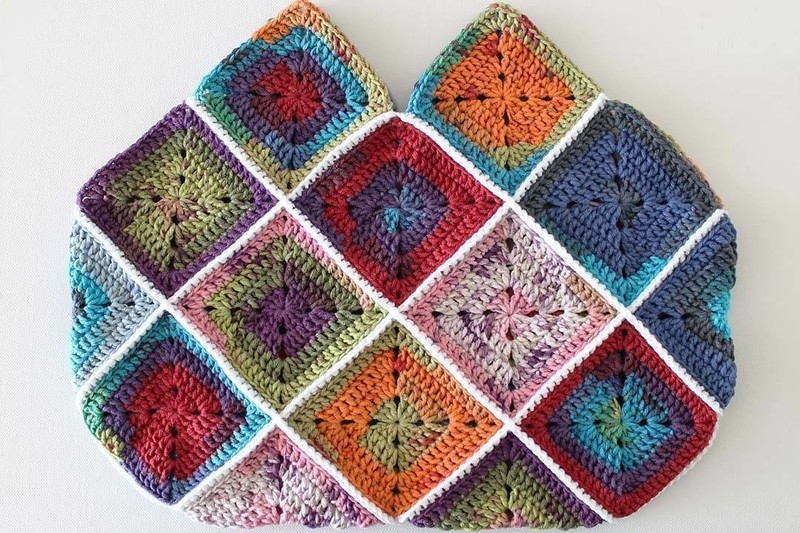
Make 24 solid granny squares.
-
 Step 2
ay out your squares according to the diagram. Try to space out your colours a bit; I made sure that the blues were evenly distributed, and that there were no ‘colour clumps’.
-
 Step 3
Crochet your squares together, following the diagram. Grab the two first squares, and put them wrong side together.
-
 Step 4
Now join them using the single crochet stitch, through the back loops only.
-
 Step 5
I usually first crochet all horizontal sides together, and then the vertical sides.
-
 Step 6
Your bag should now start to take shape. If you followed the diagram, your bag should look something like this:
-
 Step 7
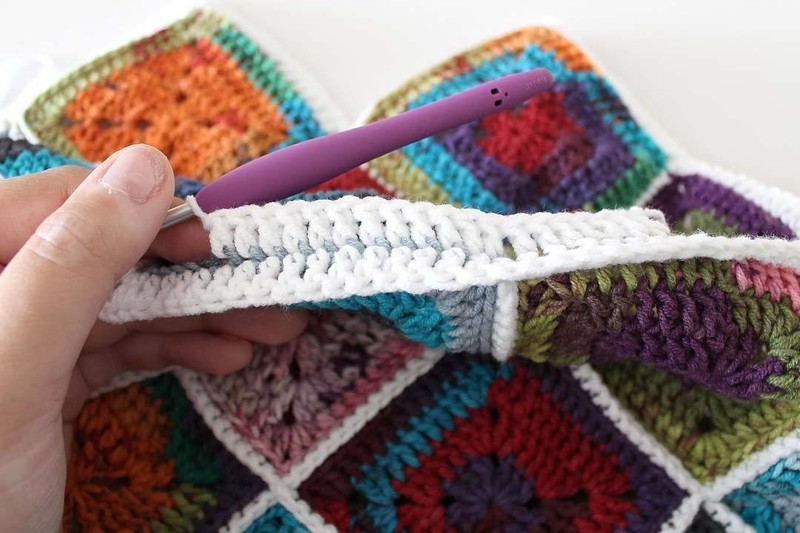
Let’s give the bag a finished look, by putting the top border around it. Grab the same yarn you used for joining the squares, and start on one of the sides, in the front loops only. Work one double crochet in every stitch.
-
 Step 8
When you get to one of the four points, do the following: work 2 double crochets in the first chain of the corner of the square; chain 1; then work 2 double crochets in the second chain of the corner of the square. This gives us a ‘loop’, which you can use later as a place to crochet your handles to.
-
 Step 9
When you get to an ‘intersection’, do the following: work 1 dc3tog through the first chain from the square on the right, the chain space of the two squares in the middle, and the second chain from the square on the left. (study the picture if you’re not sure what to do; it’s kind of hard to explain this)
-
 Step 10
Keep going until you’ve made a border around the entire top side of the bag.
-
 Step 11
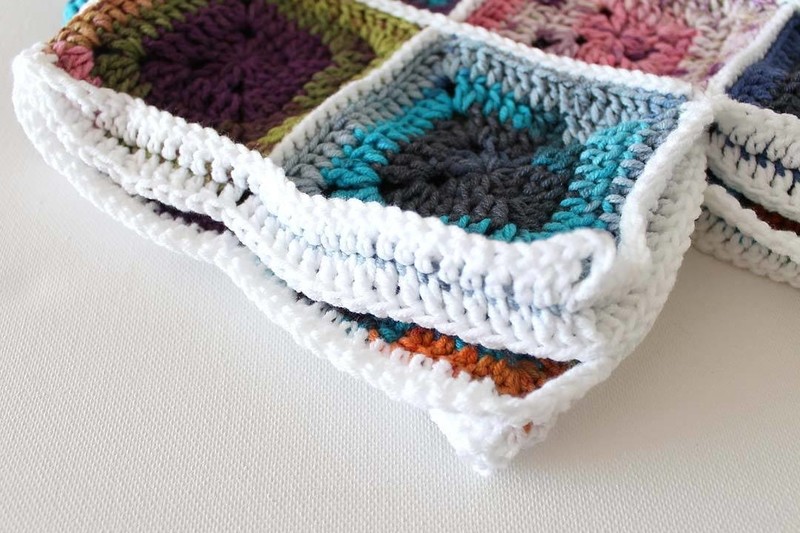
Your bag should look something like this:
-
 Step 12
If you’re not planning on lining your bag, you are done! Just attach your handles and enjoy your new bag :)
If you do want to line your bag, keep reading.
We’re going to make a second border on our bag, using the empty back loops behind the first border we just made. This will give us a place to sew the lining in later.
Start on one of the sides, in the back loops only. Work 1 double crochet in each stitch. -
 Step 13
When you get to one of the four points or intersecions, don’t make the loop or dc3tog like we did in step 4, but just keep going, crocheting 1 double crochet in every stitch.
-
 Step 14
Go around the entire top of the bag, until you have two ridges.
-
 Step 15
When you’re done, your bag should look like this:
And that’s it! Good job! :)