

Specs Appeal Necklace
Extract from The Naughty Secretary Club: The Working Girl's Guide to Handmade Jewelry • By Jennifer Perkins • Published by F+W Media

About
There is something to be said for a little Specs Appeal around the office.
Computer-related eyestrain affects oodles of diligent office workers every day. You can take "eye breaks" often and blink a lot to help the strain, or just break down and get computer glasses like I did. There is something to be said for a little Specs Appeal around the office.
-
 Key West Witch added Specs Appeal Necklace to Jewelry
30 Jun 04:55
Key West Witch added Specs Appeal Necklace to Jewelry
30 Jun 04:55
-
 Kinhime Dragon favorited Specs Appeal Necklace
22 Oct 19:11
Kinhime Dragon favorited Specs Appeal Necklace
22 Oct 19:11
-
 christina c. favorited Specs Appeal Necklace
19 May 01:23
christina c. favorited Specs Appeal Necklace
19 May 01:23
-
 GiftedDiva24 favorited Specs Appeal Necklace
28 Mar 15:18
GiftedDiva24 favorited Specs Appeal Necklace
28 Mar 15:18
-
Alecia B. favorited Specs Appeal Necklace
01 Aug 16:57
-
 Vanessa B. added Specs Appeal Necklace to Jewelry
02 Feb 15:22
Vanessa B. added Specs Appeal Necklace to Jewelry
02 Feb 15:22
-
 Ashleigh A. favorited Specs Appeal Necklace
04 Sep 06:28
Ashleigh A. favorited Specs Appeal Necklace
04 Sep 06:28
-
Nicky Frazier N. favorited Specs Appeal Necklace
22 Aug 20:46
You Will Need
-
 Step 1
<b>Remove arms from glasses</b>
Use the screwdriver from an eyeglass repair kit to remove the arms from a pair of vintage children's glasses. -
 Step 2
<b>Drill holes in frame</b>
Use a high-speed drill and a small bit to drill a hole in each side of the frame, approximately 1/4" (6mm) down from where the arms were attached. -
 Step 3
<b>Place images in frames</b>
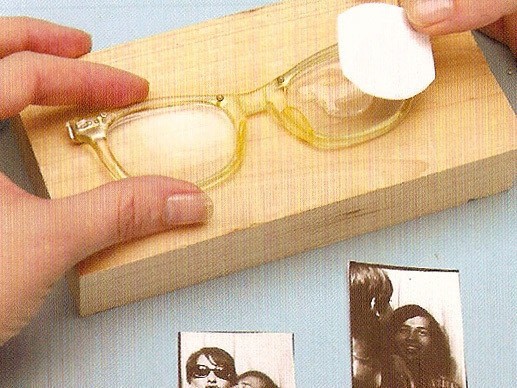
Cut 2 images to fit inside the lenses. Be sure to use real photographs or images printed on thick photo paper, or the resin will darken them. Set the images aside and mix the resin and catalyst together according to the manufacturer's instructions. Pour a small amount of resin into each lens. Blow on it to release the gases and pop the little bubbles. Let this bit of resin set up until it is thick and a little gooey. Smoosh each picture image-side down into the resin, making sure the resin has spread evenly between the picture and the glass lens. Use a craft stick to press and smooth the back of the photo to work out any bubbles that may have formed up around the edges of the picture. Let this layer dry. Mix a new batch of resin and pour it over the back of each photo, making sure it seals the edges. Let the glasses sit for 24 hours, allowing the resin to harden completely.<b>Hot tip:</b>
You may find that a few bubbles have developed between the lens and the photo, despite your best efforts. Don't let them bother you. Resin can be a tad temperamental. -
 Step 4
<b>Secure flowers to frames</b>
When your resin has set up, you can adorn your lenses further with flowers and charms! Link a silver dog charm to 1 of the eye pins, then thread on a small silver flower, a small pink flower, a medium turquoise flower and a large cream-colored flower. Thread the eye pin through one of the holes drilled in the frame. Secure the flowers by making a wrapped loop at the back of the frames using round-nose pliers. Trim away the excess wire with wire cutters. -
 Step 5
<b>Link chains to frames</b>
Beginning and ending with a turquoise channel chain, link channels and pink rings together with large jump rings until you have used 4 turquoise channels. Repeat to make a second chain. Link 1 chain to the wrapped loop at the back of the frames with an extra-large jump ring. Repeat for the second chain and remaining loop. Link 1 clasp component to each end of the necklace with a chain of 2 extra-large jump rings.


Comments


