
About
A Fun Springtime Tutorial
To celebrate spring, I've put together a fun tutorial for anyone who's feeling as crafty and inspired as I have. This would be a great project for Easter weekend or a sunny afternoon when the birds are chirping outside.
-
 Key West Witch favorited Speckled Egg Charms
01 Jul 00:38
Key West Witch favorited Speckled Egg Charms
01 Jul 00:38
-
Key West Witch added Speckled Egg Charms to Jewelry
30 Jun 02:03
-
 Lilly M. added Speckled Egg Charms to Necklaces
06 Dec 18:20
Lilly M. added Speckled Egg Charms to Necklaces
06 Dec 18:20
-
 Agnes Starlén favorited Speckled Egg Charms
06 Mar 18:30
Agnes Starlén favorited Speckled Egg Charms
06 Mar 18:30
-
 VeganSprinkles added Speckled Egg Charms to Vegan Easter
25 Feb 04:30
VeganSprinkles added Speckled Egg Charms to Vegan Easter
25 Feb 04:30
-
 PixieFey added Speckled Egg Charms to Celebrating Spring
21 Jan 00:08
PixieFey added Speckled Egg Charms to Celebrating Spring
21 Jan 00:08
-
 Skyliva favorited Speckled Egg Charms
24 Apr 18:11
Skyliva favorited Speckled Egg Charms
24 Apr 18:11
-
 Rainbow Wyvern favorited Speckled Egg Charms
12 Jan 07:58
Rainbow Wyvern favorited Speckled Egg Charms
12 Jan 07:58
-
 Oneina.million favorited Speckled Egg Charms
14 Sep 22:32
Oneina.million favorited Speckled Egg Charms
14 Sep 22:32
-
 B* added Speckled Egg Charms to Clay creations
13 Sep 12:32
B* added Speckled Egg Charms to Clay creations
13 Sep 12:32
You Will Need
-
 Step 1
Gather your supplies. You'll need black acrylic paint, polymer clay in white or light blue, headpins, a paintbrush, and jewelry pliers.
-
 Step 2
As with any polymer clay project, the first step is to condition the clay by rolling it in your hands, forming a sphere between your palms.
-
 Step 3
To create an egg shape, roll the ball of clay on one side only with your hands slanted against a flat surface.
-
 Step 4
Once you've sculpted your clay into a nice egg shape, pierce it vertically with a headpin. Smooth away any fingerprints by gently running your finger along the surface of the egg. Repeat steps 2-4 until you have as many eggs as you'd like to make.
-
 Step 5
Place the clay in an oven-safe pan and bake according to the directions on the package of clay.
-
 Step 6
Allow the cured eggs to cool completely (about 5-10 minutes after removing them from the oven). The next part of the project gets pretty messy, so you'll want to cover your work surface with something disposable such as old newspaper. I used a sheet of parchment paper. Pour a small puddle of black paint and dip your brush in water.
-
 Step 7
Once your brush has been thoroughly soaked with water, dip it in the black paint and begin flicking the paint toward the egg. Acrylic paint washes off completely with soap and warm water if you wash your hands while it's still wet, so I just used my index finger to flick the paintbrush.
-
 Step 8
Lay the eggs on the disposable paper and allow the paint to dry.
-
 Step 9
When the paint has dried, it's time to get out your pliers and wire wrap the headpin. If you need help with this step, you're in luck! I recently posted a wire-wrapping tutorial on my blog, which you can find here (http://hollyrocksjewelry.blogspot.com/2012/12/diy-wire-wrapped-charms.html). If wire-wrapping seems a little intimidating, you can always just bend the top of the headpin to create a loop.
-
Step 10
Continue the last step on any additional egg charms until they've all got a nice loop to dangle from. You can add a coat of sealer or varnish if you're worried about your paint speckles chipping away.
-
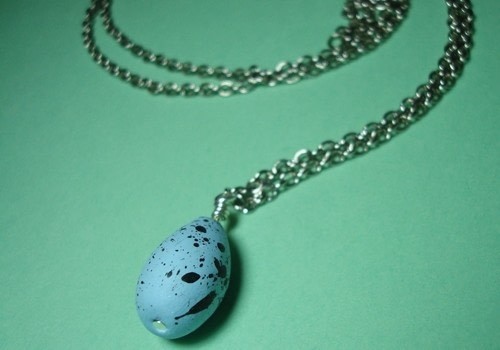
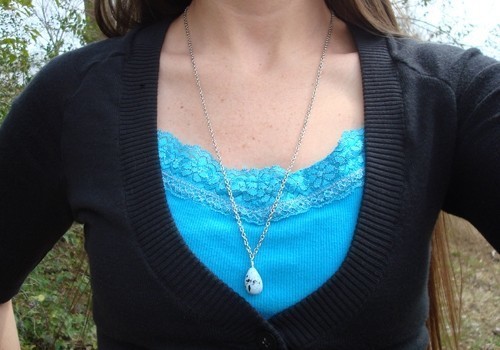
 Step 11
You may wish to attach your new charm to a chain to create a lovely nature-inspired necklace.