


About
fashionable short or long spats in different designs
Several years ago I bought a pair of ancient-designed short spats on ebay... I loved them and tried to copy... you can have a look at the original designer's website (linked) they're so great!
I also tried to do some modern ones, but I love to wear the ancient-stile-short-spats in combination with 7/8 or 3/4 trousers, that looks fabulous...
Unfortunately I didn't take photos while doing it, but I try to explain...
Pattern ist for a short heel... (actually shorter than on my pics, but I don't care...)
you can adjust for a higher heel by changing the baseline of the pattern following your shoe sole... (and adjust the raise at the bridge of the foot...:D )
-
 June S. favorited Spats Variations
02 Dec 02:46
June S. favorited Spats Variations
02 Dec 02:46
-
 Key West Witch favorited Spats Variations
07 May 09:22
Key West Witch favorited Spats Variations
07 May 09:22
-
 Carla B. favorited Spats Variations
20 Jul 02:53
Carla B. favorited Spats Variations
20 Jul 02:53
-
 Jackkie added Spats Variations to Maeve Millay
05 Jan 15:12
Jackkie added Spats Variations to Maeve Millay
05 Jan 15:12
-
 Victoria T. favorited Spats Variations
27 Jul 06:28
Victoria T. favorited Spats Variations
27 Jul 06:28
-
 Natyrsza V. favorited Spats Variations
14 Sep 04:17
Natyrsza V. favorited Spats Variations
14 Sep 04:17
-
 Reilane favorited Spats Variations
01 Sep 20:09
Reilane favorited Spats Variations
01 Sep 20:09
-
 InterpretThat favorited Spats Variations
05 Jul 18:23
InterpretThat favorited Spats Variations
05 Jul 18:23
-
 kiva.louise favorited Spats Variations
17 Apr 21:22
kiva.louise favorited Spats Variations
17 Apr 21:22
-
Aurelie L. added Spats Variations to Accessoires
14 Mar 10:39
-
 Step 1
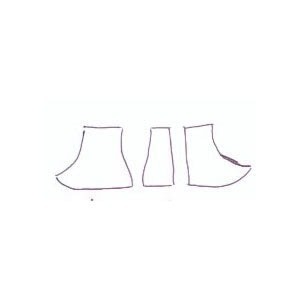
This is the pattern, scale it to DIN A4 (angles really at the border of the sheet)
You can see 3 parts: black, green and orange
-
 Step 2
Adjust size for:
Circumference of your Ankle or better your shoe... (red)Shoe size (blue)
Original is ap. size 38/39 (European size...)
-
 Step 3
For high spats, measure your leg from Heel to wherever you like. Measure several circumferences (and remember at which height you measured it... :D) and halve these.
Best to measure it with the shoes/boots you will weare the spats with, because otherwise the spats get too tight... :D
-
 Step 4
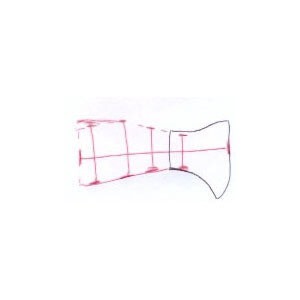
Transfer the measures by:
First make a straight orthogonal line in the middle of the pattern, measure the height.
Then elongate the frontline (shin) of your spat pattern (straight and a little bit foreward...)Then mark the circumference-halves from the frontline.
connect the points and there you have your adjusted pattern. -
 Step 5
Then ADD SEAM ALLOWANCE!!! And cut your pieces from fabric and lining (each piece 2x, normal and inverted)
you then have 4x the pieces you can see on the left (for the short spats)
For spats with eyes in the back, just take the black piece from the pattern 2x (the left one on the left), if you want a gap between the two parts for a nicer lacing, shorten it a little in parallel to the back line.
-
 Step 6
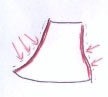
Now put your pieces together and sew where the red lines are for lining and fabric.
Dont forget to clip the seam-allowance of the inner and outer curves!! where the red arrows are, otherwise you won't be able to turn it the otherway round.
-
 Step 7
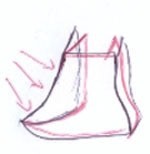
It now looks approx. like this.
Now: take fabric and lining, put right side to right side and pin the frontline (shin, red arrows) exactly!!!!! (you don't sew there but it often slips away...) -
 Step 8
Pin the rest and sew around the whole thing (red line), again clip the curves and the corners!
Leave the side open (of the green piece in the pattern) or in case of the high spat, the top-seam, to turn the whole thing to the right side.
then turn...close the seam by hand (or machine, for the side part is hidden by the closure and if you have to close the top-part, you can hide it by adding some lace...)
add snap-buttons to close your spat (or eye's if you're doing the other version, but first practice to add eyes, they can cut through your entire fabric... :( And don't cut the holes for the eyes, take an Awl!)
-
 Step 9
add two normal buttons inside each spat (exactly opposite to each other), and take a piece of buttonhole-elastic to keep your spats in position...
-
 Step 10
Add your decoration!!! Laces, eyes, deco-buttons, passament, cords
I could try potato-stamping once... :D
-
 Step 11
Though it's not the season:
If you wan't to make the scarf too
(best scarf you'll ever wear! :D you don't even need a coat anymore... :D )take the same fabric, cut a piece of 2m (78 Inch) x 45cm (18 Inch),
Take polar fleece for the lining (best take the same color as for the spats lining)
sew right to right, turn, close... finished!!Little girls will scream and pull their moms back to stare at you... The absolute Mary-Poppins-Effect :D
(you can make gloves too if you like...)