


About
A sparkleball is a magical ornament handmade from plastic cups and a string of mini-Christmas lights.
Learn the basics-- and the variations are endless. See more sparkleball photos at the end of instructions.
Tags
-
 Ew S. favorited Sparkleball
15 Aug 13:59
Ew S. favorited Sparkleball
15 Aug 13:59
-
 Sveta favorited Sparkleball
04 Dec 17:54
Sveta favorited Sparkleball
04 Dec 17:54
-
 Willa H. added Sparkleball to To-Decor
14 Oct 16:50
Willa H. added Sparkleball to To-Decor
14 Oct 16:50
-
Debbie E. added Sparkleball to Christmas Ornaments
23 Dec 11:27
-
Zeth G. added Sparkleball to Events
12 Nov 08:31
-
 Kay T. favorited Sparkleball
11 Nov 03:41
Kay T. favorited Sparkleball
11 Nov 03:41
-
 Henary C. favorited Sparkleball
26 Sep 04:43
Henary C. favorited Sparkleball
26 Sep 04:43
-
 Justin C. favorited Sparkleball
25 Sep 12:38
Justin C. favorited Sparkleball
25 Sep 12:38
-
 Rob J. favorited Sparkleball
23 Sep 10:53
Rob J. favorited Sparkleball
23 Sep 10:53
-
 Craft_manic 2016 favorited Sparkleball
21 Aug 21:49
Craft_manic 2016 favorited Sparkleball
21 Aug 21:49
-
 Step 1
The directions may sound difficult but will make sense as you work. Build your first, and you'll be rockin' and rollin' by your second sparkleball.
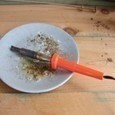
To make a basic sparkleball, you will need the following supplies: 1. A soldering iron (pictured) 2. 50 9oz Solo-style plastic cups (with slanted sides; "tumbler" style ) 3. A string of 100 lights, mini-light size. 4. Clothespins make it easier to hold cups together while you work. 5. A fan for ventilation, and you must must must work outdoors. very toxic fumes.
-
 Step 2
Heat the soldering iron. When hot, poke/melt a hole approx. 1/2" in the bottom of all 50 plastic cups.
-
 Step 3
Arrange 12 cups in a ring, as pictured(clothespins make it easier but are optional). Put the hot iron inside a cup. Press it through the side, at the base,to the next cup. (See photo below.) A welded joint forms when the melted place cools. Connect each cup to its neighbor at their bottom sides.
-
 Step 4
Now build a second layer of cups on top of the first ring. Use 9 cups in this layer, and again work from the cup bottoms. Space them evenly around; clothespins really help. Work cup by cup, joining it to at least two other cups. Make the joints at the cup bases or from inside the cup, at the bottom. This layer will have gaps between cups but that's ok.
-
 Step 5
Press the last 4 cups into the space left in the dome you've built. Once pressed in, then solder the four cups, making sure each one is joined to at least 2 or 3 other cups. (Blue cups for demonstration only)
-
 Step 6
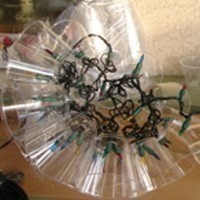
Now you're ready to thread lights into the sparkleball half. Start at the plug end (plug was cutoff from photo, but it's right by the tag which is visible.) and insert two lights into the first cup. You'll start inserting lights on the large ring you made first.
Insert 2 lights into each hole, working from top layer into bottom and back up. -
 Step 7
You must finish threading the lights in the big ring. Now you're half done. Repeat steps 1-5 to build the second half.
-
 Step 8
To thread lights in the second half, start-- this time-- from the opposite end of the lights. And start threading in the very center, working to the outside. When you get towards the end, it will be a bit awkward, with both halves coming together. Have the iron hot and ready to work.
-
 Step 9
Press the two halves tightly together, making sure the electrical plug hangs out between them. (Clothespins very handy here.) Join the halves with the hot iron, working close to the cup bottoms but being very careful NOT to melt the lights or cord.
-
 Step 10
When I'm finished, I go back and reinforce the sparkleball by melting a notch in all cups that touch at the rims. Be careful of hard cups or they'll crack if you force them.
-
 Step 11
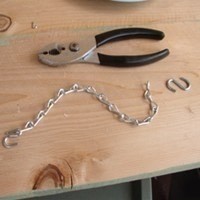
I make a hanger from chain and "s" hooks. I melt a hole, joining two cups, and insert the "s" hook. I put my hanger opposite the plug, but some people like the plug at the top. Your choice. (Other great hangers are zipties, fishing line. . .)
-
 Step 12
Plug in and enjoy. Now start your next one!
-
 Step 13
Here's Monica with a mini-sparkleball made with 1 oz condiment cups and 50 lights.
-
 Step 14
Here's Terry with "Godzilla:" 400 (!) 10oz cups; 500 lights; 30 in in diameter; very strong wire weights to hold.
-
 Step 15
Here's Manola's sparkleball made with green LED lights and red mini's.
-
 Step 16
Here's a solar-powered sparkleball made the no-melt way by Macky, Fritz, and Blythe (11, 9, 6 yrs old. Perfect kids project! See more on http:// www. sparkleball.com , a happily non-profit and free-for-all website devoted to spreading sparkleball joy.


but thanks for hsaring your great how-to for something so very wonderful ^_^