


About
Carve a symmetrical and detailed pumpkin the easy way.
Tags
-
 Susi S. added Sketch To Pumpkin Carving to Chiliqueens
30 Sep 20:05
Susi S. added Sketch To Pumpkin Carving to Chiliqueens
30 Sep 20:05
-
Susi S. favorited Sketch To Pumpkin Carving
30 Sep 20:05
-
 Bat Ma'am favorited Sketch To Pumpkin Carving
20 Jun 14:47
Bat Ma'am favorited Sketch To Pumpkin Carving
20 Jun 14:47
You Will Need
-
 Step 1
Start off with a nice shaped pumpkin and pick the best side for placing your design on.
-
 Step 2
Take a sheet of paper, fold it around your pumpkin and mark out the outlines of the pumpkin on to the paper.
-
 Step 3
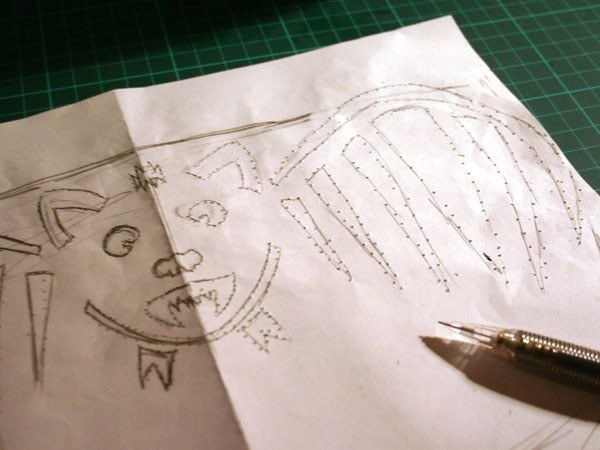
Fold the piece of paper in half at the middle. Sketch out half of the design on one half of the paper.
-
 Step 4
Fold the paper back in half and use a pin to prick through the paper around the design.
-
 Step 5
Fold it back half, your design should now be on both halves of the paper and meet in the middle perfectly.
-
 Step 6
It helps to lightly sketch over the rest of the design pin pricks, so that there's no confusion over which line goes where.
-
 Step 7
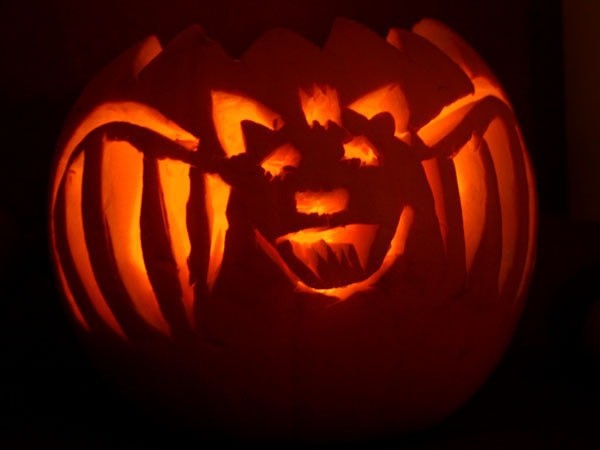
Now it's time to carve your pumpkin. It's best to cut off the lid in a zig-zag carving, so that the lid will fit in place nicely. (Remember to keep the filling to making Pumpkin Pie and Toasted Pumpkin Seeds.)
-
 Step 8
Tape the design to the front of the pumpkin so that it is secured in place.
-
 Step 9
One again, pierce around the design and in to the pumpkin.
-
 Step 10
After piercing around the entire design, remove the paper to reveal a neat outline for carving on the pumpkin.
-
 Step 11
Carve out the design, place a candle in the center of the pumpkin and enjoy the warm, eery glow!


CO + K User
CO + K User