


About
Turn a human skeleton drawing into shrink plastic skeleton earrings
I have lost my old pair of long skeleton earrings, so I decided to make some replacements, using shrink plastic. More commonly referred to as "Shrinky Dinks". The ribcage is shaped like one from long term corseting. The rest is fairly normal.
This project can take a few hours, because of all the drawing, shrinking each piece, and attaching the joints together. Take your time, and the results will be worth it.
Tags
-
 Kimya J. favorited Shrunken Skeleton Earrings
08 Feb 22:50
Kimya J. favorited Shrunken Skeleton Earrings
08 Feb 22:50
-
 Sarah Sylvia S. favorited Shrunken Skeleton Earrings
19 Jul 07:22
Sarah Sylvia S. favorited Shrunken Skeleton Earrings
19 Jul 07:22
-
 Ievars favorited Shrunken Skeleton Earrings
17 Oct 08:50
Ievars favorited Shrunken Skeleton Earrings
17 Oct 08:50
-
 Kyara S. favorited Shrunken Skeleton Earrings
04 Oct 19:10
Kyara S. favorited Shrunken Skeleton Earrings
04 Oct 19:10
-
 Susie M. added Shrunken Skeleton Earrings to Shrink Plastic
14 Jan 20:55
Susie M. added Shrunken Skeleton Earrings to Shrink Plastic
14 Jan 20:55
-
 Minimax favorited Shrunken Skeleton Earrings
25 Dec 21:02
Minimax favorited Shrunken Skeleton Earrings
25 Dec 21:02
-
 Angela I. favorited Shrunken Skeleton Earrings
30 Nov 00:58
Angela I. favorited Shrunken Skeleton Earrings
30 Nov 00:58
-
 Hydie Linn T. favorited Shrunken Skeleton Earrings
11 Sep 23:45
Hydie Linn T. favorited Shrunken Skeleton Earrings
11 Sep 23:45
-
 dean -. added Shrunken Skeleton Earrings to To-make list
17 Aug 05:21
dean -. added Shrunken Skeleton Earrings to To-make list
17 Aug 05:21
-
 Dark Rose added Shrunken Skeleton Earrings to Hair, nails and accessories
25 Jun 18:22
Dark Rose added Shrunken Skeleton Earrings to Hair, nails and accessories
25 Jun 18:22
You Will Need
-
 Step 1
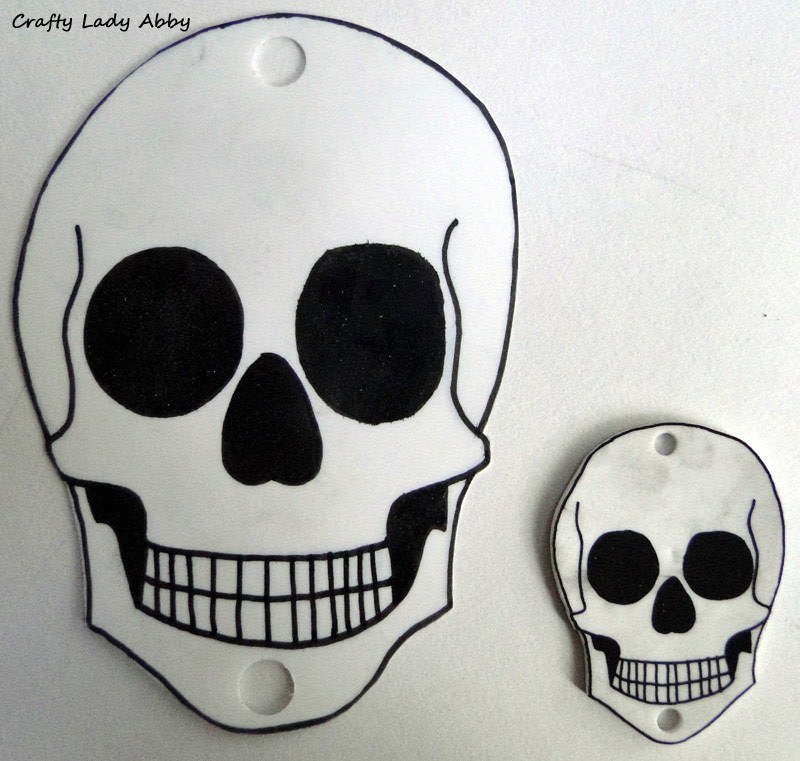
Draw your design on the paper. Remember to make it 2x the size you want the finished piece to be. I used anatomical skeletons and skulls as a reference. I drew the skull, torso, an upper leg with patella, a lower leg with foot, an upper arm, and a lower arm with hand.
The photo shows what the skull looks like before and after shrinking.
-
Step 2
Using the sanding block, sand the front and back of a shiny sheet of shrink plastic. Make sure there is NO SHINY AREAS remaining. If there are, the ink will smudge. This will take a while, but it's worth it. If you have a large design, like mine, you will need to sand two sheets or more. I sanded two.
-
Step 3
Lay a sheet of shrink plastic over the design. You will notice the white plastic is see through. Using the super fine pen, carefully trace the design onto the plastic.
-
 Step 4
Flip the sheet over. Trace the design you can see from the front side. I made little zig zag marks to indicate ares that needed to be filled in with black.
-
 Step 5
Use the Fine pen to fill in the areas you want black.
-
 Step 6
Carefully cut out the pieces with the small scissors.
-
 Step 7
Use the hole punch, to punch holes for attaching the earring hardware, and joints together with jump rings. On my design, the small Xs indicate where I have to punch.
-
Step 8
Lay the brown paper down on your work surface. You're work surface has to be able to stand high heat. A cookie sheet on your stove top would be good.
-
Step 9
You will do the shrinking ONE PIECE AT A TIME! Using the small scissors, carefully hold the center of your piece down. Turn your heat gun on. Mine had a heat adjustment. I put mine down to 500 degrees, but less with work too. The higher the heat, the faster the shrinking. Too high, and you might burn your piece. You don't want to do that. You will have to start over again with that piece.
-
Step 10
If your piece sticks together while shrinking, turn off your gun and quickly unstick the areas. If it hardens too quickly, reheat and try again. This part is very HOT, so you might want to use the pliers to undo the areas.
-
Step 11
After everything is shrunk, it's time to seal them. Using the small paint brush, paint an even coat of clear varnish on the front of each piece. After they have completely dried (about an hour), paint the other side with the varnish. If you want to use the acrylic paint, this is the time to do this. Use the acrylic paint before applying sealant, so it will adhere better.
-
Step 12
After the pieces have dried, it's time to make them into earrings. First, we need jump rings. Using the dowel rod or skewer, wrap the wire around it several times. Using the wire nippers, clip the wire from the spool.
Gently, pull the coiled wire off the dowel rod. Stretch the wire a bit, so the coils are spaced out a bit. -
Step 13
I had to do the jump ring making one at a time, because each set of skeleton joints fit together differently. Using the wire nippers, I cut different length rings off of the coil, and checked fit on different areas, until I figured out which size worked best for that joint. Use the pliers to form the cut rings into nice circles.
-
 Step 14
Using the 2 sets of pliers (one in each hand) open a jump ring, Put two pieces of the shrunk plastic together (in this case, the joints of the skeletons), on the ring. Using the two pliers, close the ring.
Repeat steps 14 and 15 for each joint of the skeletons.
-
 Step 15
At the heads of the skeletons, I added a jump ring and an earring hook. Use the 2 pliers to help open and close the jump rings.


Comments

