About
Never worry about the size of your zipper again!
Shortening metal zippers can seem like a daunting task, but with this quick tutorial and a few handy tools, you can customize the size of your next zipper in a flash.
-
 Key West Witch added Shorten Metal Zippers to Sewing
29 Jun 15:04
Key West Witch added Shorten Metal Zippers to Sewing
29 Jun 15:04
-
 hlheberlein added Shorten Metal Zippers to Sewing
26 Jan 07:34
hlheberlein added Shorten Metal Zippers to Sewing
26 Jan 07:34
-
 Hayley favorited Shorten Metal Zippers
19 Nov 20:58
Hayley favorited Shorten Metal Zippers
19 Nov 20:58
-
Suzi T. favorited Shorten Metal Zippers
08 Nov 16:26
-
 Steph. favorited Shorten Metal Zippers
18 Oct 10:35
Steph. favorited Shorten Metal Zippers
18 Oct 10:35
-
 Stacy S. published her project Shorten Metal Zippers
20 Aug 15:19
Stacy S. published her project Shorten Metal Zippers
20 Aug 15:19
You Will Need
-
 Step 1
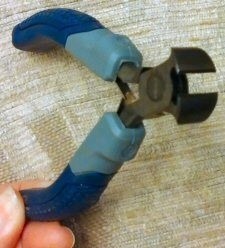
The first thing you need is a pair of Nipper Pliers (sometimes they also called End Nippers) – which is pictured on the left. Often times you can purchase these nippers online from zipper stores (around $20), but they are typically much more expensive than finding them at your local home store - I found mine as a set with several other pliers for around $10.
-
 Step 2
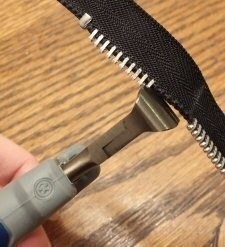
Determine the length you want your zipper to be - measure from the bottom of the zipper, up. Mark the zipper tape with a water soluble marker as to where you want your new zipper stop located.
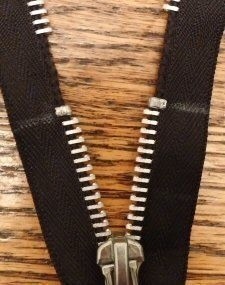
Unzip your zipper past your mark and begin removing the metal teeth with the nipper pliers, starting at the mark you made. The nipper pliers will ‘grab’ the metal teeth so all you need to do is pull straight forward and they will pop off – there should be no need to twist to remove them so you don’t need to worry about damaging the zipper tape. Continue removing the metal teeth on both sides of the tape about 1″ above your mark.
-
 Step 3
If you are able to find “zipper stops” in the notions isle your store, go ahead and apply them at the mark you made on your zipper tape. If not, you need to do what I do and remove them from the zipper tap and reattach them.
-
 Step 4
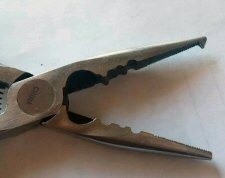
If you are unable to find zipper stops, then you'll want to take your Split Ring Pliers and remove the existing stops from your zipper. The Split Ring Pliers have a ‘wedge’ at the top that will easily open up the zipper stop so it can be removed from the tape. This also opens up the stop enough so you’re able to to re-attach it to the zipper tape at it’s new location without having to pry it apart with another tool (then use pliers to squeeze the stop so it doesn't fall out of position).
A standard set of pliers can also be used, however, it does require a bit more work than the Split Ring Style. If you use standard pliers, the zipper stop will probably have to be pried open slightly so that it will easily fit onto the new zipper tape location. Once on, use your (standard) pliers to crimp it back into place.