


About
Beautiful Butterfly Pendants
Shell pendant painted with colourful and simple butterflies.
-
 ShortHairedGirl favorited Shell Butterfly Pendants
01 Jan 04:28
ShortHairedGirl favorited Shell Butterfly Pendants
01 Jan 04:28
-
 Heather H. favorited Shell Butterfly Pendants
26 May 00:40
Heather H. favorited Shell Butterfly Pendants
26 May 00:40
-
Meghann B. favorited Shell Butterfly Pendants
11 Mar 12:50
-
 Sarah S. added Shell Butterfly Pendants to Jewelry
19 Jan 07:24
Sarah S. added Shell Butterfly Pendants to Jewelry
19 Jan 07:24
-
 Jenni favorited Shell Butterfly Pendants
25 Jun 02:57
Jenni favorited Shell Butterfly Pendants
25 Jun 02:57
-
 crazee.mare favorited Shell Butterfly Pendants
15 Feb 17:13
crazee.mare favorited Shell Butterfly Pendants
15 Feb 17:13
-
 Little MAMA favorited Shell Butterfly Pendants
12 Nov 23:16
Little MAMA favorited Shell Butterfly Pendants
12 Nov 23:16
-
 George B. entered their project Shell Butterfly Pendants to Jewelry Contest with Fifi's Secret
25 May 12:23
George B. entered their project Shell Butterfly Pendants to Jewelry Contest with Fifi's Secret
25 May 12:23
You Will Need
-
 Step 1
Take a shell and afix a blob of blue tac to the back.
-
 Step 2
Turn over and press shell down lightly on a hard working surface so that the blue tac holds it in place. Make sure the hole is at the top.
-
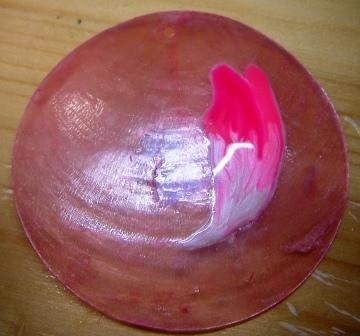
 Step 3
Now take a light colour, paint of a thick curved line like the picture. Use the paint thickly and quickly as you need to blend the colours when wet.
-
 Step 4
Now paint on another thick line, in a sort of bat wing shape with two inverted curved.
-
 Step 5
Now make a sort of peak next to that 'wing'. See picture.
And fill the entire shape in with the light colour. (Not pictured, sorry!)
-
 Step 6
Now take a medium colour and work this intop the top of the wings like so.
-
 Step 7
Now take a darker shade and just work it onto the very tips of the wings.
-
 Step 8
Work all three colours together till they are nicely graduated, go back to the lighter/medium colour if neccessary.
-
 Step 9
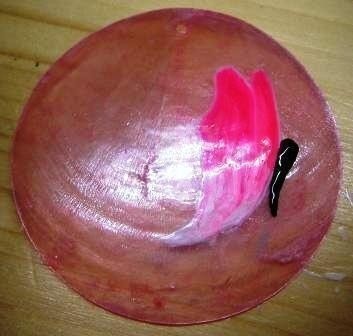
WAIT UNTIL FULLY DRY!!!! Now using black, paint on a slightly curved carrot shape for the body next to and just touching the wings.
-
 Step 10
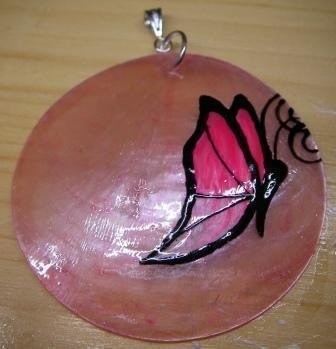
Now with the black go all the way around the outside of the wings, bringing the bottem tip to a slight point. Remember to split the two wings. Doesn't matter too much if your outline is slightly wobbly as you'll work on this on the next step.
-
 Step 11
Now thicken up the outline so its smooth and gives good shape to the wings. Add 3/4 'veins' by just putting a thin line in the natural curves if the wings. Add thin lined antennae.
-
 Step 12
Cover with a gloss when dry.
-
 Step 13
When that has dried, add a jump ring and bail and 'wallah' its ready to be attached to any chain, cord or ribbon!!


Comments


