


About
a wonderful addition to your collection of canes!
Direct from Israel, here's a beautiful cane design from PCC member Naama Zamir that will bea wonderful addition to your collection of canes!
-
 Lora G. added Shady Flower Cane to clay
10 Mar 05:31
Lora G. added Shady Flower Cane to clay
10 Mar 05:31
-
 Tigress favorited Shady Flower Cane
12 Jul 22:57
Tigress favorited Shady Flower Cane
12 Jul 22:57
-
 BrokenSorrowLove favorited Shady Flower Cane
15 Apr 21:10
BrokenSorrowLove favorited Shady Flower Cane
15 Apr 21:10
-
 mpanda favorited Shady Flower Cane
05 Sep 01:00
mpanda favorited Shady Flower Cane
05 Sep 01:00
-
 Sue S. favorited Shady Flower Cane
23 Jul 17:20
Sue S. favorited Shady Flower Cane
23 Jul 17:20
-
 Selene favorited Shady Flower Cane
15 Mar 10:14
Selene favorited Shady Flower Cane
15 Mar 10:14
-
 Beautasha favorited Shady Flower Cane
15 Jan 04:40
Beautasha favorited Shady Flower Cane
15 Jan 04:40
-
 asia_kas123 favorited Shady Flower Cane
09 Aug 18:29
asia_kas123 favorited Shady Flower Cane
09 Aug 18:29
-
 Step 1
I'm using Purple and White to make my cane, but you can choose any two complimentary colors. Start by making a Skinner Blend.
-
 Step 2
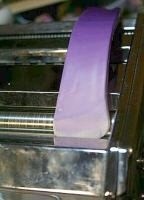
After the Skinner Blend is finished, fold it in thirds (as in steps 25-27 of Leigh's lesson) and pass it through the pasta machine on the thickest setting in a direction like shown in the picture. The final result will be a long, thin strip going from white on one side to purple on the other.
-
 Step 3
Fold the strip on itself like an accordion to make a loaf.
-
 Step 4
Cut the block into three equal pieces as shown.
-
 Step 5
Pinch the ends of the pieces together, and work the pieces to form the shapes as shown.
-
 Step 6
Turn one piece so the white point faces you. Take the second piece in the opposite direction (purple end facing you) and attach purple point from the second piece to the white point of the first. Gently form the second piece to the first until the other two points meet, as in the right side of the next picture.
-
 Step 7
Repeat the same action on the other side with the remaining piece. Now squeeze it to form a round cane.
-
 Step 8
Now put your third color (turquoise in my example) through your pasta machine at #4, and cut a sheet and wrap the cane as shown.
-
 Step 9
Reduce the cane until it is 20cm long (approximately 8" - click picture for a larger view). Mark and cut the cane into 5 equal parts.
-
 Step 10
Pinch each piece to form the 5 shapes as shown in the photo. These will be the petals of your flower.
-
 Step 11
Join all the pieces together to form the flower. If there is a gap in the center, fill it with a little snake of contrasting color (here I filled it with green clay that I had laying around the table).
-
 Step 12
Now fill in the gaps between the petals using your translucent clay (I'm using Premo Frost). Be careful to maintain the spacing of the petals.
-
 Step 13
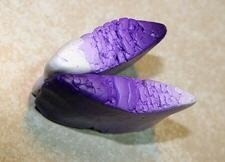
Here is the completed cane before reducing.
-
 Step 14
And after reducing and cut in half.
-
 Step 15
Lastly, cut and reduce the canes into various sizes as you wish. Enjoy!


pretty creative, i like it
naama
www.naamazamir.blogspot.com
BTW, that is a pretty flower cane that will be the first one I try.