


About
I love Shabby Chic decorating
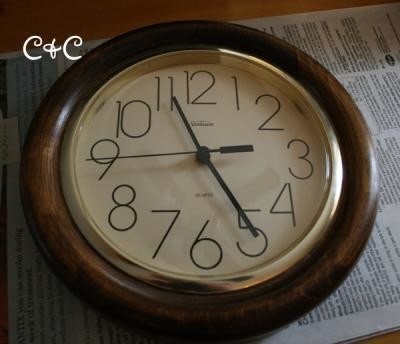
I love Shabby Chic decorating – the light colors, the repurposing of things that might otherwise be discarded, the feminine aspect of the style….I love it all! My house is decorated somewhat….um….eclectically. I know what I like but….I have what I have. I don’t like to get rid of anything, replace it, etc., unless it absolutely must go….it just seems wasteful to me and while I love shiny new things I make do with what I have. I have had the same brown clock hanging in every house I’ve lived in since I was 20….I have never replaced it or gotten rid of it because….well….it still works. For a few years now I have really wanted to give it away so that I could get a new clock….but really, who would want it???? So, I decided to do a quick ‘redo’ of it using what I had on hand: tissue paper, paint, glue, ribbon and scrapbooking/card making supplies. It was super easy and though not ‘classic’ shabby chic it’s my new/old shabby chic clock.
-
 Annette R. added Shabby Chic Clock to home decor
27 Oct 17:45
Annette R. added Shabby Chic Clock to home decor
27 Oct 17:45
-
Annette R. favorited Shabby Chic Clock
27 Oct 17:45
-
 Sarah W. favorited Shabby Chic Clock
28 Jan 18:39
Sarah W. favorited Shabby Chic Clock
28 Jan 18:39
You Will Need
-
 Step 1
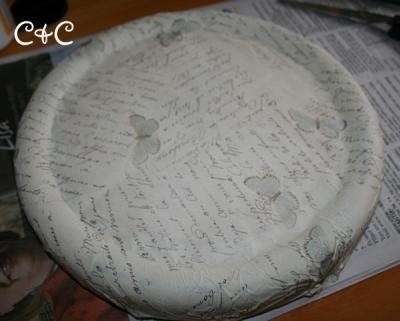
Lightly sand surface & brush off.
-
 Step 2
Paint a base coat on your surface that is similar in hue to the tissue paper you will be using.
-
 Step 3
Cover entire surface with Mod Podge then cover with tissue paper. Mold the tissue paper to your surface leaving some small wrinkles for texture.
-
 Step 4
Once dry cover with 2 more coats of Mod Podge to seal thoroughly.
-
Step 5
Using a sharp exacto knife trim edges of your tissue paper around edge of clock, front and back.
-
Step 6
Glue trim to back of clock to give it a finished look.
-
 Step 7
Embellish the front as desired. I used scrapbooking flowers with brads and a small metal plaque.
-
 Step 8
That’s it! Quick, easy and almost free!
-
 Step 9
hugs, mb


I absolutely love this idea, great creative mind.