

About
Scrabble Tile Pendant Tutorial
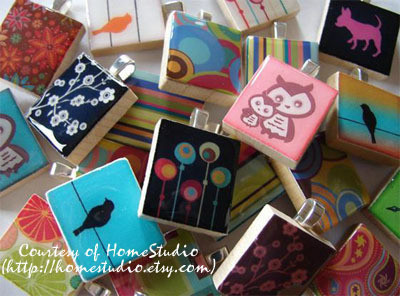
I’m excited to share this tutorial for Scrabble Tile Pendants from Mark and Stefani at HomeStudio. They’ve so graciously provided this how-to for making these lovely pendants to all of us crafters. These pendants are great for necklaces, charms, and gifts to give.
-
 Key West Witch favorited Scrabble Tile Pendant
12 May 15:31
Key West Witch favorited Scrabble Tile Pendant
12 May 15:31
-
 Sveta favorited Scrabble Tile Pendant
04 Dec 17:54
Sveta favorited Scrabble Tile Pendant
04 Dec 17:54
-
 Jen S. added Scrabble Tile Pendant to stuff for me
18 Jul 17:44
Jen S. added Scrabble Tile Pendant to stuff for me
18 Jul 17:44
-
 Chudames favorited Scrabble Tile Pendant
15 Oct 22:09
Chudames favorited Scrabble Tile Pendant
15 Oct 22:09
-
 Emma H. favorited Scrabble Tile Pendant
27 Jun 22:08
Emma H. favorited Scrabble Tile Pendant
27 Jun 22:08
-
 RareJewel favorited Scrabble Tile Pendant
25 May 07:10
RareJewel favorited Scrabble Tile Pendant
25 May 07:10
-
 SF B. favorited Scrabble Tile Pendant
10 Mar 23:45
SF B. favorited Scrabble Tile Pendant
10 Mar 23:45
-
b b. favorited Scrabble Tile Pendant
23 Sep 15:25
-
Agnes S. added Scrabble Tile Pendant to Accessories
14 Jun 22:52
-
Agnes S. added Scrabble Tile Pendant to Clothing
14 Jun 22:52
-
 Step 1
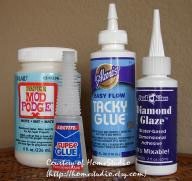
Supplies needed: · Paper · Scrabble Tiles · Scissors · Craft Glue · Metal File · Mod Podge · Small Paint Brushes · Utility Knife · Diamond Glaze · Super Glue · Small Aanraku Jewelry Bails in Silver
-
 Step 2
Choose your paper wisely! I use a template card, a little template on an index card with a hole the size of a scrabble tile. That way when I shop for paper, I can see if the pattern will fit the tile. You can use almost
any paper you find; scrapbook paper, card stock, Japanese Washi paper, origami paper, gift wrap, even lightweight recycled greeting cards. Everything will become a possibility, so experiment. Using a light box (or holding your paper to the window), use your template card and trace the pattern for your tile. Trim the paper about a 3/4” to 1/2” around your outline. Allow enough excess paper so you can hold the paper while spreading the glue. -
Step 3
Using a paint brush and your light box, “paint” a thin layer of glue (I use Tacky Glue) onto the back of your paper. Place your tile in the box, being sure to notice which way is up so your letter isn’t upside down when you’re finished. I like using a thin glue.
-
 Step 4
After about 10-20 minutes your glue should be dry. Using a utility knife, carefully trim around the outside of the tile being careful not to cut the tile in the process. The wood is pretty soft.
-
 Step 5
Gently file the edges of the paper to be smooth and flush with the side of the tile. Since the wood is soft, be careful not to file too hard. You may want to experiment with different types of metal files in order to find the one you like best. The one I use is a medium grit file.
-
 Step 6
Now you need to seal the paper. Use a paint brush to apply a thin layer of Mod Podge. I like to seal the top and all sides. Let that dry for 10-20 minutes. I like to lay my tiles on wax paper so the glue doesn’t stick to my work surface. A cookie sheet lined with wax paper works perfectly!
-
 Step 7
Once the Mod Podge is dry, it is time to apply the Diamond Glaze. Do NOT shake the glaze. First, I like to make a little dot on my wax paper. The first dot usually has a bubble & I’d rather have it on the wax paper than on my tile. Holding the bottle at an angle, apply the glaze around the edges and then fill in the middle. Be sure to get close to the edges. The glaze shouldn’t roll off the edge, but in case it does, just file it off when the whole thing is dry. If you get a bubble, which will happen, just use your fingernail to pull it off the tile. You can use a needle, but I find that is harder to do. Diamond Glaze is water soluble, so it just washes off with soap and water. Now let your tile dry for a minimum of 4 hours. Dry your tile in a cool place where it won’t get bumped by anyone.
UPDATED:
I let mine to fully cure 3 days before packaging it. The glaze manufacturers may suggest less time but to be safe, plan on 3 days. -
 Step 8
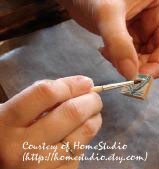
Now attach the silver bail. Hold the bail with your fingers, put a drop or two of glue and hold the tile in place. I like to use Super Glue because then it’s stuck “forever”! The only down side, is that if the bail isn’t exactly centered, it’s tricky to remove. In seconds, it’s attached and ready to go!
-
Step 9
Now to clean up any rough edges. Get your metal file again and smooth down any rough edges and excess glue. Now you’re finished! Enjoy your pendant.


CO + K User