


About
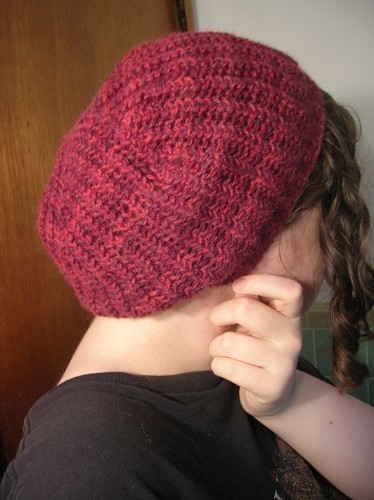
the perfect thing for those who like the shape of tams but don’t have enough hair to wear the larger ones
River is meant to be a much closer fitting hat than her brother, making her the perfect thing for those who like the shape of tams but don’t have enough hair to wear the larger ones. Simon is structured, with a fluffy, thick fabric; River is drapey and fluid, with a slinky lightweight feel. And, of course, River Tam looks better in red.
Finished size: 17″ around ribbing, unstretched, 9.5″ diameter when laid flat.
Gauge: 5 stitches and 7 rows over 1″ in flat stockinette on larger needles
Notes:
-Any DK or sport weight alpaca yarn will work just fine for this hat; be sure to pick one without a lot of guard hairs, otherwise you will have itchy ears/back of neck.
-The hat as you’re working it will look very small; the sizing relies on both blocking out the lace and the proclivity of alpaca to stretch out and stay that way. Keep this in mind if selecting another fiber to use–if you’d like a wool version, it would probably be best to go up a needle size or two, or change the stitch counts.
-
 Leslie D. added River Tam to KNIT YUMMIES
14 Sep 18:51
Leslie D. added River Tam to KNIT YUMMIES
14 Sep 18:51
-
 Victorian Dreamer favorited River Tam
22 Dec 07:47
Victorian Dreamer favorited River Tam
22 Dec 07:47
-
 Falene M. favorited River Tam
16 Nov 10:06
Falene M. favorited River Tam
16 Nov 10:06
-
 Amanda Wicked favorited River Tam
20 Aug 23:25
Amanda Wicked favorited River Tam
20 Aug 23:25
-
Step 1
Using smaller needles and a tubular cast on, CO 86 stitches. PM and join, being careful not to twist. Work k1, p1 ribbing for 1.5 inches.
-
Step 2
prep rnd: switch to larger needles, *k4, m1,* repeat around, end k2, m1.
-
Step 3
patt rnd 1: *p1, YO, k2tog,* repeat to end.
patt rnd 2: *p2tog, YO, k1,* repeat to end. -
Step 4
Repeat patt rnds until hat measures 6 inches from cast on edge, end rnd 1.
-
Step 5
marker rnd: *(p2tog, YO, k1) 9 times, pm,* repeat to end.
-
Step 6
dec rnd 1: *(p1, YO, k2tog) to three sts before marker, k3tog,* repeat to end.
dec rnd 2: *(p2tog, YO, k1) to four sts before marker, p2tog, YO, k2tog,* repeat to end.
dec rnd 3: see patt rnd 1.
dec rnd 4: see patt rnd 2. -
 Step 7
Repeat dec rnds six more times (seven repeats total), then work dec rnds 1 and 2 once more. K3tog all the way around, then break yarn and draw tail through remaining four stitches. Weave in all ends on the wrong side. Block hat over a plate or a plastic bag stuffed and shaped into a flattened sphere.

Comments


