About
Easy and quite versatile...
Reversible shopping bag is quite easy to make can be adapted by adding names, appliques. Make these to give quilted gifts to friends and family.
Tags
Downloads
- Reversible_Shopping_Bag.pdf 206 KB [ Download ]
-
 Gisela B. added Reversible Shopping Bag to Bags
29 Aug 02:16
Gisela B. added Reversible Shopping Bag to Bags
29 Aug 02:16
-
Gisela B. favorited Reversible Shopping Bag
27 Aug 10:40
-
 Alison C. favorited Reversible Shopping Bag
14 Jun 21:52
Alison C. favorited Reversible Shopping Bag
14 Jun 21:52
-
colourChemist favorited Reversible Shopping Bag
09 Jun 08:14
-
 MrsJackson favorited Reversible Shopping Bag
12 Jan 18:07
MrsJackson favorited Reversible Shopping Bag
12 Jan 18:07
-
 Martha.Martin.Stocks favorited Reversible Shopping Bag
26 Oct 16:18
Martha.Martin.Stocks favorited Reversible Shopping Bag
26 Oct 16:18
-
 Beth W. favorited Reversible Shopping Bag
29 Jul 06:55
Beth W. favorited Reversible Shopping Bag
29 Jul 06:55
-
 GothicYolita favorited Reversible Shopping Bag
28 Jul 04:20
GothicYolita favorited Reversible Shopping Bag
28 Jul 04:20
-
 Eliza C. favorited Reversible Shopping Bag
18 Jul 13:05
Eliza C. favorited Reversible Shopping Bag
18 Jul 13:05
-
Lianne C. favorited Reversible Shopping Bag
11 Jul 13:39
You Will Need
-
 Step 1
Allow: 2 Hours Skill Level: Beginner
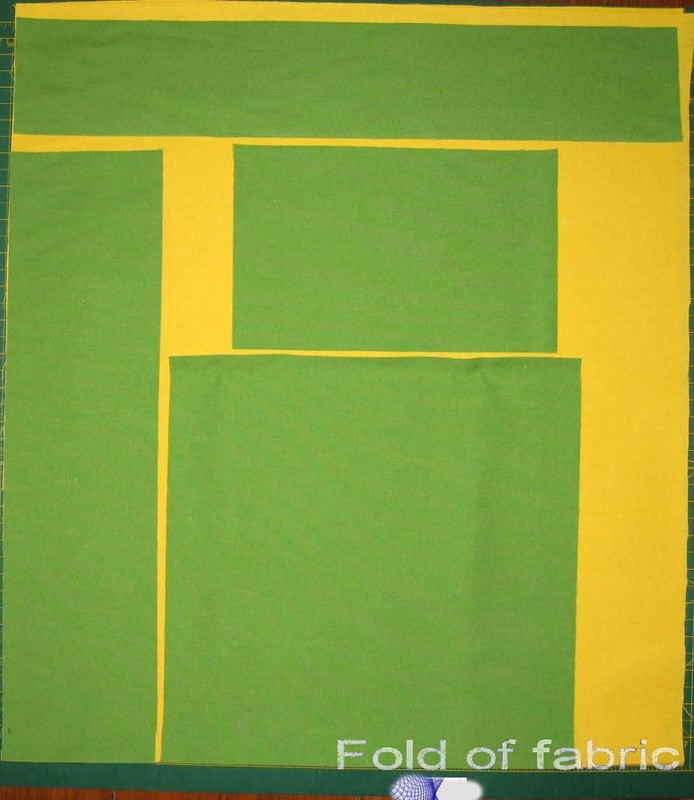
1. Cut the following from each of the fabrics: Cutting suggestion shown.
12” x 12” (x 2 – sides) on fold
4.5” x 36” (x 1 – gusset) on fold
19” x 3.5” (x 2 – handles)
6” x 9.5” (x2 – pocket)2. Using 1 each of Fabric A and B, make the pockets by placing contrasting fabrics right side together and sewing all round – remember to leave an opening on the long side for turning. Turn and press. Make 2 of these.
3. Position the pockets on the right sides of Fabric A and B sides, about 2.5” from the bottom, making sure the openings are positioned towards the bottom (when the 3 sides are sewn, the opening used for turning will be closed up). Sew 3 sides and leave the top open. Press.
4. Using Fabric A, pin the gusset to the side panel on three sides, right sides facing. Sew together on a machine. This will be Unit A.
5. Repeat the same process as (4) with second side panel.
6. Repeat steps (4) and (5) with Fabric B. This will be Unit B.
7. With right sides facing, put Unit B into Unit A. Set aside.
8. Using contrasting handle strips and right sides together, sew both long sides of the strips. Turn to the right side through either unsewn short ends. Make 2 of these.
9. Insert the handles in between Unit A and Unit B with the raw edges all lined up (the handles will be sandwiched between the 2 bag units).
10. Match the edges of Unit A and Unit B. Pin if necessary. Sew round the top edge of the units leaving an opening to turn the bag right side out.
11. Turn the bag and make sure the handles are positioned properly and are facing the right way.
12. Top stitch around the top edge. This will strengthen the handle stitches and also close the opening used to turn right side out.
13. Decorate the front of the bag with appliqué if plain fabric was used.
14. Your bag is ready for to go shopping with.