


About
Retro Space Age Stocking Tutorial
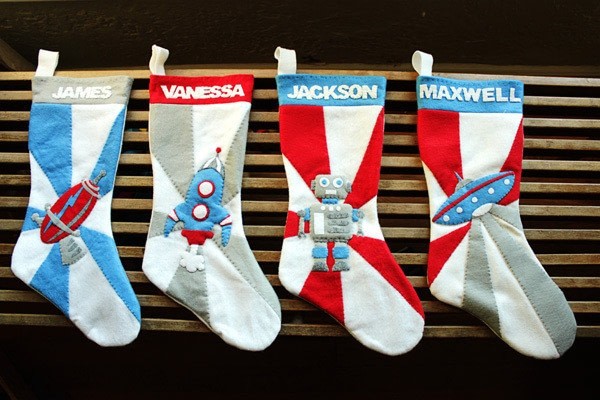
Here are the instructions for assembling your very own Retro Space Age Stocking! All those stitches may look a bit daunting but just wait and see, it comes together fairly easily and quickly. As always, feel free to contact me if you have any question or if any of the directions are unclear.
Tags
Downloads
- 71986490-Retro-Stockings-01.pdf 594 KB [ Download ]
- 71986507-Retro-Stockings-03.pdf 593 KB [ Download ]
- 71986497-Retro-Stockings-02.pdf 595 KB [ Download ]
- 71986517-Retro-Stockings-04.pdf 595 KB [ Download ]
- 71986525-Retro-Stockings-05.pdf 596 KB [ Download ]
- 71986537-Retro-Stockings-06.pdf 596 KB [ Download ]
- 71986549-Retro-Stockings-07-1.pdf 594 KB [ Download ]
- 72001632-Retro-Stockings-Robot.pdf 595 KB [ Download ]
- 72001844-Retro-Stockings-Rocket.pdf 598 KB [ Download ]
- 72002052-retrostockings-raygun.pdf 601 KB [ Download ]
-
 Tierra T. favorited Retro Space Age Stocking
14 Nov 21:41
Tierra T. favorited Retro Space Age Stocking
14 Nov 21:41
-
 mmotse03 favorited Retro Space Age Stocking
14 Apr 10:40
mmotse03 favorited Retro Space Age Stocking
14 Apr 10:40
-
 michelle.francis4 favorited Retro Space Age Stocking
28 Dec 21:26
michelle.francis4 favorited Retro Space Age Stocking
28 Dec 21:26
-
 Penny F. added Retro Space Age Stocking to CHRISTMAS!
25 Dec 09:41
Penny F. added Retro Space Age Stocking to CHRISTMAS!
25 Dec 09:41
-
 Cassandra B. favorited Retro Space Age Stocking
24 Dec 15:06
Cassandra B. favorited Retro Space Age Stocking
24 Dec 15:06
-
 cinderelly favorited Retro Space Age Stocking
24 Dec 07:51
cinderelly favorited Retro Space Age Stocking
24 Dec 07:51
-
 Serah B. favorited Retro Space Age Stocking
13 Dec 01:37
Serah B. favorited Retro Space Age Stocking
13 Dec 01:37
-
 Laura D. favorited Retro Space Age Stocking
12 Dec 20:18
Laura D. favorited Retro Space Age Stocking
12 Dec 20:18
-
 Catie L. added Retro Space Age Stocking to To-make list
08 Dec 16:54
Catie L. added Retro Space Age Stocking to To-make list
08 Dec 16:54
-
 Dana B. added Retro Space Age Stocking to Stuff for Rachel
06 Dec 00:45
Dana B. added Retro Space Age Stocking to Stuff for Rachel
06 Dec 00:45
-
 Step 1
Decide on the color scheme for the entire stocking. For Maxwell’s Alien Ship pattern, I’ll be using red rays, a blue cuff and a combination of red/glue/gray for the ship.
-
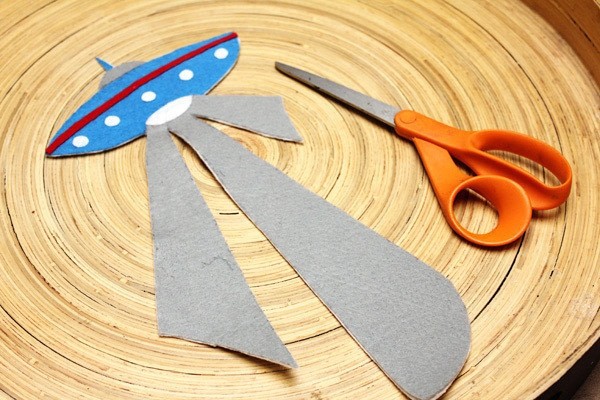
 Step 2
Cut out pattern pieces.
-
 Step 3
Trace pattern pieces onto felt/fusible webbing and cut out. (The blue piece in the picture above was cut first and then cut again when I attached it to the webbing. I highly suggest you not do it this way. Cut out a piece of felt and webbing and trace the pattern onto that. Then you can cut through all the pieces. Much easier!)
-
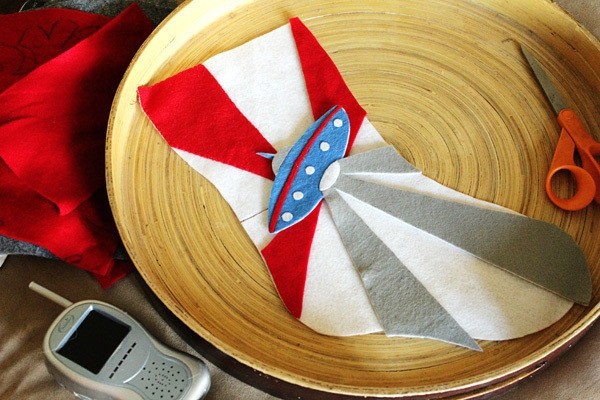
 Step 4
Position all the felt pieces together on a larger piece of white felt and iron into place.
-
 Step 5
Cut out entire applique.
-
 Step 6
Cut out remaining pattern pieces (stocking, cuff, hanging tag, letters, rays). Piece together to make sure Tried and True’s pattern is, indeed, tried and true. Check baby monitor to see if baby is still sleeping soundly. Whew, still asleep. Onto step 7!
-
 Step 7
Using small, even sized stitches, begin by attaching the background rays onto the stocking. For this example (Alien Ship), we’ll be omitting ray #1 and #5 from the stocking since the alien ship has nifty transporter rays. All the other stocking designs have five background rays.
-
 Step 8
Once all the background rays have been sew on, proceed to attach the applique (Alien Ship) onto the stocking. Note: I screwed up big time on this step. I didn’t bring out the other stockings as I was finishing Maxwell’s last week and forgot that I used matching thread on each felt color instead of just all white thread (see picture). Because I knew it would eat at me every year that I brought out the stockings and saw that Max’s was slightly different, I just went ahead and re-embroidered every single white stitch with the matching color thread. Double the work. Ugh, note to self: plan ahead!
-
 Step 9
Stitch name onto cuff.
-
 Step 10
Center cuff and name onto stocking top (you may have to cut off excess cuff materials.) Sew the cuff to the stocking, right sides facing. Repeat with backside.
-
 Step 11
Press seams open with iron.
-
 Step 12
Sew stocking front to stocking back.
-
 Step 13
Fold the edge under 1/4? and stitch.
-
 Step 14
Sew on hanging tab and you’re done!


Comments


