


About
How to turn an oversized tee in to a skinny tee - revisited!
Okay, so this was one of the first projects I ever made for CO+K about 3 years ago and when I did it, I shot it on my camera phone. Here's a new and improved version of this how-to, shot on a proper camera and this time I finish off the arms and bottom of the tee properly.
-
 Jen S. added Resizing Tees to stuff for me
18 Jul 18:39
Jen S. added Resizing Tees to stuff for me
18 Jul 18:39
-
laurie b. added Resizing Tees to Revamped Clothes
22 Sep 00:47
-
 jessica.boulanger.10 favorited Resizing Tees
14 Jul 05:51
jessica.boulanger.10 favorited Resizing Tees
14 Jul 05:51
-
 Jupiter added Resizing Tees to Clothing
11 Jul 02:28
Jupiter added Resizing Tees to Clothing
11 Jul 02:28
-
 Crafterella added Resizing Tees to Jenny Lewis
27 Apr 10:29
Crafterella added Resizing Tees to Jenny Lewis
27 Apr 10:29
-
 Elentine added Resizing Tees to T-shirt recon
08 Feb 01:14
Elentine added Resizing Tees to T-shirt recon
08 Feb 01:14
-
 Joana A. added Resizing Tees to stuff to do
07 Jan 18:52
Joana A. added Resizing Tees to stuff to do
07 Jan 18:52
-
 Kinhime Dragon added Resizing Tees to clothes
03 Oct 17:26
Kinhime Dragon added Resizing Tees to clothes
03 Oct 17:26
-
 Modern Myth Angel favorited Resizing Tees
21 Sep 17:46
Modern Myth Angel favorited Resizing Tees
21 Sep 17:46
-
J F. added Resizing Tees to Clothing
14 Sep 17:05
-
 Step 1
Start off with an oversized tee that you'd like to reduce.
-
 Step 2
Find another tee, one that fits perfectly and the way you want the oversized tee to fit.
-
 Step 3
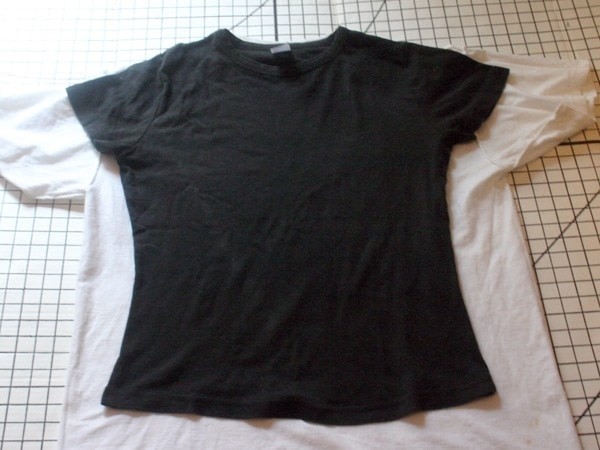
Turn the large tee inside out and lay it out neatly on a flat surface. Lay the smaller tee on top of the larger one, so that the necklines of both of the tees are aligned.
-
 Step 4
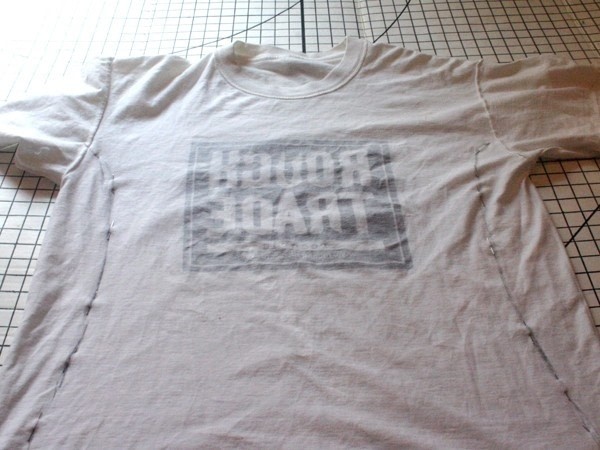
Draw around the outline of the smaller tee on to the larger one, using tailors chalk if you're working on a dark tee or charcoal if you're working on a lighter tee.
-
 Step 5
Remove the smaller tee and place pins around the outline you drew, pining through both the front and the back of the tee.
-
 Step 6
Pin around the whole outline of the smaller tee.
-
 Step 7
Cut around the sides of the tee, removing excess fabric but leaving a one inch allowance around the outside. Don't cut the bottom of the tee yet.
-
 Step 8
Now, take the bottom edge and fold up, so that the tee is at the desired length. You can use the smaller tee for guidance at this point. Pin along the bottom edge.
-
 Step 9
Repeat with the back of the tee, ensuring the both sides are at the correct height, and pin in place.
-
 Step 10
Cut off the excess fabric but leave a one inch allowance.
-
 Step 11
Now it's time to fix up the arms. Remove a couple of pins, so that they don't get in your way.
-
 Step 12
Fold back the fabric of the tee, so that the sleeve is at the desired length and pin in to place. Once again, you can use the smaller tee for reference. Repeat with the other sleeve, ensuring their both at the same length.
-
 Step 13
Now it's time to bring out the sewing machine. Start by sewing along the edge of the bottom of the tee. Remove a few pins from each side before you begin, then sew along the front and then the back, before returning the pins back to their original positions.
-
 Step 14
Now along the ends of the sleeves, once again removing a couple of pins from the bottom, sewing along the hem, and then returning the pins.
-
 Step 15
Now it's time to sew along the sides of the tee. Start at the bottom of the sleeve and then sew right along the outline to the bottom of the tee, removing the pins as you go. Repeat with the other side.
-
 Step 16
Finally, cut off any excess fabric, turn the tee inside out and you're all done!


Versions


Comments


