


About
Reconstructing a hat to fit, then recovering it with lace and fabric.
I've had a black party top hat lying around for a while now. It didn't fit properly, so I've never worn it. I wanted a white top hat, but suspected I'd just have the same fitting issues, and I won't wear it enough to justify spending £40+ on a proper top hat.
So, as the black one cost only a few quid in the first place, and if things went wrong with my experiment, it wouldn't have been a great loss, I embarked on a mission to make the hat fit, and to make it look lovely.
Note: This tutorial assumes your hat is too small. If the hat is too big rather than too small, you can use the same instructions, but rather than adding the gap. simply cut out a small section of the hat, before taping it back together.
If your base hat fits you fine, then disregard the first few steps, and skip straight to the reupholstering :)
Tags
-
 Key West Witch added Resizing And Redesigning A Cheap Top Hat to Top Hats, Witch Hats, Hats & Fascinater’s
30 Jun 14:21
Key West Witch added Resizing And Redesigning A Cheap Top Hat to Top Hats, Witch Hats, Hats & Fascinater’s
30 Jun 14:21
-
 Misato M. favorited Resizing And Redesigning A Cheap Top Hat
16 Jun 09:51
Misato M. favorited Resizing And Redesigning A Cheap Top Hat
16 Jun 09:51
-
 Joy F. favorited Resizing And Redesigning A Cheap Top Hat
22 Jun 23:12
Joy F. favorited Resizing And Redesigning A Cheap Top Hat
22 Jun 23:12
-
 Step 1
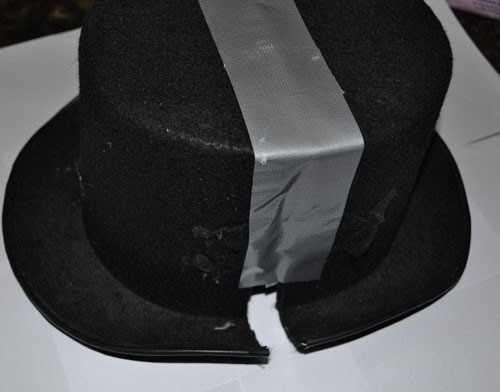
Work out why your hat doesn't fit. Mine was too tight on the forehead, so I lengthened it.
If it's too tight on the sides, cut down the length, front to back.
-
 Step 2
Part the two sides, and over the top of the hat, tape open the gap. Try the hat on, and adjust the gap as necessary.
-
 Step 3
Using some rigid card, reinforce the gap on the inside of the hat. I didn't use quite enough, so when I covered the hat, the fabric pulled the two halves together a little. My suggestion to prevent this would be to either use a long length of card all the way around the inside of the hat, or, staple rather than tape the card in place. Another idea might be to use some rods to keep the halves apart whilst you cover the hat.
-
 Step 4
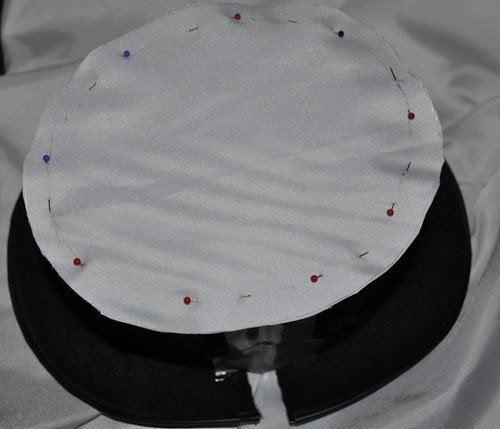
From your fabric, trace around the top of the hat, and add a little extra for seams.
Because I'm using white satin over a black hat, I cut two circles, and layered them, to ensure the base couldn't be seen through the satin. That's why the pins are there in the picture, it's just the two halves pinned together, not pinned to the hat.
-
 Step 5
Next, measure the height of your hat, and the circumference around it. From your fabric, mark out a rectangle this size, and add a couple of inches to the length, and a seam allowance to the height. Cut this out, and pin it around the circle you cut for the top.
You'll want to do this on the wrong sides of the fabric, with the right sides laid on the hat.
Once you've checked the fabric fits nicely, stitch it up.
-
 Step 6
Turn it right side out, and check the fit again.
Fold the ends under themselves, and pin them up. Make sure the fabric is a snug fit to the hat, and sew up the ends.
Note; if you're using lace to cover your hat, a neat finish on the sides isn't important. If not, you might want to take the pinned cover off the hat, and stitch the ends on the wrong side, for a neat seam when it's right side out.
-
 Step 7
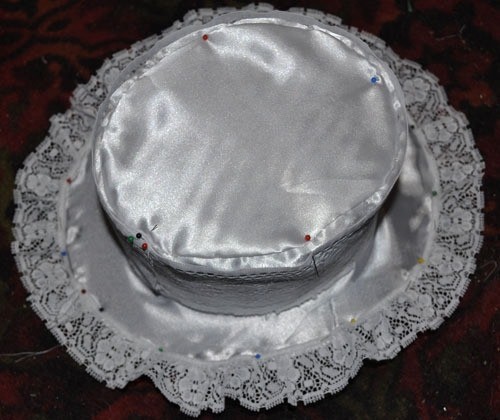
Next, draw around your hat brim. Add half a centimetre for seams, and cut two of this shape out.
Fron the centre, cut a star shape into the circles. Place one over the top of your hat, and one underneath, as shown. Pin around the edges, and once the fabric is in place correctly, stitch around the brim.
-
 Step 8
I didn't get a photo of the edge stitching before I added the lace, but you can see it in the photo of the underside of the hat here.
The lace will be stitched around the brim, hiding the edge stitching, as you can see in the main image.
-
 Step 9
The lace around the rise of the hat is simple a length of wide lace, wrapped around, and then folded under itself at the back, then stitched in place.
Around the top, I chose to stitch the lace to the satin, but you could simple leave it open, and add a few stitches around the sides to keep it secure.
-
 Step 10
Almost finished.
Pin the satin on the underside of the brim to the hat itself, and going around the inside, fold the triangles underneath themselves, and stitch to the hat all the way round, to create a neater 'band' effect of fabric.
-
 Step 11
You can choose to line the inside if you want to. I chose to leave it, and just glued a circle of thin card inside the top, to cover the taped part, since nobody's going to see it once it's on my head.
Add a band of ribbon around the hat to finish, and cover the join where the brim covering meets the side of the rise. I forgot to take a photo of this step, but I used a black ribbon to contrast. You could use a matching or contrast ribbon, and either leave it plain, or add a bow to the side, it's up to you :)


Comments

