


About
DIY: a mirror from a leaded-glass window
I acquired an old leaded-glass window by way of my parents, and quickly destroyed it.
Actually, several of the panes were already cracked, the window was warped, and the frame was rotten and crumbling. But the part where the entire assembly fell off the mantle, cracking a few more panes, dislodging several entirely, and destroying the frame - that was all me. No matter. It's been re-purposed as a mirror and has a nice home now on our living room wall.
I used Krylon's Looking Glass paint to turn the window into a "mirror" of sorts - it's shiny and reflective, but not in the way a brand-new mirror would be; rather, it's cloudy and antique-looking. I actually rather love the effect. Read on for instructions on achieving the effect and hanging the cumbersome, unwieldy thing on your wall.
-
 Katie E. added Repurposed Window Mirror to Macrame
28 May 22:45
Katie E. added Repurposed Window Mirror to Macrame
28 May 22:45
-
 frostkatelyn favorited Repurposed Window Mirror
30 Mar 13:19
frostkatelyn favorited Repurposed Window Mirror
30 Mar 13:19
-
frostkatelyn added Repurposed Window Mirror to PROJECTS
30 Mar 13:19
-
 Cheryl added Repurposed Window Mirror to Sherlock's Flat
29 Oct 18:55
Cheryl added Repurposed Window Mirror to Sherlock's Flat
29 Oct 18:55
-
 uptodateinteriors added Repurposed Window Mirror to Gwenneth Paltrow's Room
08 Sep 18:18
uptodateinteriors added Repurposed Window Mirror to Gwenneth Paltrow's Room
08 Sep 18:18
-
 v favorited Repurposed Window Mirror
23 Jan 08:53
v favorited Repurposed Window Mirror
23 Jan 08:53
-
 zoegirl221 favorited Repurposed Window Mirror
18 Sep 00:35
zoegirl221 favorited Repurposed Window Mirror
18 Sep 00:35
-
 Vanessa B. added Repurposed Window Mirror to Home DIY
14 Apr 02:50
Vanessa B. added Repurposed Window Mirror to Home DIY
14 Apr 02:50
-
 Birgit added Repurposed Window Mirror to Wall decor
06 Apr 17:04
Birgit added Repurposed Window Mirror to Wall decor
06 Apr 17:04
-
 Jed P. favorited Repurposed Window Mirror
18 Feb 02:39
Jed P. favorited Repurposed Window Mirror
18 Feb 02:39
-
 Step 1
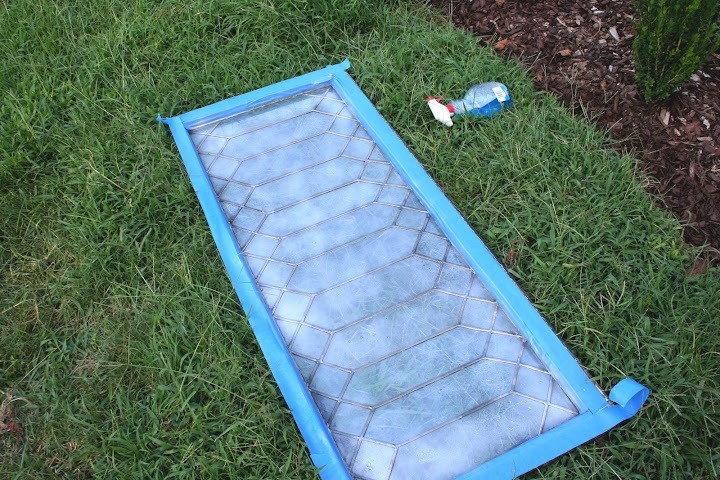
Here was the window before I began the process:
I simply cleaned the back (unbeveled) side of the window well with soap, water, and Windex - and I left some of the black cloudiness that it had acquired from years spent sitting in a shed.
The instructions on the Looking Glass paint are to give the item several very light coats of paint. I taped off the frame (which became moot in the end), and laid it out in the yard.
In order to get an irregular, antiqued effect, I first spritzed the glass with a light spray of water, then sprayed on my first and second coats of paint. I spritzed again before applying the third and fourth, and then the fifth and sixth coats of paint. This lends a mottled look to the silvered surface.
-
 Step 2
Post-painting, the glass still has a good bit of translucency, but only when it's set right in front of something. From the back - the side you painted - it will still look almost transparent.
-
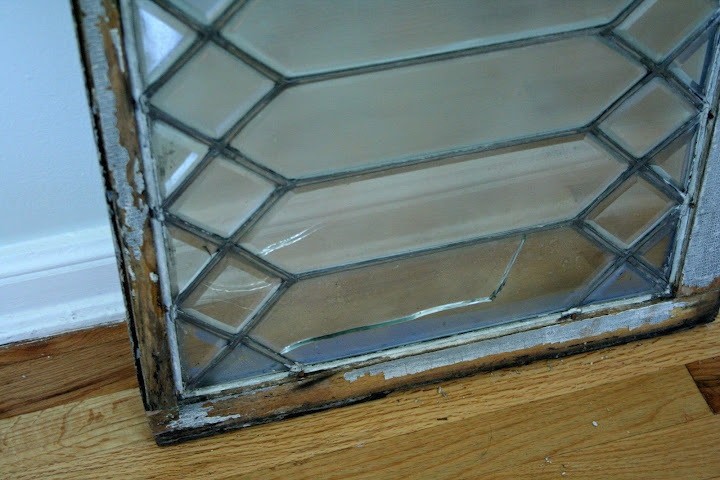
 Step 3
The window's plummet to the floor took care of removing the rotting frame for me, but it would have been easy enough to remove otherwise - the glass was held in by just a few wayward nails and some crumbling glazing compound. I struggled for two hours one night, desperately reinserting the panes that had removed themselves in the crash. The window came out the worse for wear, but I like to think of it as rustic.
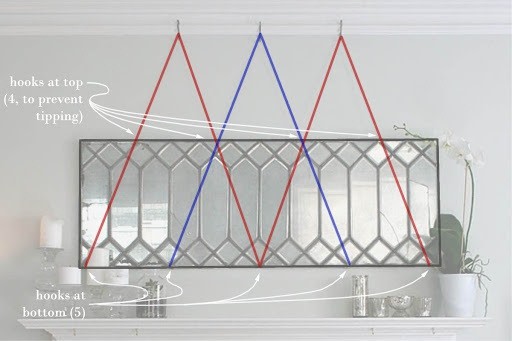
We have picture moldings in our living room, so I used these to hang the mirror. This system would work just as well using screws or hooks in the wall - but I would try to located at least two of the screws on studs, as the glass is surprisingly weighty.
Attaching strings to the mirror itself was the really tricky part, but hardware-store-bought picture molding hooks did the trick. I manipulated nine of these hooks with pliers, smushing down the bottom (the part that holds the wire) completely, and the top (the part that hooks onto the rail) a little. The top part would now hook over the mirror, and the bottom part was out of the way (you could cut it instead, if you're so inclined). I put five of these at the bottom of the mirror, and looped twine through the hole on the hook.
I put the other four hooks on the top of the mirror, gluing them lightly in place with hot glue. I ran the twine through the holes on these, too. These top hooks keep the mirror from pitching forward.
(I describe this process like it was seamlessly smooth and well-considered. Really, it was horrible - an architect fighting with her engineer husband on the best way to mount a frustratingly flexible assembly of glass that could easily shatter and kill a dog in its descent floorward. But learn from our experience - I think this really is the best way to do it.)
-
 Step 4
In the end, I had two discrete twine systems - one length runs from the bottom-left corner of the mirror, up to the molding, down to the bottom-center of the mirror, up to the molding again, and back down to the bottom-right corner of the mirror - like a double camel's hump. This length of twine was secured by a hook whenever it passed the top of the mirror.
The other length of string went from the mid-left-bottom of the mirror, to the molding, then down to the middle-right of the mirror - a single hump. The length is unsecured at the top - it just serves to take some of the mirror's weight off the first length.
-
 Step 5
The important thing about the top hooks is that they should be "floating" - the string shouldn't be tied to the top hooks, so that they stay clipped to the mirror no matter what the string is up to.
I found out, when working at this, that the Looking Glass paint rubs and scratches off very easily, so be careful when handling your finished mirror.
-
 Step 6
Give a cool, old window some new life! But try not to nearly kill it first.


Great use of a great piece!