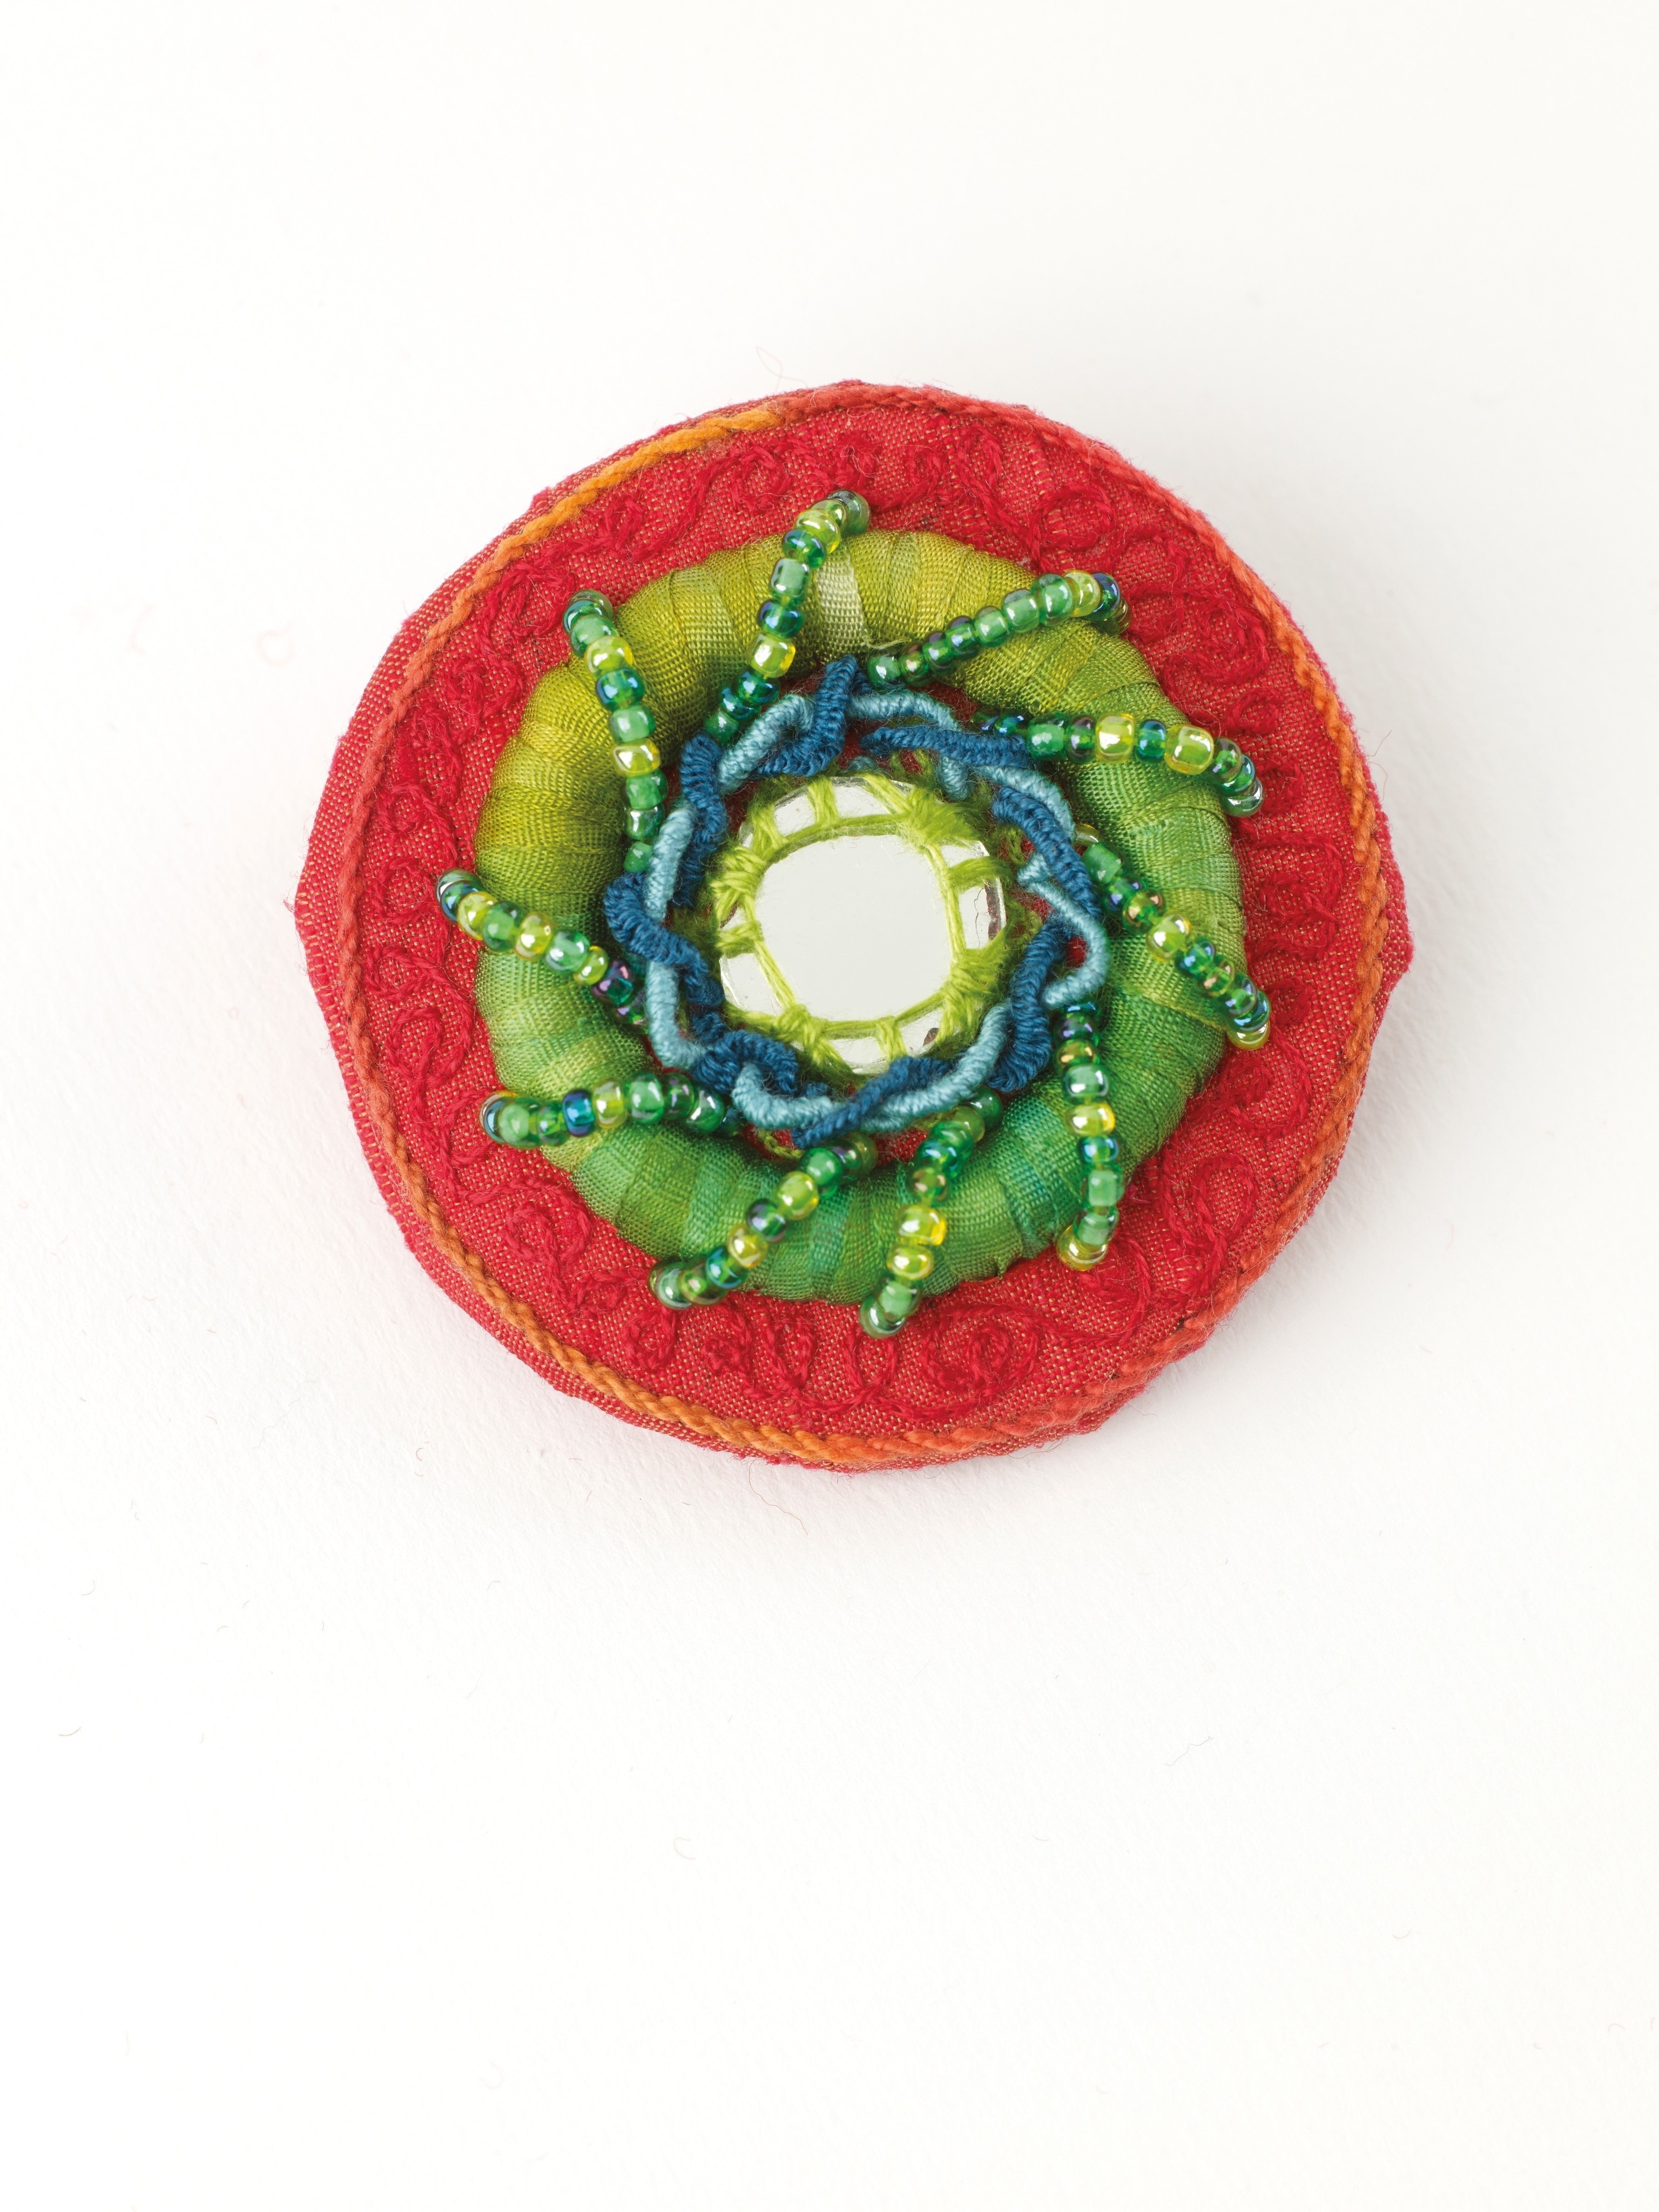
Raised Embroidery Brooch
Extract from Raised Embroidery • By Kelley Aldridge • Published by Search Press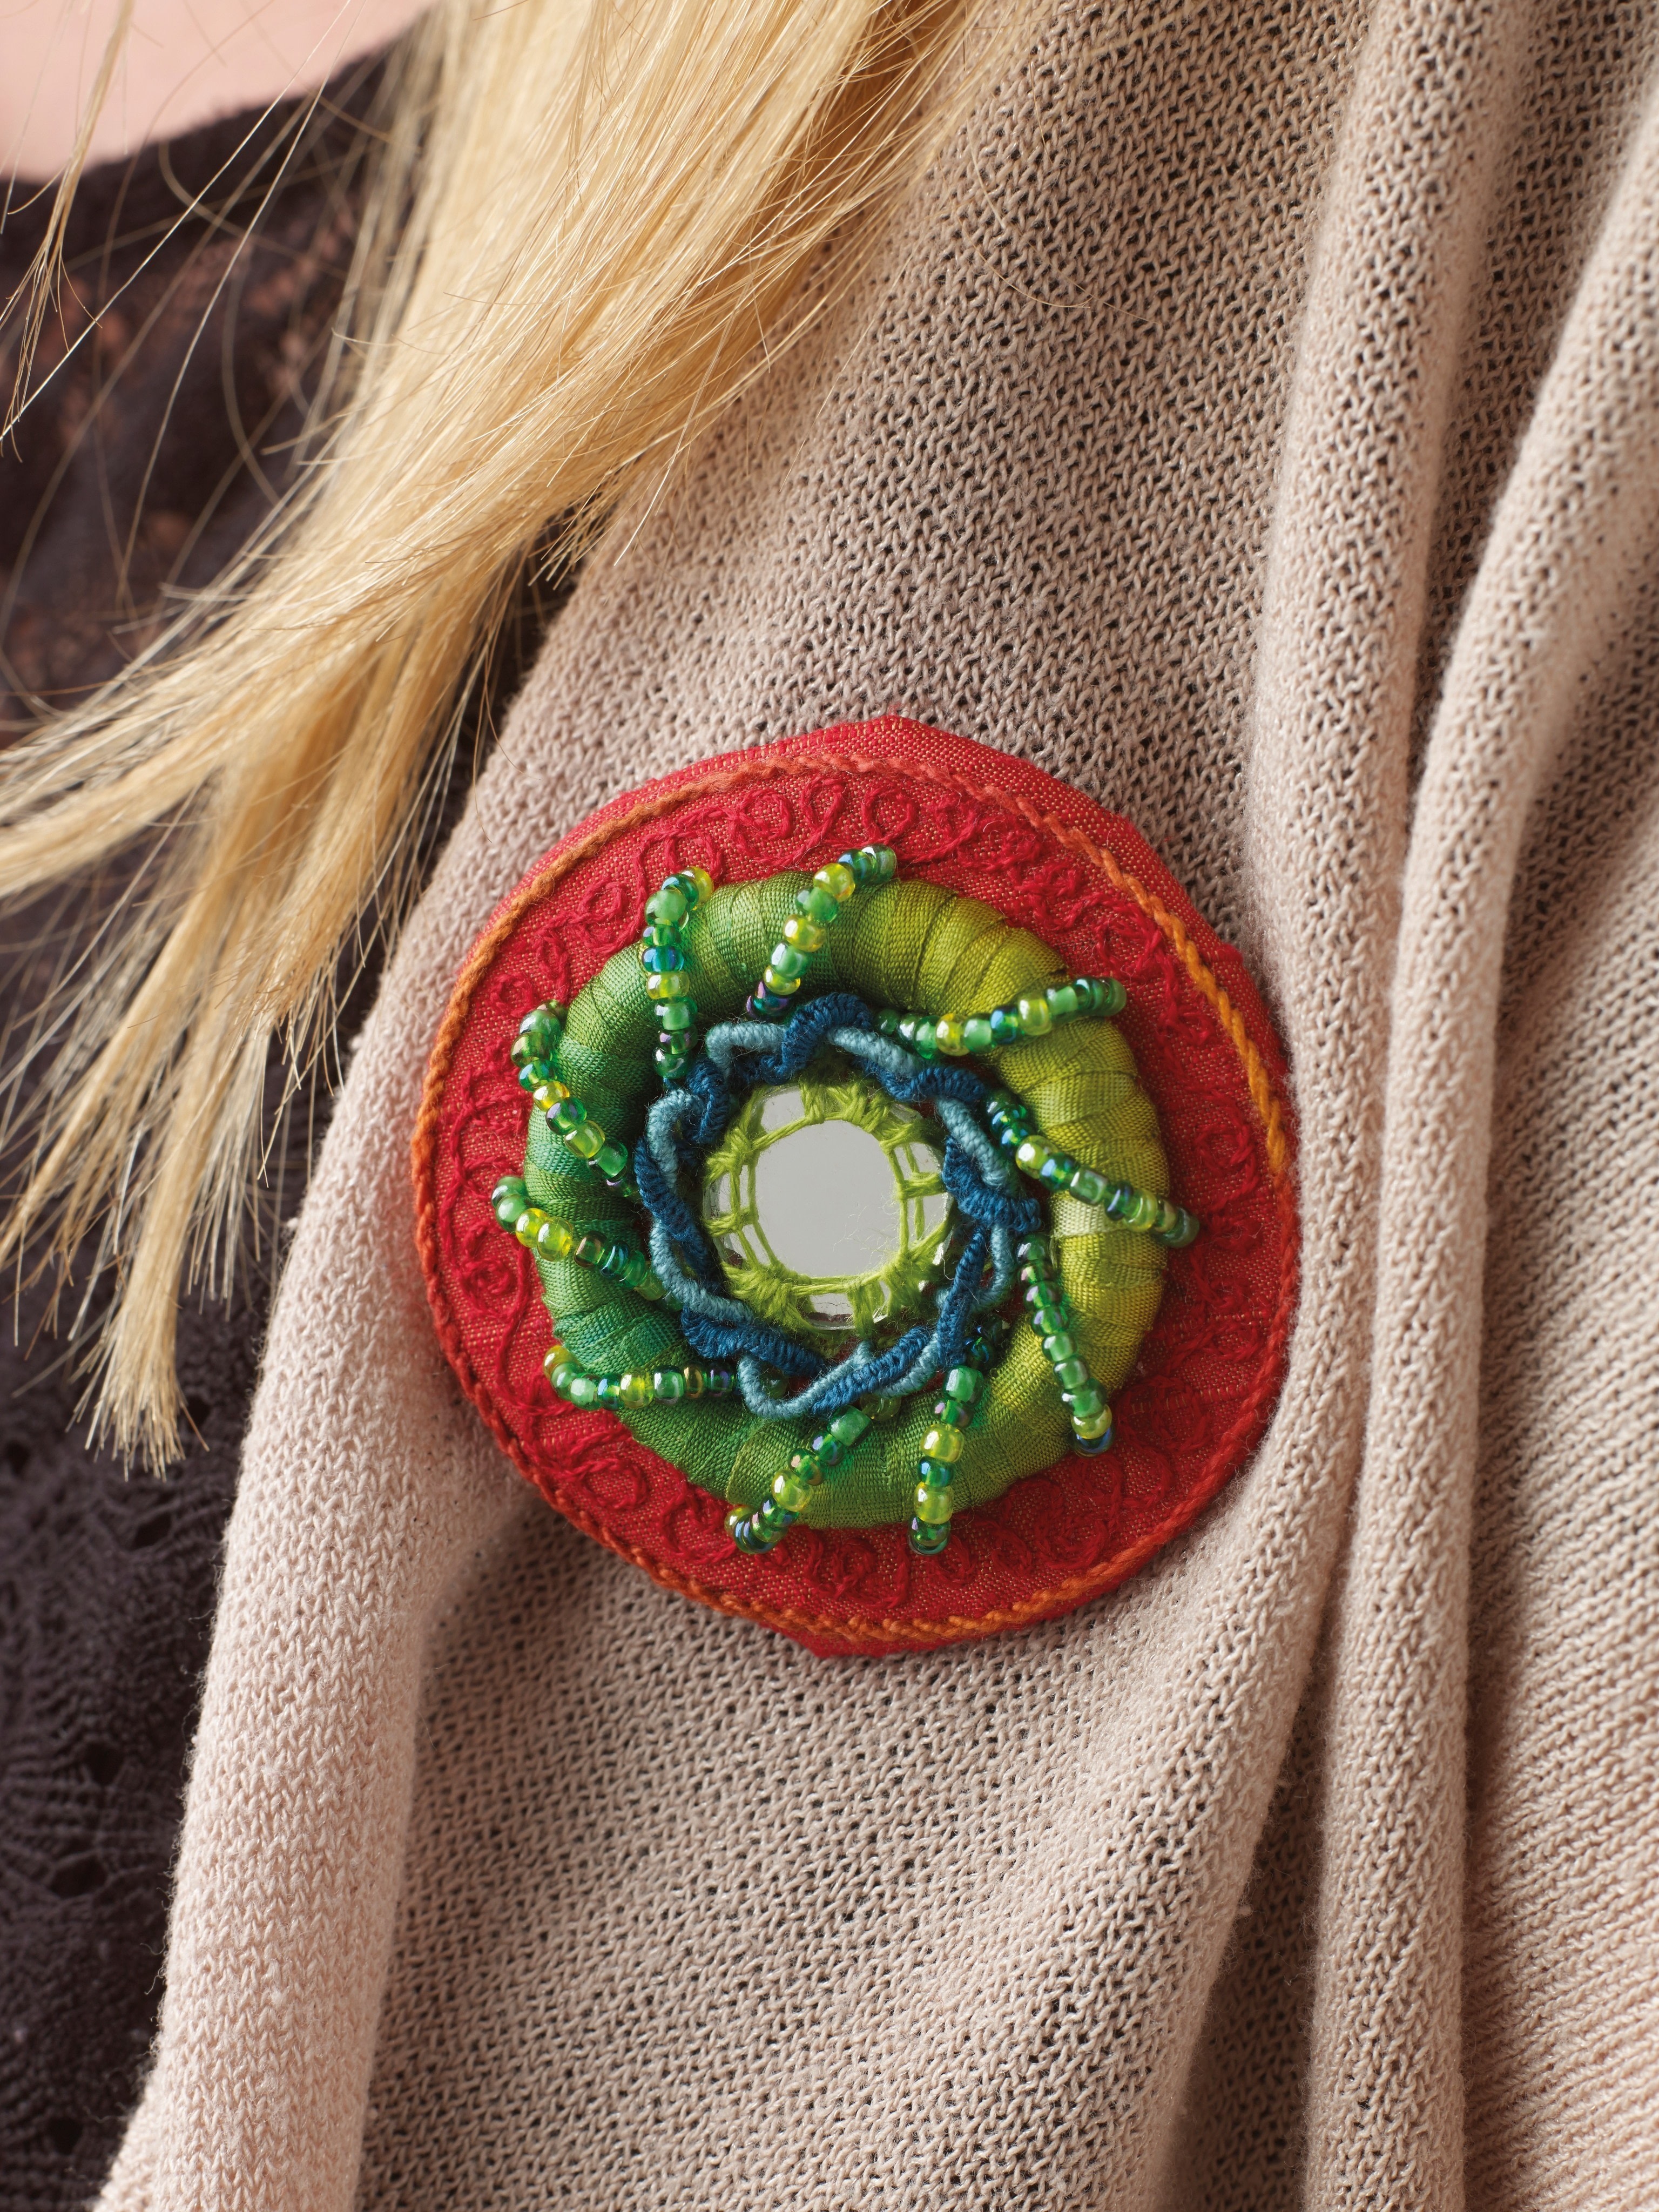


About
Raised Embroidery
5 x 5cm (2 x 2in)
I’m a fan of ‘statement’ accessories – unusual pieces paired with very simple outfits are my favourite. As with the other projects in this book, the small size involved means you can make a feature of fine stitching and sumptuous materials without having to commit to a large project. Even better, it’s portable to make as well as to wear! The important thing to remember is that the design needs to be very simple, and bold.
The piece is worked in a small frame as an embroidered panel, which is then stretched gently over either card or pelmet vilene, then lined on the back to hide the construction stitches. Given that it exists as a single item, and isn’t attached in any way to anything else except the jewellery findings, it can be whatever shape you like. Start with your favourite colour and build out from there! Remember – be bold with your materials and simple with your design!
Downloads
- 116608_2F2017-07-12-171138-diagram_badge_re-drawn_emma+copy.eps 500 KB [ Download ]
-
 JadeSucksAtLife favorited Raised Embroidery Brooch
02 Mar 15:25
JadeSucksAtLife favorited Raised Embroidery Brooch
02 Mar 15:25
-
 Kimya J. favorited Raised Embroidery Brooch
04 Nov 02:56
Kimya J. favorited Raised Embroidery Brooch
04 Nov 02:56
-
 HuntressFashion added Raised Embroidery Brooch to Fashion how to!
16 Aug 15:45
HuntressFashion added Raised Embroidery Brooch to Fashion how to!
16 Aug 15:45
-
 Crafterella featured Raised Embroidery Brooch
26 Jul 23:00
Crafterella featured Raised Embroidery Brooch
26 Jul 23:00
-
 Sarah Sylvia S. favorited Raised Embroidery Brooch
26 Jul 02:24
Sarah Sylvia S. favorited Raised Embroidery Brooch
26 Jul 02:24
-
 Alissa B. favorited Raised Embroidery Brooch
23 Jul 19:17
Alissa B. favorited Raised Embroidery Brooch
23 Jul 19:17
-
 Search Press published her project Raised Embroidery Brooch
21 Jul 09:00
Search Press published her project Raised Embroidery Brooch
21 Jul 09:00
You Will Need
-
Step 1
Designing the piece
From the start, I wanted this piece to be eye-catching, in fact I wanted it to be eye-popping! The colours needed to be very bright, and I knew there would be at least one shisha mirror to catch and reflect back the light. Whether worn as a brooch or a necklace (or earrings), this little piece of embroidery would often shift and move with the wearer, so reflective and shiny materials would really flash and sparkle. Silk fabric and ribbons would help add rich colour and sheen, which would be counter-balanced with some interesting texture.
The size of this piece is relatively small – brooches generally are not too large for practical reasons. A pendant could be bigger, but only slightly. If you are familiar with the term ‘inchie’ – a tiny piece of textile-art sampling which measures no more than one square inch – you will have an idea of what I was envisaging, though the final piece is slightly larger than this to give more space for the decorative embroidery. -
Step 2
Moodboard
I love the work of artist Dave Galchutt, who is known for his use of vibrant colours. Inspired by the colours in one of his pieces, I began my moodboard by pinning colour sketches to the cork, then finding matching threads that would allow me to incorporate the same bold hues in my piece. I also came across a series of large ceramic titles by artist Christopher Gryder and was immediately struck with how lovely they would be in raised stitches.
I spent some time working out possible combinations of techniques and colour, making notes to myself and pinning them to the board, too. -
 Step 3
Order of work
The shisha mirror is attached first, as you need a lot of elbow room for this complex stitch. The ribbon and beadwork are worked last as they are very raised, which makes them liable to being damaged from working nearby stitches if you add them earlier.
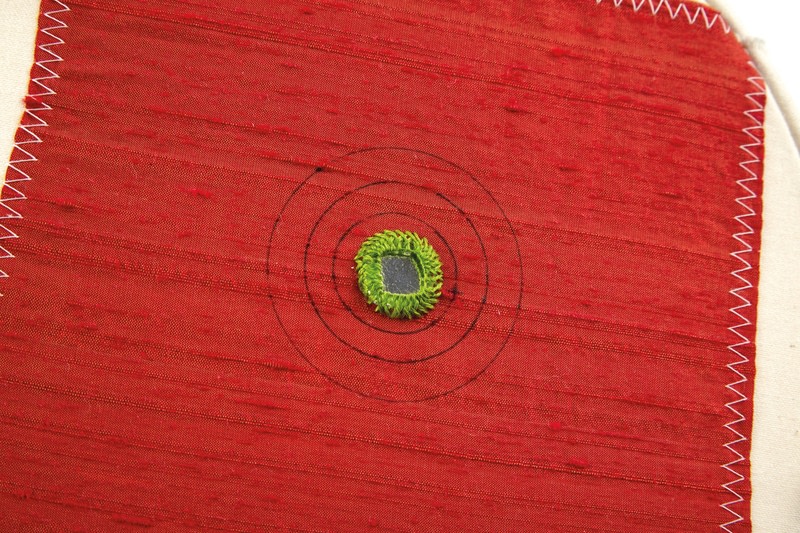
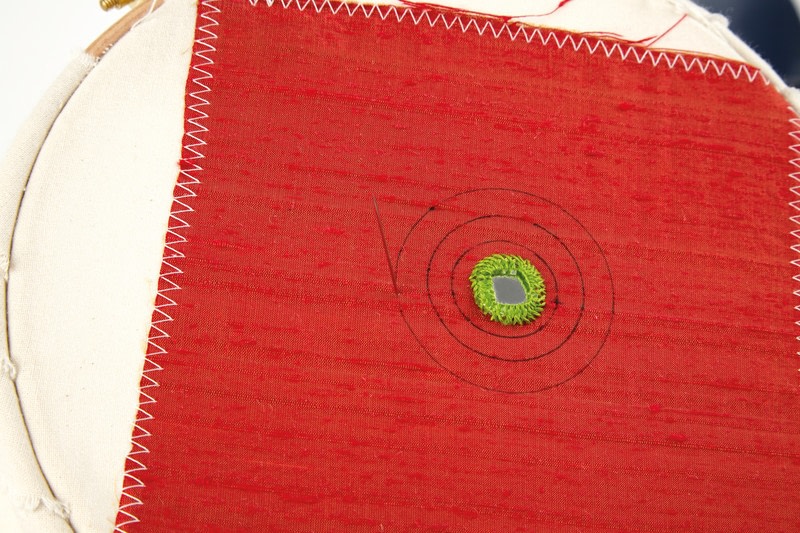
A Secure the fabric to the hoop, then transfer the design and secure the shisha. This stage is shown to the right.
B Work the stem stitch areas.
C Work vermicelli – the green areas first, then the red areas.
D Work the bullion knots and cast-on stitches.
E Add the ribbon and bead embellishment. -
 Step 4
Stem stitch
This is a ‘workhorse’ of a stitch, providing lines that are straight, curved, thick, thin, shaded and plain.Using a semi-fine variegated thread in an embroidery needle and the cast-on securing method, begin your stem stitch on the outer line shown on the template, bringing your needle up through the line itself.
-
 Step 5
Take your needle down about 2mm (1⁄16in) away from its starting point, pulling most of the thread through but leaving a loop on the surface of the fabric.
-
 Step 6
Holding the loop of thread to the inside of the border line, bring your needle up again, on the line, halfway between the start and end of the previous stitch.
-
 Step 7
Pull the working thread through completely, thereby tightening the first stitch.
-
 Step 8
Take the needle down 2mm (1⁄16in) further round the circle to start the next stitch.
-
 Step 9
Repeat all the way round until the border line is complete.
Tip
To turn a sharp angle in stem stitch, the first stitch in the line must be worked backwards to avoid bringing the needle up where it has just gone down.Stem stitch
Stem stitch makes an excellent neat, understated and subtle border. In this detail from the finished piece, note how the variegated thread adds a little interest. -
 Step 10
Vermicelli backstitch
Named after the spiralling pasta, this creates an all-over background pattern.Secure a fine embroidery thread in the area next to the shisha using the cast on method. Ensure you cover your securing stitches as you work. Bring your needle up at the starting point of your stitch, and take it down about 2mm (1⁄16in) further on.
-
 Step 11
Pull all the thread through firmly. Start the next stitch by bringing your needle up through the middle of the previous stitch, splitting the thread as you go.
-
 Step 12
Take it down about 2mm (1⁄16in) further on, pulling thread firmly.
-
 Step 13
Repeat the step, keeping lengths consistent and gradually curving around and about in a wandering ‘squiggle’ effect.
-
 Step 14
Fill the entirety of the inner circle with green vermicelli, then cast off the working thread so that it is hidden by the final split stitches.
-
 Step 15
Fill the outer circle with red vermicelli stitch in the same way.
-
 Step 16
Bullion knot and cast-on flower
Inspired by Brazilian embroidery, this motif combines three well-known raised stitches.Work a long curved bullion knot quarter of the way round the shisha, starting at the 12 o’clock position and working round to the 3 o’clock position.
-
 Step 17
Work round the rest of the shisha with three more long curved bullion knots; the first from 3 o’clock to 6 o’clock, the second from 6 o’clock to 9 o’clock, and the third from 9 o’clock to 12 o’clock.
-
 Step 18
Just like bullion knots, cast-on stitches can be made curved by adding too many wraps to comfortably sit between the start and end points of the stitch. Use this to make a curved cast-on stitch over the first loop, bringing the needle up on the inside of the loop (i.e. nearer the shisha) and down on the outside of the next loop.
-
 Step 19
Repeat on the other three bullion knots, starting each overfilled cast-on stitch inside one bullion knot loop and taking it over the next loop.
Overlapping bullion knots
Twisting and turning, the intertwined bullion knots and cast-on stitches are echoed by the orange vermicelli split stitches and the rows of beads going over the padded ribbon roundel. -
 Step 20
beads and ribbon ‘cutwork’
Inspired by the goldwork embroidery technique, this creates a raised roundel of colour and sparkle.Use soft string padding to create a doughnut shape with neatly fitting ends on the surface as shown.
-
 Step 21
Thread a length of silk ribbon into a large-eyed embroidery needle and secure the end at the outer edge of the padding, via the cast-on method. Take the ribbon over the padding at a slight angle.
-
 Step 22
Cast a fine red thread onto an embroidery needle and add a couching stitch to hold the ribbon down tightly on the inside of the padding.
-
 Step 23
Take the ribbon back over the padding, overlapping the previous section slightly.
-
 Step 24
Secure the ribbon on the outside.
-
 Step 25
Continue to secure the ribbon, ‘zig-zagging’ back and forth over the padding as you work.
-
 Step 26
Once you have worked all the way round, thread a fine embroidery needle with matching thread. Bring it up on one side of the padding and thread on ten or so beads.
-
 Step 27
Take the needle over the padding and down close to the padding on the other side, slightly further around. Draw through to pull the beads tightly against the padding.
-
 Step 28
Repeat all the way around.
-
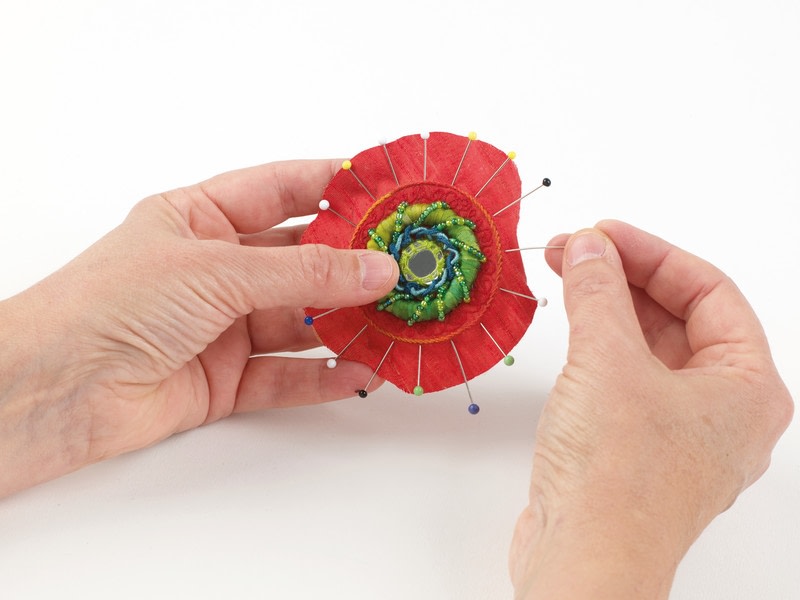
 Step 29
Construction
Use scissors to trim your fabric into a circle, leaving a border of 2.5cm (1in) around the outer line (see template above). Pin this to a piece of stiffened fabric cut to the same size as the template.
-
 Step 30
Use a strong thread and a curved needle to begin firmly lacing the fabric across the back of the roundel. Start by securing your thread then taking a small stitch through the seam allowance of the fabric on one side of the roundel.
-
 Step 31
Take a second small stitch directly opposite, so that the thread travels straight across the back of the roundel.
-
 Step 32
Make your next stitch a little way clockwise round the shape, then repeat steps 2 and 3, folding in the fabric seam allowance as you work. Your roundel will begin to resemble a wheel with criss-crossing strokes.
-
 Step 33
Continue working all the way round until all the fabric seam allowance has been secured, then secure and cast off your working thread. Using a single strand of embroidery cotton, work a line of detached buttonhole bar ‘scallops’ (see page 54) into the very edge of the fabric as a decorative finish, taking care not to damage the surface embroidery.
-
 Step 34
Cut a piece of red felt to 3–5mm (1⁄8–¼in) smaller than the piece and position it on the back of the roundel. Use a matching thread and a curved needle to secure the felt to the piece using small, neat stitches.
-
 Step 35
Use the matching thread and a curved needle to attach a brooch finding to the felt to finish.
Necklace variation
If you prefer, you can attach a necklace finding in place of the brooch back, then thread a chain or ribbon through to make a necklace.