


About
This cute and colorful crocheted scarf will turn you into a treat!
In the spirit of Halloween, tricks, and treats, I wanted to whip up a fun candy-themed scarf for you guys. The extra cool part is that if you are a beginner crocheter, this project is not too complicated and is basically just a striped scarf with some extra details. You should be familiar with (in U.S. terms) single crochet (sc), half double crochet (hdc), double crochet (dc), and changing yarn colors. I hope you have a lot of fun making and wearing this!
Tags
-
 Galaxie A. favorited Rainbow Tart Candy Scarf
28 Dec 23:09
Galaxie A. favorited Rainbow Tart Candy Scarf
28 Dec 23:09
-
 Paige D. favorited Rainbow Tart Candy Scarf
22 Sep 05:21
Paige D. favorited Rainbow Tart Candy Scarf
22 Sep 05:21
-
 Summer O. favorited Rainbow Tart Candy Scarf
17 May 07:11
Summer O. favorited Rainbow Tart Candy Scarf
17 May 07:11
-
 Leia B. favorited Rainbow Tart Candy Scarf
20 Mar 22:34
Leia B. favorited Rainbow Tart Candy Scarf
20 Mar 22:34
-
 Leslie M. favorited Rainbow Tart Candy Scarf
09 Mar 01:06
Leslie M. favorited Rainbow Tart Candy Scarf
09 Mar 01:06
-
 Candi L. commented on Rainbow Tart Candy Scarf
29 Feb 06:24
Candi L. commented on Rainbow Tart Candy Scarf
29 Feb 06:24
-
Candi L. added Rainbow Tart Candy Scarf to crochet
29 Feb 06:23
-
Candi L. favorited Rainbow Tart Candy Scarf
29 Feb 06:21
-
Suzi T. favorited Rainbow Tart Candy Scarf
22 Nov 03:28
-
 amyistheparty favorited Rainbow Tart Candy Scarf
19 Nov 18:11
amyistheparty favorited Rainbow Tart Candy Scarf
19 Nov 18:11
-
Step 1
Abbreviations
Ch(s): chain(s)
Dc: double crochet
Hdc: half double crochet
Sc: single crochet
Sk: skip
St(s): stitch(es)
( ): work everything inside the parentheses into the next stitch -
 Step 2
SCARF
- The color order of your stripes isn’t super important, but I followed the color pattern on the Smarties pool floatie.
- With Yellow, ch 20.
Row 1: Sk 1st 2 chs, 18 hdc evenly across. (18)
Rows 2-5: Ch 2, turn. 18 hdc evenly across. (18)
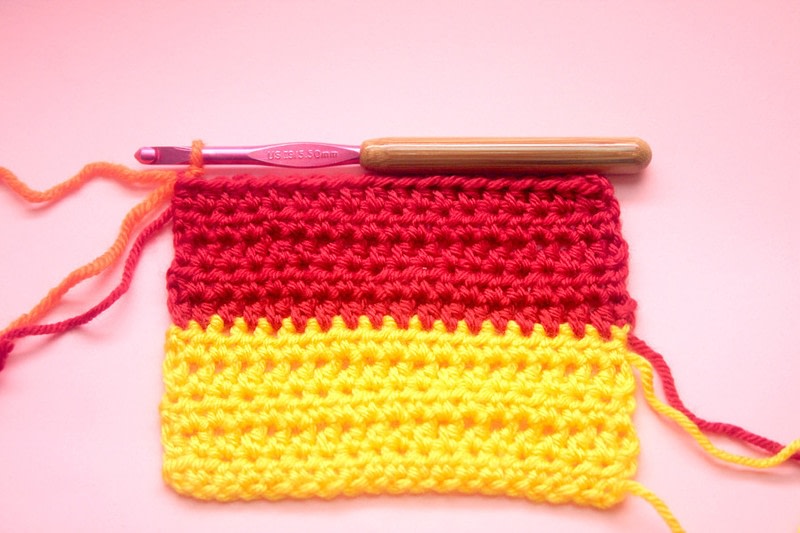
- (Photo 1) Break off Yellow. Join Red. -
 Step 3
Rows 6-10: Ch 2, turn. 18 hdc evenly across. (18)
- (Photo 2) Break off Red. Join Orange. -
 Step 4
Rows 11-15: Ch 2, turn. 18 hdc evenly across. (18)
- Break off Orange. Join Blue.
Rows 16-20: Ch 2, turn. 18 hdc evenly across. (18)
- Break off Blue. Join Green.
Rows 21-25: Ch 2, turn. 18 hdc evenly across. (18)
- Break off Green. Join Yellow.
- Keep working 5 rows of each color until your scarf is your desired length. I made mine 72 inches long, which was actually a big too long on me (I'm 5'4"). The final scarf will end up being slightly longer due to the “wrapper” we will be adding at the end.
- After you’ve worked the last row of the last stripe, break off your yarn and join White.
Rnd 1: Ch 1, turn. Work in sc evenly around the entire scarf. This will give the illusion that your candy is inside a wrapper. 17 sc evenly and in the last st of the row, work (3 sc) to turn the corner. On the sides of the scarf, working 7 sc for every 5-row stripe worked best for me. When you’ve reached the other short end of the scarf, work (3 sc) into the first st to turn the corner, 16 sc evenly, and (3 sc) again in the last to to turn the corner again. Work evenly on the long side as you did before. When you’ve reached the first sc of the rnd, work (2 sc) into the same st to mimic the (3 sc) corners you’ve been working, then sl st to that first sc to join. (Photo 3)
- Break off White.
- Weave in ALL the ends. SO MANY ENDS. Watch some tv while you do it. -
 Step 5
WRAPPER ENDS
- With the Right Side of Rnd 1 facing you, insert your hook into one of the short ends of the scarf. Start from the (3 sc) corner on the right and then count 3 sts. Insert hook into 4th st. (Photo 4) -
 Step 6
Row 1: Ch 2 and dc into same st. Work 2 more dc evenly. Then (2 dc) 4 times, then 3 dc evenly. The 14 sts you just worked should sit in the middle of the scarf-end. Leave remaining sts unworked. There should be 3 more sc and then the (3 sc) corner. (14)
Row 2: Ch 2, turn. 3 dc evenly, (2 dc) 8 times, 3 dc evenly. (22)
- Break off White. Join Red.
Row 3 : Ch 2, turn. 3 dc evenly, (2 dc) 16 times, 3 dc evenly. (38)
- Break off Red. Join White.
Row 4: Ch 2, turn. Work 38 dc evenly across. (38)
- Break off White. Join Red.
Row 5: Repeat Row 4. (38)
- Break off Red. Join White.
Row 6: Repeat Row 4. (38)
- Break off and weave in all ends. -
Step 7
- Flip the scarf around and work another Wrapper End on the other side.
- If you want, you can cut and sew some felt lettering to embellish your scarf with words, but I think it's pretty cute as it is!


Thank you !!!