


About
This IS the droid you are looking for...
I like to make celebration cakes for my Godson and friends' kids on their birthdays and this year I made an R2-D2 cake. I kind of made it up as I went along so a few of the quantities might be a bit off but I took plenty of pictures so you can get the gist of how I made it! You might want to do the baking the day before so the cake is cool and firm.
The weight of the cake was making him bulge a little bit - luckily we were eating it the same day but in future I might put some support rods down through the body to support the head. Good Luck!
-
 kieeeera_ favorited R2 D2 Cake
12 Feb 14:34
kieeeera_ favorited R2 D2 Cake
12 Feb 14:34
-
 C.Rami added R2 D2 Cake to todo
20 Oct 08:25
C.Rami added R2 D2 Cake to todo
20 Oct 08:25
-
 CookieBird Lover added R2 D2 Cake to snacks,drinks,meals and desserts
01 Sep 03:11
CookieBird Lover added R2 D2 Cake to snacks,drinks,meals and desserts
01 Sep 03:11
-
CookieBird Lover favorited R2 D2 Cake
29 Aug 03:12
-
 emma s. favorited R2 D2 Cake
22 Jun 15:33
emma s. favorited R2 D2 Cake
22 Jun 15:33
-
 Thalia favorited R2 D2 Cake
29 Jul 03:27
Thalia favorited R2 D2 Cake
29 Jul 03:27
-
 thatdorkychick favorited R2 D2 Cake
27 Jul 16:03
thatdorkychick favorited R2 D2 Cake
27 Jul 16:03
-
 Elena<3 favorited R2 D2 Cake
15 Jul 19:54
Elena<3 favorited R2 D2 Cake
15 Jul 19:54
-
 GSNETart favorited R2 D2 Cake
01 Jul 05:57
GSNETart favorited R2 D2 Cake
01 Jul 05:57
-
 Leo R. favorited R2 D2 Cake
24 Jun 15:35
Leo R. favorited R2 D2 Cake
24 Jun 15:35
-
 Step 1
Bake or buy about 6 8-inch cakes. I used my favourite chocolate cake recipe but you can do any flavour you like.
I also baked a madeira cake to use for the top so there was a choice of flavours and also madeira cake is a bit firmer so would hold up to the poking about that the icing process would bring!
Stick four layers together with butter icing. -
 Step 2
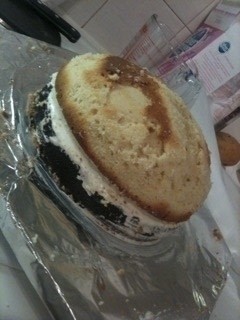
For the head, I stuck the madeira sponge onto another chocolate layer and shaped it into a dome shape by trimming with a knife.
Then cover the whole dome with more butter icing. -
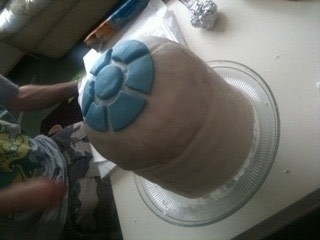
 Step 3
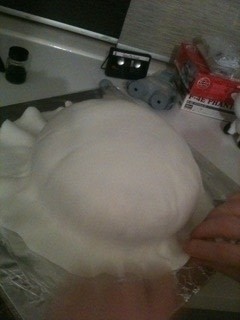
My local supermarket sells ready-rolled white fondant icing so I bought 2 or 3 packs - lay one over the head and press down, then trim off the excess. Keep the trimmings, and try to keep them clean of crumbs.
-
 Step 4
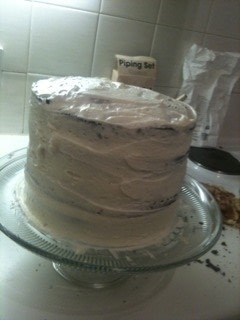
Cover the whole of the rest of the cake with butter icing too, then take another pack of ready roll icing and re-shape it into a rectangular shape. This will cover the main cake and can be done in sections if you like as there's plenty of opportunity to cover up joins later.
-
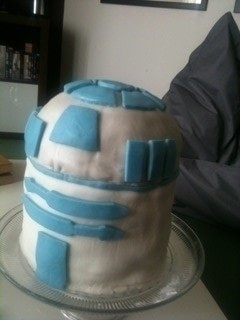
 Step 5
wrap the rolled icing around the cake - this is easier with two people! Then I figured it might be easiest to decorate the top before putting it on so mix up some blue food colouring with the trimmed off ready-rolled icing - add it a bit at a time until you get the right colour. I downloaded pictures of R2-D2 off the internet to see what he looked like.
-
 Step 6
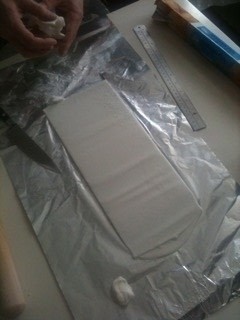
I cut out all the blue bits I needed in one go - roll out onto tin foil then cut out with a new, clean craft knife. This will cut right through the foil so it's easier to handle and apply them to the cake - just stick them on with icing and peel off the tin foil.
-
 Step 7
Stick the head onto the body with butter icing... then move onto the legs.
-
 Step 8
cut out leg shapes from the last tray cake as pictured, then wrap the legs in ready-roll icing, put a layer of butter icing on first to act like glue.
-
 Step 9
I dusted the head with an edible silver lustre dust but you could hardly see it and it was expensive. If I made another I'd leave it off, or maybe make the head icing light grey first.
-
 Step 10
Stick on all your blue bits, and the legs, using yet more butter icing. Using my picture of R2-D2 I also noticed there are white bits, vents, lines, circles etc all over him, so I added these where needed.
-
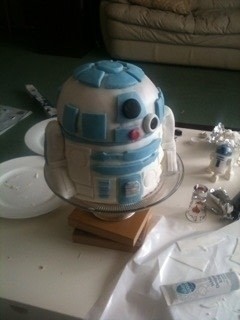
 Step 11
He's also got a black....eye(?) thing and a red light, so I made a little bit of black and red icing and added these.
Finally for serving I crushed up rice Crispies and put them around his feet to look like the desert.
Then we ate him up quick before he collapsed under his own weight!


Thank you for posting.