About
A tutorial on printing a repeating pattern with the Speedball Ultimate Fabric and Paper Block Printing Kit
The kit I was sent from Speedball to test for this site contained both a linoleum block and a speedy-carve block. I opted to use the speedy-carve block first since this was my first time block printing. I read in the instructions that you can carve on both sides of the speedy-carve block to get a 2-in-one printing block, so that's why you can see almost the same design on the back of the block in some of the pictures. I only used one side for this project, so if you see the side without ink on it in the picture, that means the inked side is down.
-
 The Sewing Maven favorited Printing A Repeating Pattern With A Block Printing Kit
07 Dec 08:44
The Sewing Maven favorited Printing A Repeating Pattern With A Block Printing Kit
07 Dec 08:44
-
 Chudames favorited Printing A Repeating Pattern With A Block Printing Kit
21 Mar 00:45
Chudames favorited Printing A Repeating Pattern With A Block Printing Kit
21 Mar 00:45
-
 AlterEgo Designs published her project Printing A Repeating Pattern With A Block Printing Kit
10 Nov 00:02
AlterEgo Designs published her project Printing A Repeating Pattern With A Block Printing Kit
10 Nov 00:02
-
 Step 1
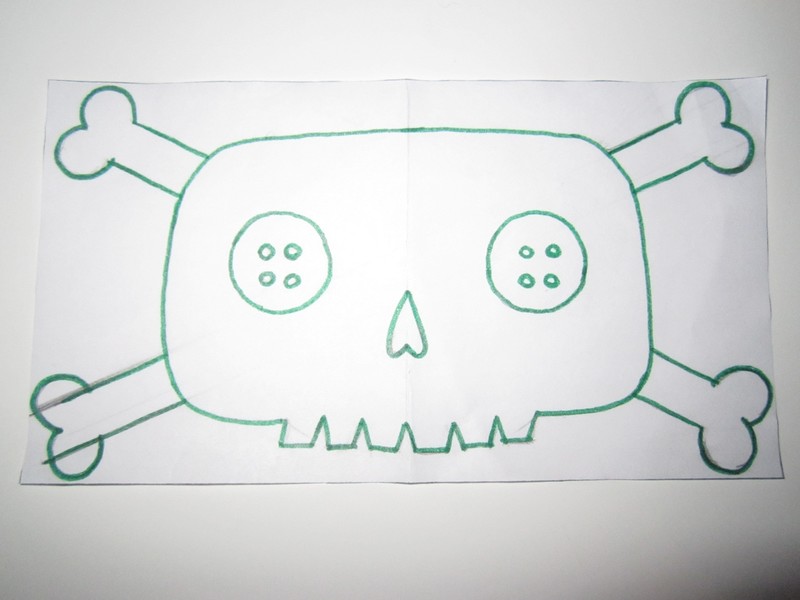
First you'll need a design. I decided to do a little logo for my Blockhead dolls, which I resized on my computer to fit the block. You can draw your design on paper, or print one with your printer. If you're more confident in your drawing abilities than I am, you can also draw directly onto the block.
-
 Step 2
If you draw your design on paper, you'll need to transfer it to your block. I used carbon paper, and then traced over the carbon paper lines to make them more bold. Make sure you can see your drawing very clearly. Any cut or scratch on the surface of the block will show up in the print, so you don't want to choose a design that's going to be too difficult to cut out.
-
 Step 3
When your design is transferred to the block and you're ready to start cutting, start by cutting the outline for your design with your small cutting tool (I used the #1 blade from the kit). Only remove the outline of the areas you want to be printed. (The picture with the next step will illustrate this better if my wording is confusing.)
-
 Step 4
With your large cutting blade, remove any large areas that you don't want to show up in your print. Don't get too close to the areas you want to keep. You can come back with a smaller blade (I used the #2 from the kit for this part) and get those areas just along the edges. The cuts don't have to be even, but you don't want any of the carved-out sections to be as raised as your design, or you'll end up with spotty prints.
*Since the kit said you can carve both sides of the speedy-carve block, I carved one side to be a more solid print, and the other to be just the outlines. On this side of the block, the skull, bones, and button eyes will be printed onto the surface, with the outlines of the eyes and the nasal cavity of the skull showing as negative space.*
-
 Step 5
If you want a design with just the outlines, cut it more like I did the other side of my block. On this side, just the button eyes, the nasal cavity, and the outline of the skull and crossbones will be printed. The buttonholes and the skull and bones themselves have been hollowed out.
*I didn't end up using this side for this project, but if I had opted to use it, the printing steps would be the same. I would just flip the block over and roll the ink onto this side instead.*
**Once you've cut your block, you're ready to print!**
-
 Step 6
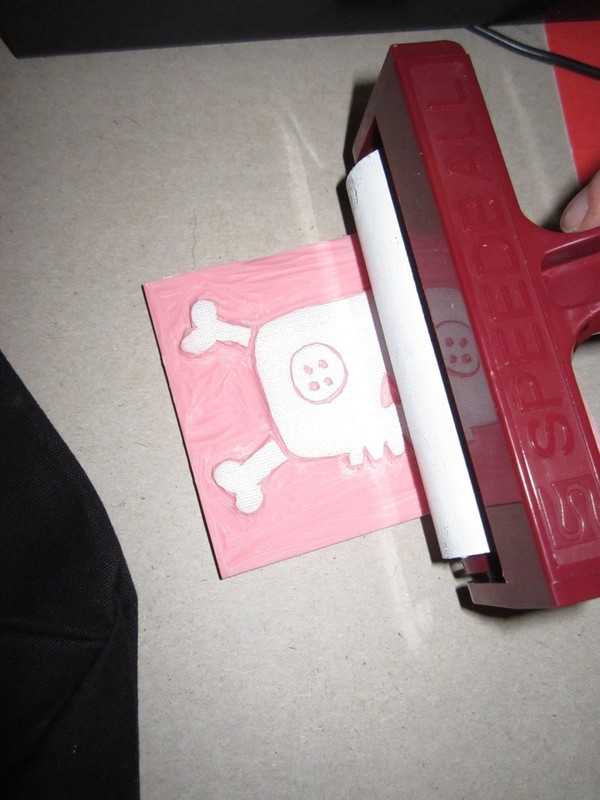
Start by squeezing a little of your ink onto your inking plate. Roll the ink with your rubber brayer until the roller is fully coated with an even layer of ink.
-
 Step 7
Using your brayer, roll the ink evenly onto your block. It's important to make sure the ink is completely even if you want your print to be solid. If you want your print to look distressed like mine, then it's not as important to roll the ink perfectly even. Just make sure that your design is completely covered.
*If you notice any ink ending up anywhere on your block where it shouldn't be (areas you carved out, like the edges of your block), you can carefully carve those bits out a little more with your cutting tools. Roll the ink back over the block and make sure the ink is now only coating the design you carved.*
-
 Step 8
Decide where you want your print to start on your printing surface. I chose a plain canvas tote bag that was just wide enough for me to do three side-by-side prints, lining the block up with the edge of the previous print each time. Make sure to line the reverse side of your printing surface with newspaper or cardboard to prevent any ink from bleeding through onto your work surface or the inside of your fabric before printing.
*For a continuous print, start on one side and work your way across so that you don't accidentally smear any prints as you go (I learned this the hard way, but if you're doing a distressed-looking print, you can actually work with this by splattering/smearing other random areas to make it look intentional).*
-
 Step 9
Pressing your block down with your hand vs. other tools will give you different effects. For the print on the far right, I just pressed the block down with my palm, smoothing it from side-to-side while holding it steady with my other hand. For the one on the left, I used the baren included with the kit. Using the baren gets you a clean, even print, while pressing the block with your hands can help you get that randomly faded look.
-
 Step 10
Once you have one row of your pattern printed, you can either stop at one row of prints, or you can continue your design over the entire printing surface. Carefully line up your block each time to keep your design even.
*For a more random look, use the same steps as above, but don't line your block up so carefully each time.*
**Make sure to re-ink your block after each print, or you'll end up with some prints in your design looking much more faded than others. This can work in your favor if that's the look you're going for, but for a nice, clean print you'll want to make sure your block is full of ink each time and re-ink after each use.**
-
Step 11
Once you're finished printing, let the ink dry and set overnight. Speedball inks cure after 1 week, but I like to heat set any fabric print before wearing/washing the first time just to be safe. To heat set, turn fabric inside out or place a pressing cloth on top. With a warm iron, press the entire surface of the print in 10-second intervals for up to a minute, making sure to keep the iron moving the entire time so you don't burn your fabric. You don't need to push it back and forth, just wiggle it around a bit.
**And always, ALWAYS wash your printed fabrics inside-out in cold water to preserve the print.**
-
Step 12
***If you're new at printing like I am, it can be really helpful to make sure you do a few test prints on a similar printing surface (or at least on paper of a similar color) before you start printing on your fabric. This helps you make sure there aren't any unwanted lines or errors in your block, and can be very helpful in figuring out how much ink your block will need to create the effect you want.***