


About
How to Print on Fabric Using Freezer Paper Stencils
Ever wanted to print your own patches, tee shirts, or curtains? Well, this is the cheap and relatively easy way to do so!
-
 Kimya J. favorited Print On Fabric Using Freezer Paper Stencils
26 May 00:33
Kimya J. favorited Print On Fabric Using Freezer Paper Stencils
26 May 00:33
-
 LastKoalaBear favorited Print On Fabric Using Freezer Paper Stencils
10 Jan 23:44
LastKoalaBear favorited Print On Fabric Using Freezer Paper Stencils
10 Jan 23:44
-
 mmotse03 favorited Print On Fabric Using Freezer Paper Stencils
04 Nov 16:42
mmotse03 favorited Print On Fabric Using Freezer Paper Stencils
04 Nov 16:42
-
 Amanda Wicked favorited Print On Fabric Using Freezer Paper Stencils
09 Apr 17:25
Amanda Wicked favorited Print On Fabric Using Freezer Paper Stencils
09 Apr 17:25
-
 Harley G. favorited Print On Fabric Using Freezer Paper Stencils
10 Feb 21:51
Harley G. favorited Print On Fabric Using Freezer Paper Stencils
10 Feb 21:51
-
 Amadeus W. favorited Print On Fabric Using Freezer Paper Stencils
05 Oct 19:45
Amadeus W. favorited Print On Fabric Using Freezer Paper Stencils
05 Oct 19:45
-
 deryn S. favorited Print On Fabric Using Freezer Paper Stencils
24 Sep 17:20
deryn S. favorited Print On Fabric Using Freezer Paper Stencils
24 Sep 17:20
-
 Yeledov favorited Print On Fabric Using Freezer Paper Stencils
13 Sep 22:10
Yeledov favorited Print On Fabric Using Freezer Paper Stencils
13 Sep 22:10
-
 Dinosaur-96 favorited Print On Fabric Using Freezer Paper Stencils
13 Jul 09:58
Dinosaur-96 favorited Print On Fabric Using Freezer Paper Stencils
13 Jul 09:58
You Will Need
-
 Step 1
Choose and print an image onto freezer paper! This is what you're going to be putting on your shirt. Ideally, this should be a high-resolution black-and-white stencil with bridges.
Some printers will accept and print on freezer paper, while other times you have to print on regular paper and double-stick tape it to your freezer paper. You want to print on the 'matte' side because the thin layer of wax is what will be holding your stencil on.
-
 Step 2
Cut it out with your X-acto knife, box cutter, or whatever. Scissors don't really work for this. You need to also leave your bridges intact. If you're using a pre-made stencil, you'll want to cut out the black parts as accurately as possible and leave everything that's white. If you have a piece of paper attached to the freezer paper, after cutting would be the right time to remove it.
-
 Step 3
Now it's time to set up your workspace and iron. Set your heat to medium and iron the item of clothing flat. This doesn't need to be a SUPER job, but just enough so that where your stencil will be has no creases. Also, slide a thick piece of cardboard or tee shirt form (available at most craft stores) between the layers if printing on a tee.
-
 Step 4
Keeping your iron on medium, place your stencil shiny-side down where you would like it to be. Then, run your iron over it a couple of times, making sure the entire sheet is stuck to the fabric and there are no bent pieces.
-
 Step 5
Now it is time to remove the bridges that give your design the cheap 'stencilled' look. Some people like the bridges, and if you do, skip this step. Take your x-acto knife and GENTLY cut through the bridges on your paper. You can now pick these pieces off. As for the floating "islands," they aren't fully affixed and the whole stencil needs a gentle ironing again.
-
 Step 6
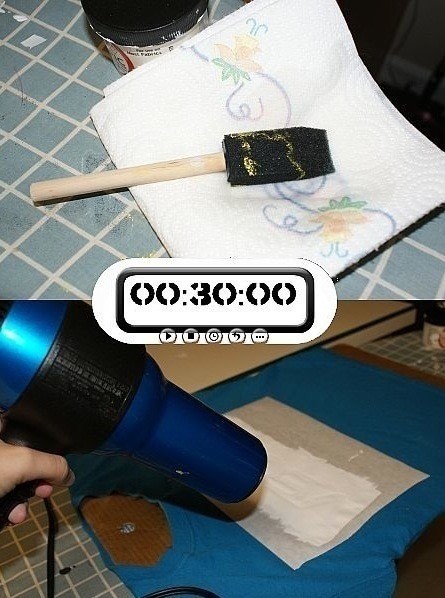
Now, assuming the whole thing is affixed and the workspace has cooled off, it is time to paint! Using your brush or roller, apply a thin coat of paint. Try to not get any bubbles, or brush lines. Don't press too hard with the roller or brush, because it's liable that you'll get a run in the fabric. This is only your first coat and it is normal for some of the paint to sink into the fabric. After you've applied this coat, wait ten minutes.
If you are using a bottle full of bleach, spray a thin coat over the entire image and wait 20 minutes.
-
 Step 7
Assuming your ten minutes is up, it's now time to apply your second coat. This coat should be thicker than the first and compensate for any uncovered/thin/streaky parts in layer one. Don't make this layer too thick, or it's liable to remain sticky for hours and you won't be able to heatset it.
This step is not necessary if you're using bleach solution.
-
 Step 8
Wait 30 minutes for the second coat to dry. Oftentimes, less time is necessary, but we're playing it safe here. This is a great time to rinse off/dry your brush or roller. If your coat is sticky to the touch after 30:00, set a hairdryer on high to medium heat and run it for a few minutes over the design. This will aid in heatsetting and dry your work much quicker.
-
 Step 9
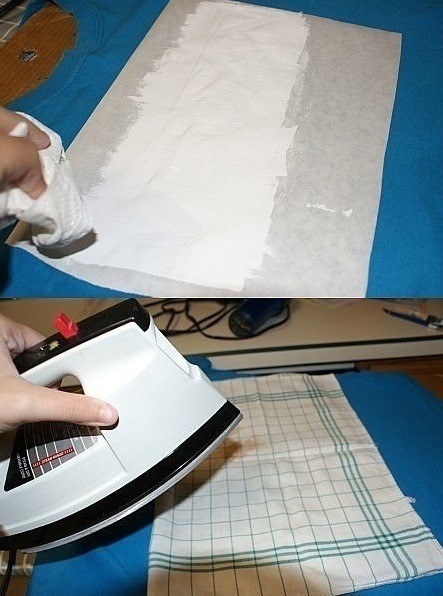
Using a paper towel, wipe as much excess paint off of the sides of the paper as possible. This will save your rag from getting sticky. Place your rag, folded in half, over the area your freezer paper is on and iron for roughly 1 min. Then remove the rag.
This step is not necessary if you're using bleach solution.
-
 Step 10
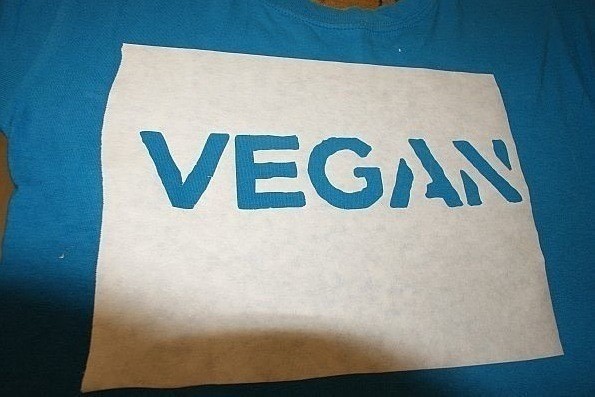
Now it is time to see the (almost) finished product. Peel off your freezer paper! Islands may be difficult to remove without smudging the paint, but will peel off if you slide your x-acto under the corner. If there's a little overrun, don't fret. This is your first project after all! Most people won't notice little mistakes.
-
 Step 11
Place your towel, unfolded over the design and iron on low for a couple of minutes. Then, turn your tee shirt inside out and iron the back for about five minutes. This process is called heatsetting and keeps your paint from washing off or cracking.
This step is not necessary if you're using bleach solution.
-
 Step 12
Put on your finished shirt and go out! (but please, wait 72 hours before washing.)
-
Step 13
Tips & Warnings
If you want to remove some overrun, just get a q-tip full of nail polish remover or alcohol and rub it on the affected area.
If you're printing on a dark fabric, chances are colors other than white won't show up. Do your base layer of white using steps 1-9, then do steps 6-end in your desired color.
Irons can get hot and set everything on fire, so keep it away from your workstation and cooled off when not in use.
X-Acto knives should only be used by adults or responsible teens.
Bleach is caustic, so be extremely careful if working with this method.


Versions


Comments


