About
WARNING!! This is addictive
I made my gran a shirt for her birthday yesterday and i was so extactic with the results and had sooo much fun that i just had to make another one so that i could do a step by step and share it with everyone:)
i did a shirt and vest, but you could do a blanket,dress,shorts,pillow...a wall. anything!
if you're doing clothes though, just make sure that you use fabric paint!
be prepared for A LOT of fun!! if you have small children,this is a perfect craft for them too:)
Tags
-
 Sarah Sylvia S. favorited Potato Printing
19 Jul 23:33
Sarah Sylvia S. favorited Potato Printing
19 Jul 23:33
-
 Donna M. favorited Potato Printing
30 Nov 17:41
Donna M. favorited Potato Printing
30 Nov 17:41
-
 porcelain.girl.melissa favorited Potato Printing
23 Apr 23:38
porcelain.girl.melissa favorited Potato Printing
23 Apr 23:38
-
Len favorited Potato Printing
30 Mar 11:16
-
S.L favorited Potato Printing
29 Mar 09:29
-
 Lois favorited Potato Printing
29 Mar 03:16
Lois favorited Potato Printing
29 Mar 03:16
-
 PinKween favorited Potato Printing
23 Mar 15:19
PinKween favorited Potato Printing
23 Mar 15:19
-
 Bethy_Page favorited Potato Printing
02 Mar 21:41
Bethy_Page favorited Potato Printing
02 Mar 21:41
-
 Katie H. favorited Potato Printing
28 Feb 14:42
Katie H. favorited Potato Printing
28 Feb 14:42
-
 Chemical Kid favorited Potato Printing
24 Feb 02:51
Chemical Kid favorited Potato Printing
24 Feb 02:51
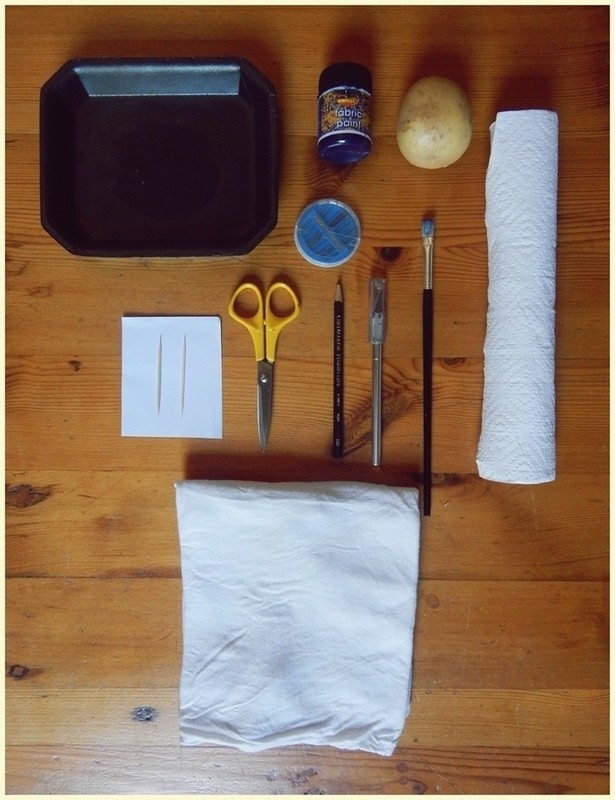
You Will Need
-
 Step 1
get all your supplies toogether
-
 Step 2
draw (or print) whatever image you want to do on a scrap of paper.
i did a cat but the possibilities are endless.
it might be cool to do different sizes of the same print or more than one shape.
my sister and i have some aaawesome ideas!! :D but you'll have to wait to see those (follow my tumblr or facebook because i update that more frequently)
-
 Step 3
cut out the shape
-
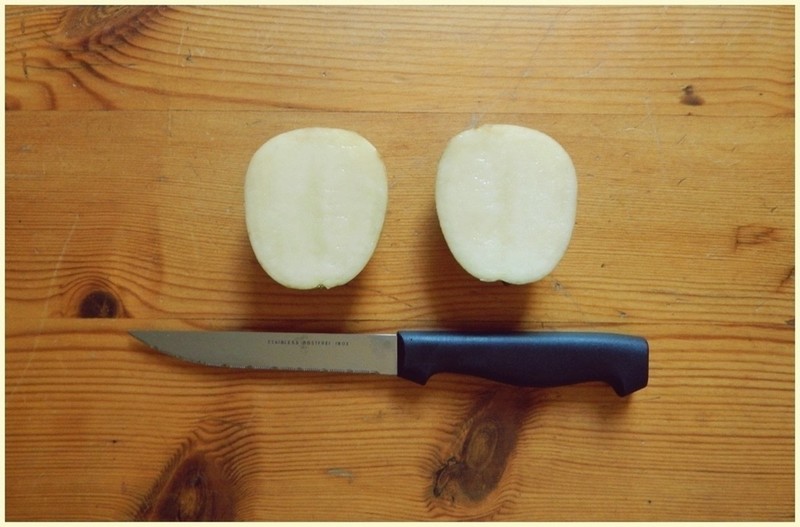
 Step 4
cut a potato in half
*when choosing the potato, make sure its big enough for the size design you want to do
use some paper/kitchen towling to dry up the moisture from the potato or leave it out for a while to dry
-
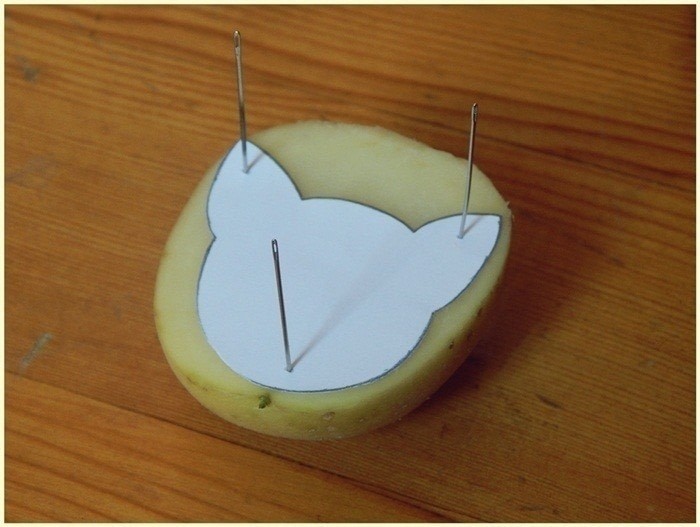
 Step 5
pin your shape to a potato half
-
 Step 6
cut around the outside of the design
-
 Step 7
remove the design and slice off the sides so that the design sticks up
(difficult to explain but just look at the picture)
-
 Step 8
it's useful to stick toothpicks through the design so you know when its straight, because it's difficult to tell when the potato is upside down
-
 Step 9
put a board/cardboard of some sort in the shirt so that the paint doesn't go through to the other side
-
 Step 10
cover the design with paint
you can either pour paint into a container and dip it in or use a brush
i used a brush, i like the effect of the brush strokes in the design (see what i mean in step 12)
-
 Step 11
place the potato paint side down.carefully.
and press down evenly so that the full design will transfer -
 Step 12
here you can see the brush strokes i was talking about
-
 Step 13
keep going till you're happy with the overall appearance
allow to dry
mine dried almost instantly. but it's always safest to wait about half an hour. depending on your paint
-
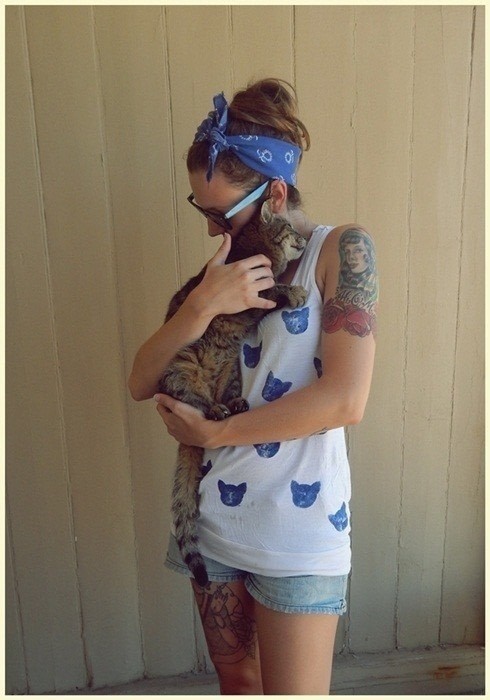
 Step 14
pose for a photo in your new shirt :D
-
 Step 15
get approval from the nearest cat <3
-
Step 16
when you wash the shirt/blanket/pillow for the 1st time, wash it separately to make sure the colours don't run


Comments