


About
Learn to sculpt step-by-step!
I decided to make a full tutorial of this one so if anyone's interested, come sculpt along! I will be adding more pics as I go.
Tags
-
 Key West Witch favorited Polymer Clay Sculpture Tutorial
12 Sep 12:45
Key West Witch favorited Polymer Clay Sculpture Tutorial
12 Sep 12:45
-
 Kay T. favorited Polymer Clay Sculpture Tutorial
12 Nov 22:41
Kay T. favorited Polymer Clay Sculpture Tutorial
12 Nov 22:41
-
 Angel C. favorited Polymer Clay Sculpture Tutorial
27 Oct 19:33
Angel C. favorited Polymer Clay Sculpture Tutorial
27 Oct 19:33
-
 Ethan S. favorited Polymer Clay Sculpture Tutorial
10 May 10:35
Ethan S. favorited Polymer Clay Sculpture Tutorial
10 May 10:35
-
Katrina P. favorited Polymer Clay Sculpture Tutorial
02 May 02:36
-
 Lona R favorited Polymer Clay Sculpture Tutorial
25 Apr 07:46
Lona R favorited Polymer Clay Sculpture Tutorial
25 Apr 07:46
-
 russ t. favorited Polymer Clay Sculpture Tutorial
24 Apr 08:40
russ t. favorited Polymer Clay Sculpture Tutorial
24 Apr 08:40
-
Patricis O. favorited Polymer Clay Sculpture Tutorial
14 Apr 05:00
-
Camille D. favorited Polymer Clay Sculpture Tutorial
14 Sep 21:49
-
 Gingerbread1992 favorited Polymer Clay Sculpture Tutorial
26 May 11:37
Gingerbread1992 favorited Polymer Clay Sculpture Tutorial
26 May 11:37
You Will Need
-
 Step 1
So I made some inset eyes with white Fimo and printed irises. They have slight indents because I want to create the clear "globe" effect by filling them out with 3D crystal lacquer later.
-
Step 2
Begin by positioning the eyeballs on the face
-
Step 3
Map out the features. The trick is to touch your own face to feel where the bones should be and how huge the eye sockets are.
She looks like C3PO now LOL! -
Step 4
Make two very small snakes for eyelids, add clay balls to cheeks and chin.
-
Step 5
Blend the additions with a flat tool and a soft paint brush.
-
 Step 6
I refined the face, made ears and baked the head on a stick at 130C for 20 minutes. I also made a hole in her scalp so the armature wire can go through to make a loop on the head. This will be useful when I work on the tail later.
-
Step 7
Build a wire armature with the aid of an anatomy reference. I used Patricia Rose's lady pattern. Keep it simple and leave extra wire for the arms for posing purpose. Hold the wires together by soldering or simply tape firmly with masking tape.
-
Step 8
Next, bulk up the chest, buttocks and thighs with foil. This will reduce the thickness of clay in these areas so you can bake for a shorter time, and not worry about burning the thinner parts.
-
Step 9
Wrap the whole armature with floral or masking tape. It is important to cover the wires as the steel can leave black marks on the clay.
-
Step 10
Put the head on to check the proportion. Pose your doll.
Brush some baby oil on the armature and cover it with clay. The oil helps the clay to adhere. Give her more flesh than you'd like and blend well. Roughly carve out her figure. I use anatomy references of nude women. -
 Step 11
Hang your sculpt while sculpting to minimise squishing and dirt. Use good anatomy references to make the body.
-
 Step 12
Smooth her as much as you can with a soft brush dipped in a solution of baby oil+ water. Gently feather off fingernail marks and fingerprints.
After smoothing, I discretely branded her with my initials. It doesn't have to be on the shoulder blade. Depending on the pose, I sometimes put it on the back of the neck, on the inner thigh or under the foot.
I wrapped her already baked head in wet cotton and foil to keep it from darkening more than the fresh clay on her body.
-
 Step 13
I made "fin holes" on her hips to assemble the fins later. The golden wires for her tail fin will be baked on first.
-
 Step 14
Start with a cold oven, hang her from the top tray to avoid flattening anything. Use an oven thermometer, do NOT trust the oven's built-in thermometer! Baking time and temperature vary from brand to brand. For Prosculpt, it's recommended to bake every 6mm for 15 min at 130'C.Again, DO NOT touch her until she is cooled after baking. Open the door slightly to stop the cooking, let her cool naturally in the oven.
There will be white marks on her face from the wet cotton, but they can be easily removed by rubbing with *very little* acetone and then baby oil.
-
 Step 15
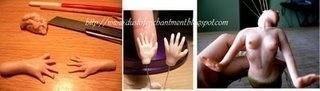
The size of her hands should be about the length from her chin to half way of her forehead. Roll out two equal sausages, flatten the palm and cut 5 little wedges for fingers. Using a soft brush and a detail tool of your choice, define the joints, knuckles, wrinkles and fingernails. Assemble to the arms and bake. I have also blushed and painted her body.
-
 Step 16
Paint her tail with a base colour of your choice. When dry, cover the tail with a paper-thin sheet of translucent clay. Using a small drinking straw or any suitable tube, cut at a 30 degrees angle and sculpt the scales with it. Bake and paint with metallic paint or Pearl-ex.
-
 Step 17
Give her make up... I am just holding some scrap mohair for the picture, her real hair is still soaked in the dye :)
-
Step 18
I glued fantasy films for her fins, held them over fire (be very careful!) to shrink the film and decorated with micro beads. I also hand dyed her mohair and made her a tiara.
-
Step 19
Finished!


One question: How did u attach the hair?
>_<
CO + K User