About
Take life one month at a time.
As a blogger, I love planning my posts well in advance. Having a calendar right on my desk helps me stay organized, but I'm not overwhelmed just looking at one month at a time.
This dry-erase calendar project is also great because there's no buying a new calendar every year, or printing a new page every month. You make the page once, and use it again and again. The best part? You probably have most of the materials at home: a piece of paper, some paint, and an old picture frame.
If you don't have a round sponge brush, try a wine cork! I did this once and it turned out great.
-
 Pimke added Polka Dot Dry Erase Calendar to Upcycling
27 Jan 08:15
Pimke added Polka Dot Dry Erase Calendar to Upcycling
27 Jan 08:15
-
 Vanessa B. added Polka Dot Dry Erase Calendar to Home DIY
20 Feb 06:20
Vanessa B. added Polka Dot Dry Erase Calendar to Home DIY
20 Feb 06:20
-
 Eleanor favorited Polka Dot Dry Erase Calendar
29 Jan 20:25
Eleanor favorited Polka Dot Dry Erase Calendar
29 Jan 20:25
-
 Oonagh B. favorited Polka Dot Dry Erase Calendar
29 Jan 12:34
Oonagh B. favorited Polka Dot Dry Erase Calendar
29 Jan 12:34
-
 Karo V. favorited Polka Dot Dry Erase Calendar
28 Jan 15:58
Karo V. favorited Polka Dot Dry Erase Calendar
28 Jan 15:58
-
 Penny F. favorited Polka Dot Dry Erase Calendar
28 Jan 04:06
Penny F. favorited Polka Dot Dry Erase Calendar
28 Jan 04:06
-
Penny F. commented on Polka Dot Dry Erase Calendar
28 Jan 04:06
-
Penny F. added Polka Dot Dry Erase Calendar to TO MAKE!
28 Jan 04:05
-
 Julia C. added Polka Dot Dry Erase Calendar to Fun Decor
27 Jan 17:18
Julia C. added Polka Dot Dry Erase Calendar to Fun Decor
27 Jan 17:18
-
 mpanda favorited Polka Dot Dry Erase Calendar
27 Jan 05:01
mpanda favorited Polka Dot Dry Erase Calendar
27 Jan 05:01
-
 Step 1
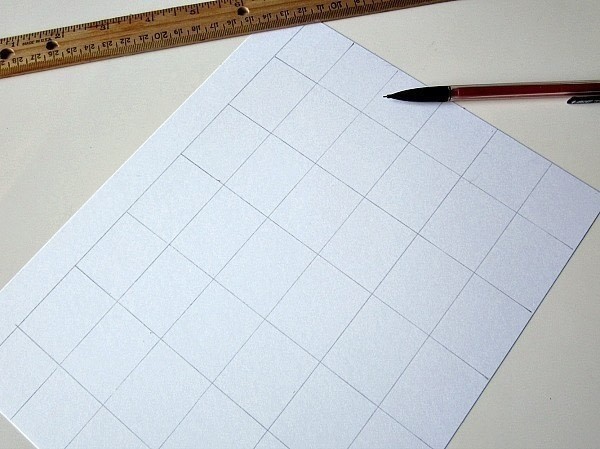
Using a pencil, start by drawing an even grid on your paper, with 7 columns and 6 rows. Leave a thin, blank strip at the top of the paper.
-
 Step 2
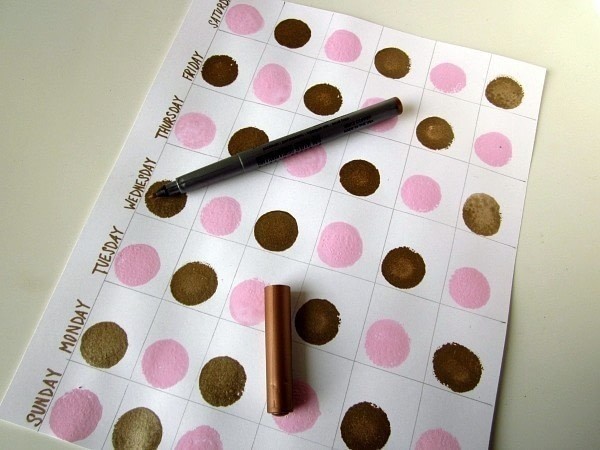
Using a round sponge paint brush, apply circles in the top left corners of each calendar square. You can make them all the same, or use any pattern of colors that you like. I alternated pink and champagne gold paint. Let Dry.
-
 Step 3
When paint is dry, write the days of the week at the top of each column.
-
Step 4
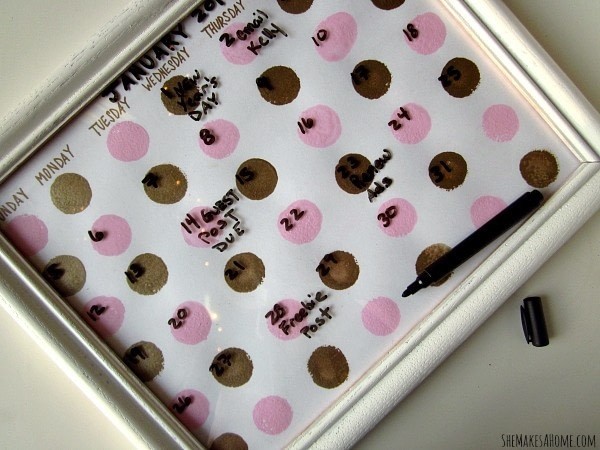
Erase all pencil markings completely.
-
 Step 5
Place the calendar in a frame. Write the current month at the top, and number the circles. You now have a reusable calendar!