Pockets Full Of Posies
Extract from Simple Sewing with Lola Nova • By Alexandra Smith • Published by Mitchell Beazley


About
Creative Makers: Simple Sewing with Lola Nova
When I was young, my family and I lived along a winding river, our house tucked up on a hillside in the woods. I remember that all of my free time was spent wandering those woods. I knew every trail, every secret spot,
and every place that the wild flowers grew. I would come home from my adventures with my arms full and decorate our house with flowers in every nook and cranny. I love these Pockets Full of Posies made from linen and bits of vintage finery – perfect for wild flowers. They also make wonderful storage for pens, pencils or paintbrushes in a workspace.
-
 Perfectly DeStressed added Pockets Full Of Posies to Jane Austen's Bedroom
12 Aug 22:58
Perfectly DeStressed added Pockets Full Of Posies to Jane Austen's Bedroom
12 Aug 22:58
-
 Bek S. favorited Pockets Full Of Posies
02 Aug 11:05
Bek S. favorited Pockets Full Of Posies
02 Aug 11:05
-
 Mia added Pockets Full Of Posies to Room Decor
18 Jan 09:04
Mia added Pockets Full Of Posies to Room Decor
18 Jan 09:04
-
 Leia B. favorited Pockets Full Of Posies
29 Jul 08:16
Leia B. favorited Pockets Full Of Posies
29 Jul 08:16
-
 Chachee.rayna added Pockets Full Of Posies to Sew, Sew!
11 May 20:02
Chachee.rayna added Pockets Full Of Posies to Sew, Sew!
11 May 20:02
-
 Val t. favorited Pockets Full Of Posies
31 Dec 18:28
Val t. favorited Pockets Full Of Posies
31 Dec 18:28
-
 Marjla added Pockets Full Of Posies to To do list
07 Dec 16:05
Marjla added Pockets Full Of Posies to To do list
07 Dec 16:05
-
Joann O. added Pockets Full Of Posies to To make
15 Oct 03:28
-
 ale_corason favorited Pockets Full Of Posies
14 Oct 07:46
ale_corason favorited Pockets Full Of Posies
14 Oct 07:46
-
lydia a. favorited Pockets Full Of Posies
07 Oct 07:23
You Will Need
-
Step 1
Prepare the pattern pieces
Cut one 25 x 18cm (10 x 7in) rectangle each from the
linen, cotton and interfacing. These will become the vase.
Cut one 8 x 18cm (3 x 7in) rectangle each from the linen,
cotton and interfacing. These will become the handle.
In this example, I cut a corner triangle from a vintage linen
napkin for embellishment. You could use a sweet vintage
hankie, a bit of doily, embroidery, ribbon and buttons…
anything that strikes your fancy, really.
Following the manufacturer’s instructions, fuse the
corresponding interfacing to the wrong side of each of
your lining pieces, then set aside. -
 Step 2
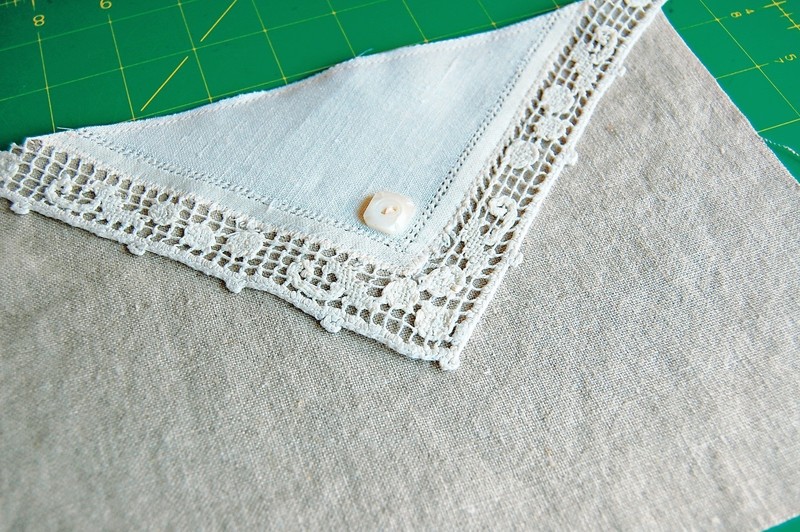
Embellish the piece
Take your large linen rectangle and your embellishments;
choose one long edge to be the top of your fabric vase and
sew the embellishments to your linen piece. Set aside. -
 Step 3
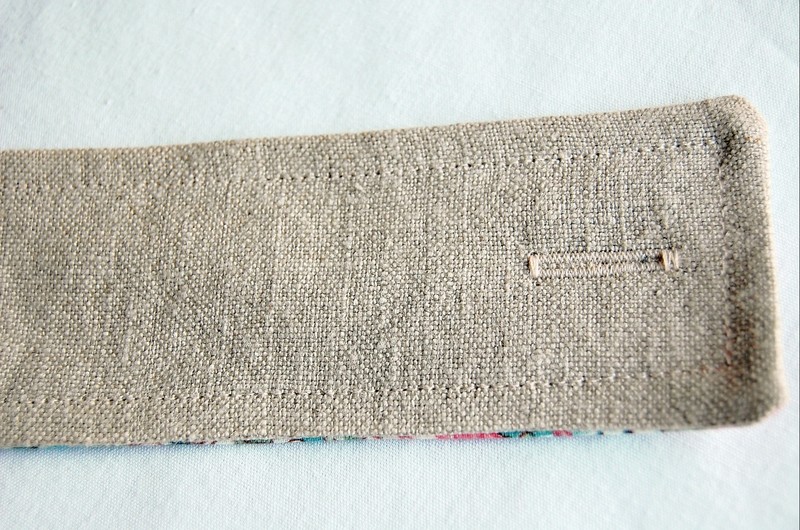
Sew the handle
Place the smaller linen and lining pieces right sides
together, matching raw edges. Pin in place. Stitch around
three sides with a 1cm (3/8 in) seam allowance, leaving one
narrow end of the rectangle open. Trim the seam allowance
and clip the corners. Turn the handle right side out and
press. Top-stitch 5mm (¼in) around the 3 sewn edges.Create a buttonhole centred on the sewn end of the handle,
the appropriate size for your button. -
Step 4
Sew the outer vase
To create the vase, take your embellished linen rectangle
and fold it in half, short sides matching and right sides
together. Pin. Stitch along the raw edges taking a 1cm
(3/8 in) seam allowance. Press the seam open and fold the
vase in order to centre the seam. This seam will be the
back of your vase. -
 Step 5
Stitch along the bottom edge of your piece using a
1cm (3/8 in) seam allowance. Clip the corners and press
the seam open. -
 Step 6
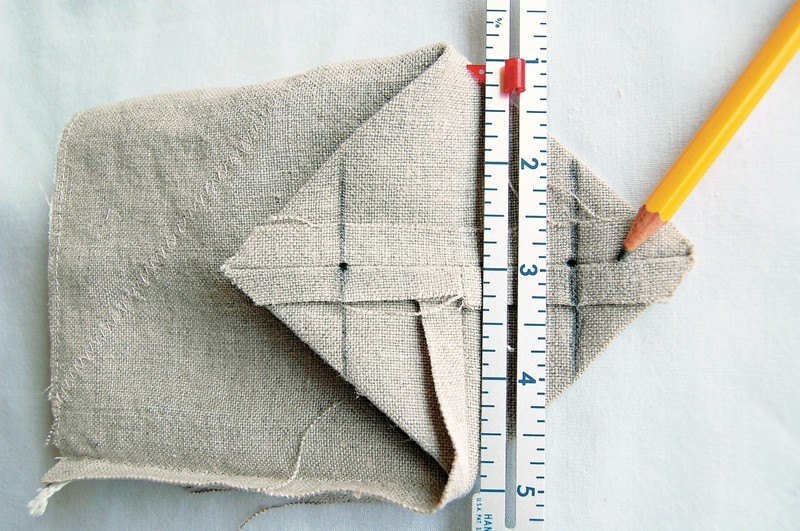
This next stage is a little like origami and can seem a bit
tricky if you have never done boxed corners before; just
take a deep breath and let it come naturally. Working with
the bottom seam of the vase, pinch/pull the corners into
triangles, making sure they are even and centred, then
press the triangles so they are nice and crisp. You want to
fold the bottom of your vase into a kind of square, making
sure everything is centred properly, as shown. -
 Step 7
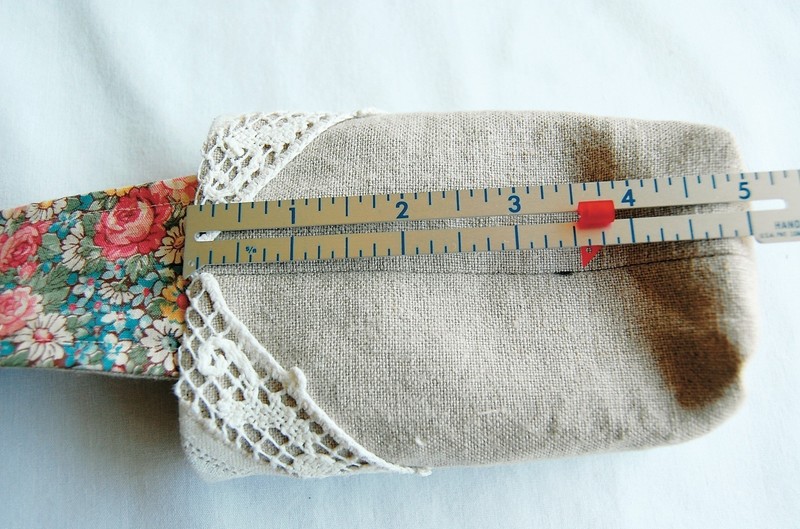
Using a pencil or fabric marker, make a mark 2.5cm (1in)
in from the corners on the bottom seam on both ends.
Using a straight edge or quilter’s ruler, draw a line through
your markings. -
Step 8
Secure your triangles with pins and stitch along the lines
you have drawn. Trim off the excess of the triangle near
the stitch line and press.TIP
Use a rolled up hand towel inside tight spaces to help
with pressing. -
Step 9
Sew the lining
Take your large interfaced lining rectangle and fold it in
half, with short sides matching and right sides together.
Pin. Stitch along the raw edges with a 1cm (3/8 in) seam
allowance, making sure to leave a 5cm (2in) opening in
the seam for turning.Continue sewing the lining piece, following step 4
instructions for the outer vase. Turn right side out. -
 Step 10
Finish the vase
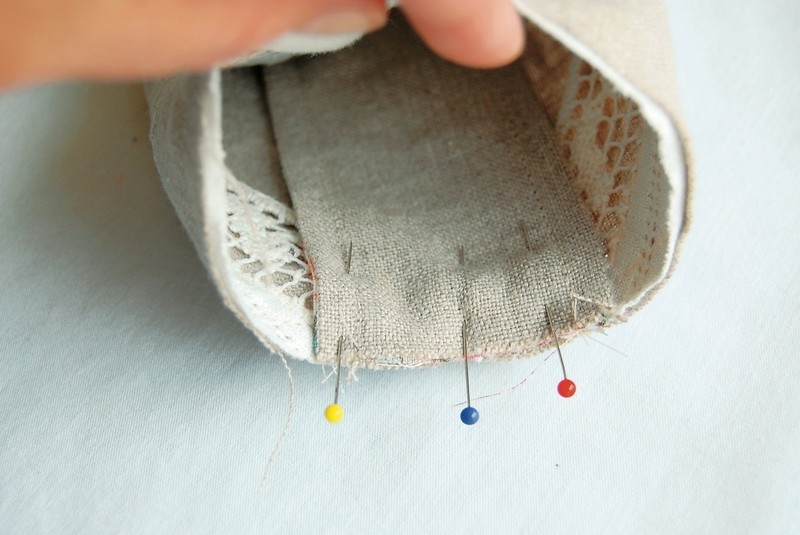
With the outer vase the wrong side out, centre the handle
inside on the back seam, matching the raw edges. Pin and
tack in place. -
 Step 11
Tuck the lining, with the right side out, into the outer
vase, aligning the back seams and matching the raw
edges. Pin the lining in place. Stitch 1cm (3/8 in) around
the raw edges. -
 Step 12
Turn the vase the right side out through the lining
opening. Stitch the opening closed using your preferred
method. Tuck the lining down into the outer vase and
press it neatly. -
 Step 13
Measure and mark approx. 9cm (3½in) down from the
top of the vase on the back seam. -
 Step 14
Stitch your button in place on the mark.
-
 Step 15
Place a jam jar, glass bottle, or other waterproof vessel
inside the fabric shell and you have your finished fabric
wall vase! Using a curtain or towel rod attached to the
wall, hang your vase by the handle and button up. Use
2 or 3 in a row for a dramatic effect. All that is left to do
is to fill your vase with some lovely flowers and enjoy! -
 Step 16
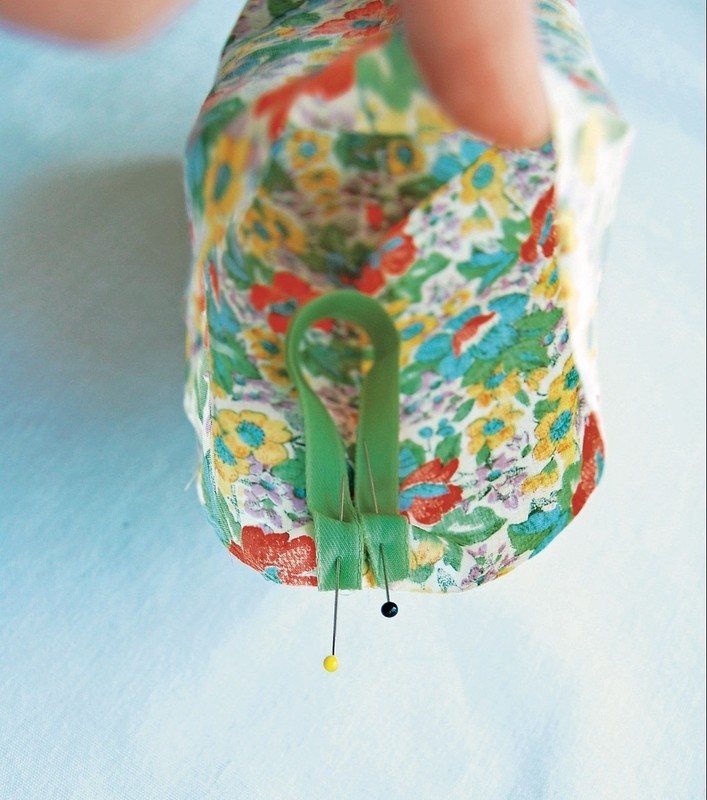
Variation
If you would like to make a posy vase to hang on a hook
instead of a curtain rod, bypass making the handle and
replace it with a length of ribbon folded into a loop. Attach
it in the same way you would the handle (see step 6). (k)
…and Ta Da